🚀 Getting started
👋 What is BotDCA ?
💻 What is TradingView ?
📋 Requirements
🎮 Try the demo
🏁 First steps
1️⃣ TradingView account setup
2️⃣ TradingView paid plans
3️⃣ Choose and buy a Pack
4️⃣ Access to BotDCA
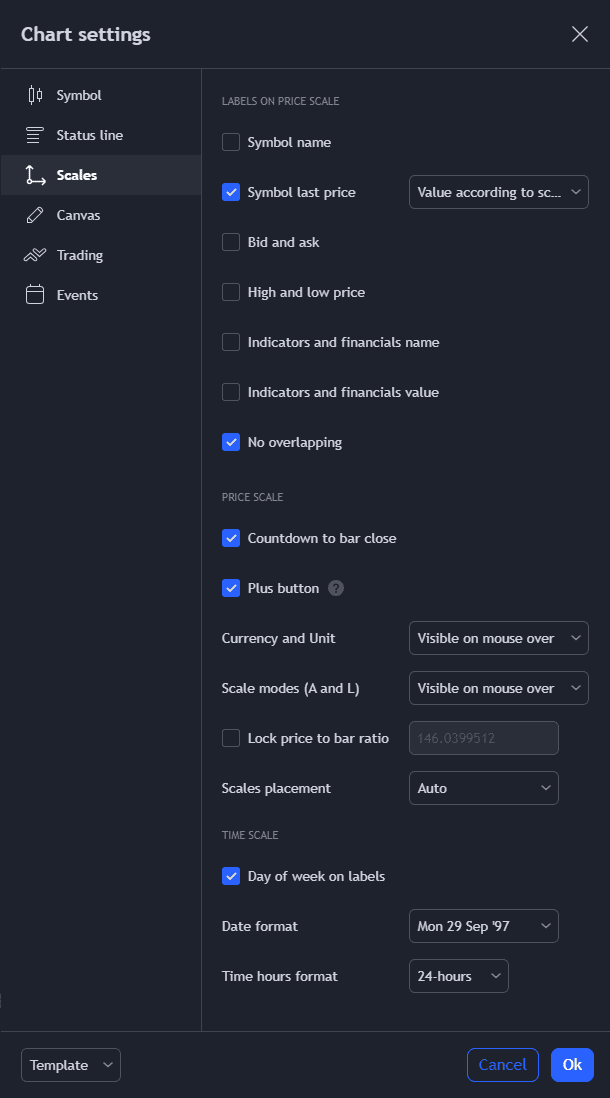
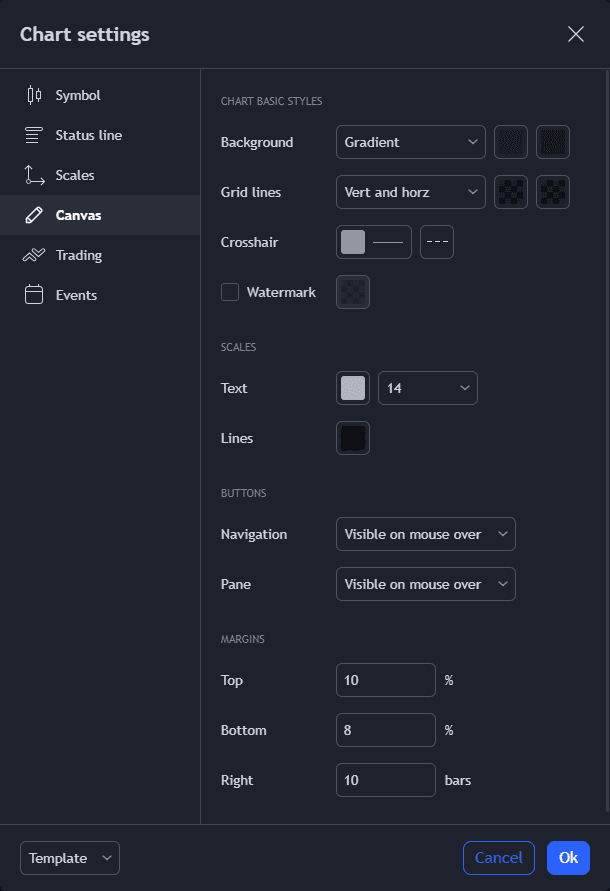
5️⃣ Chart setup
🛠️ Setup the bot
🏛️ Exchange selection
⚙️ Choose the right settings
🎲 Backtest the settings
⭐ Pack FULL Auto
🔌 Exchange connection (API)
📢 Notifications
❌ Errors
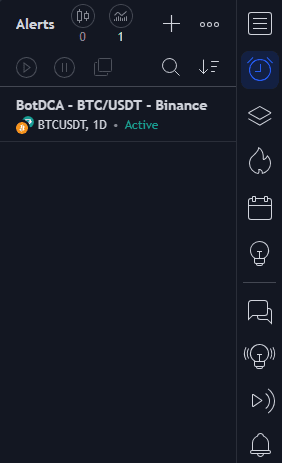
🔥 Start the bot
💾 Save configuration
🔄 Update the bot
♻️ Relaunch / Edit the bot
🔔 Alerts expiration
⚙️ Bot settings (Inputs)
📆 Date
⏲️ Trading session
🏛️ Exchange
🛒 Positions
🔵 Buy
🟢 Sell
🕹️ Simulator
🎨 Visual
🤖 Bot
💡 Good to know
❓ Adapt chart to bot
❓ Upgrade SEMI Auto to FULL Auto
❓ Release notes
BotDCA revolutionizes your approach to cryptocurrency investing with its smart Dollar-Cost Averaging (DCA) method.
The concept behind Dollar-Cost Averaging is to invest at regular intervals.
This limits the impact of volatility and smoothes the average purchase price, so you can profit from bullish as well as bearish periods.
Our bot differs from conventional DCA systems with our unique algorithm that combines trend, momentum, volatility and volume to determine optimal buy and sell points.
BotDCA is hosted on the world famous trading platform : TradingView.
TradingView is a revolutionary online trading platform designed for investors and traders of all experience levels.
With an intuitive and user-friendly interface, it allows users to access a wide range of financial markets, including stocks, currencies, commodities, indices, and cryptocurrencies.
Advanced Charts :
TradingView offers a plethora of customization options for charts, enabling users to create charts tailored to their specific needs.
Technical analysis tools such as indicators, trendlines, geometric shapes, and annotations are easily accessible to assist traders in making informed decisions.
Active Community :
The platform boasts a large user community where traders share ideas, analyses, and strategies.
Users can follow other traders, comment on their analyses, and even automatically copy their trades with the “Social Trading” feature.
Alerts and Notifications :
Users can set up custom alerts to be notified in real-time of significant market movements.
This allows them to react quickly to opportunities or threats.
Integrated Economic Calendar :
TradingView provides a detailed economic calendar that displays upcoming economic events and their potential impacts on the markets.
This helps traders plan their operations based on important announcements.
Multi-Platform Access :
The platform is accessible from any web browser, meaning users can trade from their desktop computer, tablet, or mobile phone, with real-time synchronization of their settings and data.
Real-Time Data :
TradingView provides high-quality real-time data, allowing traders to make informed decisions with up-to-date information.
Screener Tools :
Traders can use screeners to filter assets based on specific criteria, making it easier to find trading opportunities.
Here is a list of what you need to use BotDCA :
Create a TradingView account, or if you already have one, proceed to the next step.
Once logged in, go to the following link : Try the demo.
Scroll to the bottom of the script description and click on Add to favorite indicators.

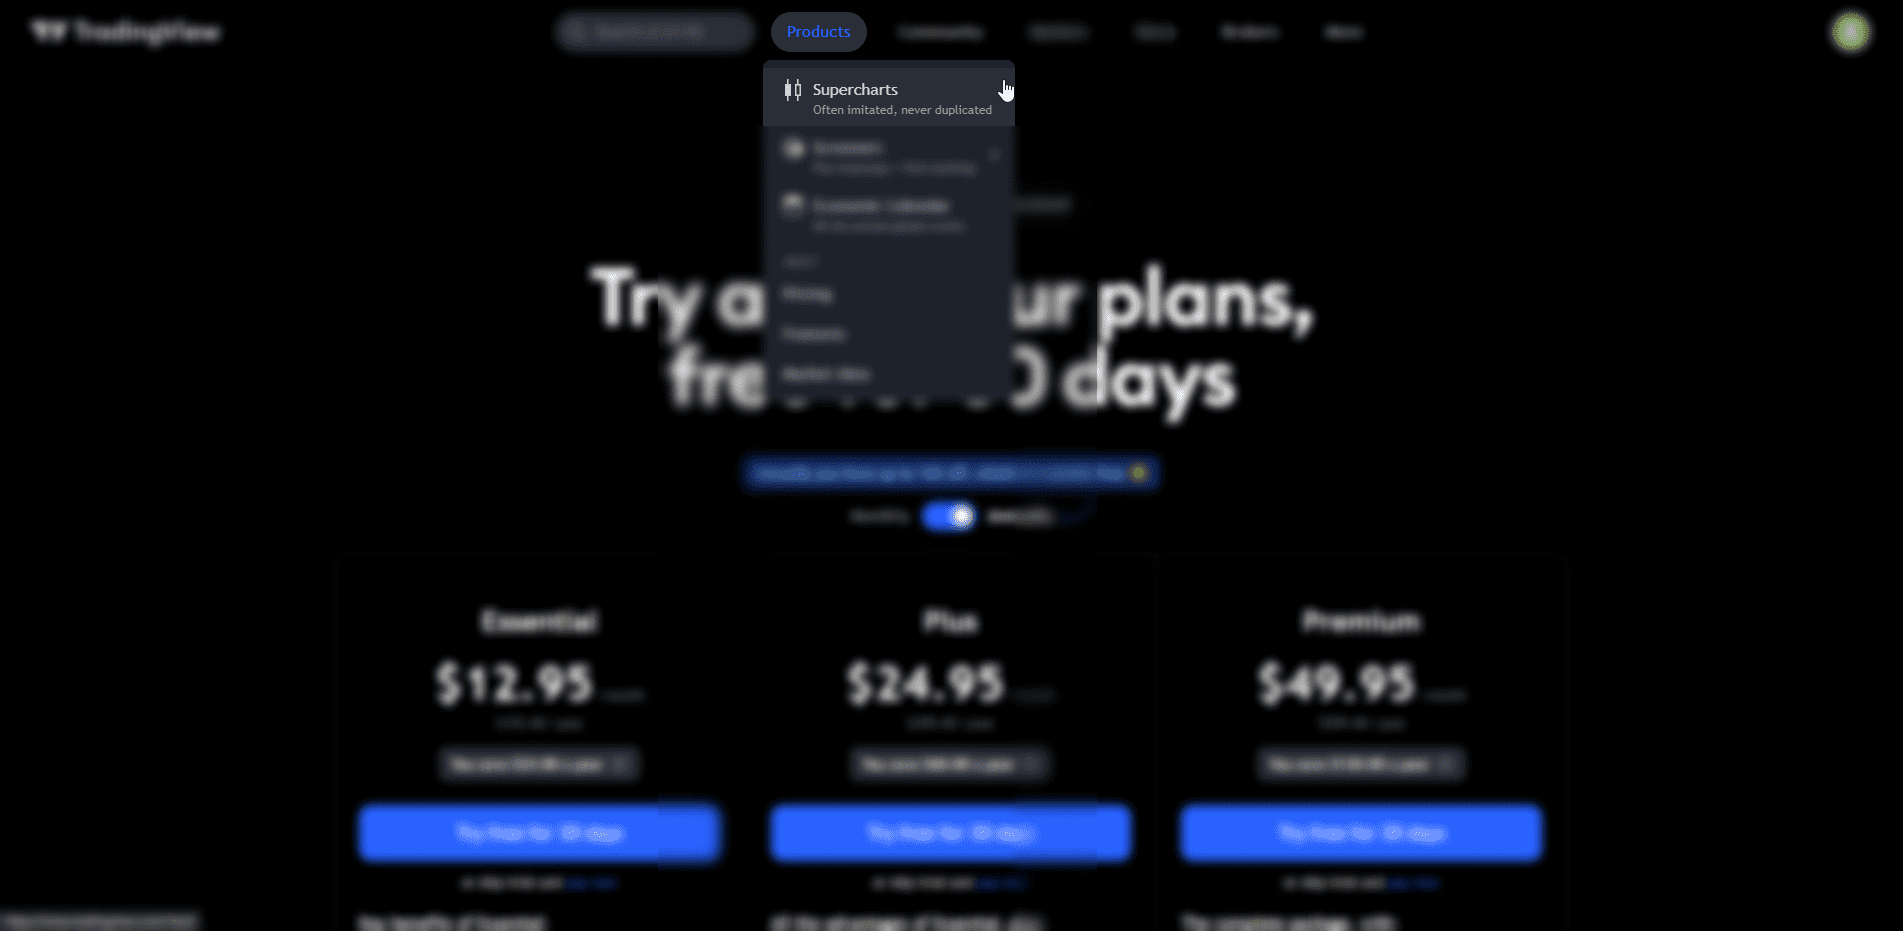
At the top of the TradingView website, click on Products, then on Supercharts.

Enter SOLUSDT in the text box, then choose the result with Binance as exchange.
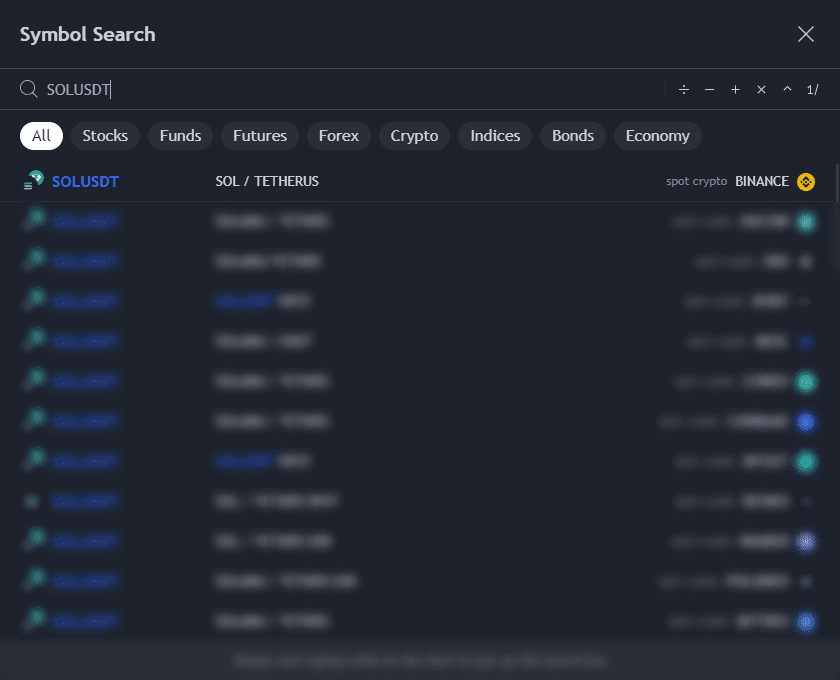
Then, if it isn’t already the case, switch to timeframe D (Daily) or H4 (4 hours).

The last step is to add the demo to the chart.
To do this, click on Indicators, go to the Favorites tab and click on the BotDCA Demo script name.
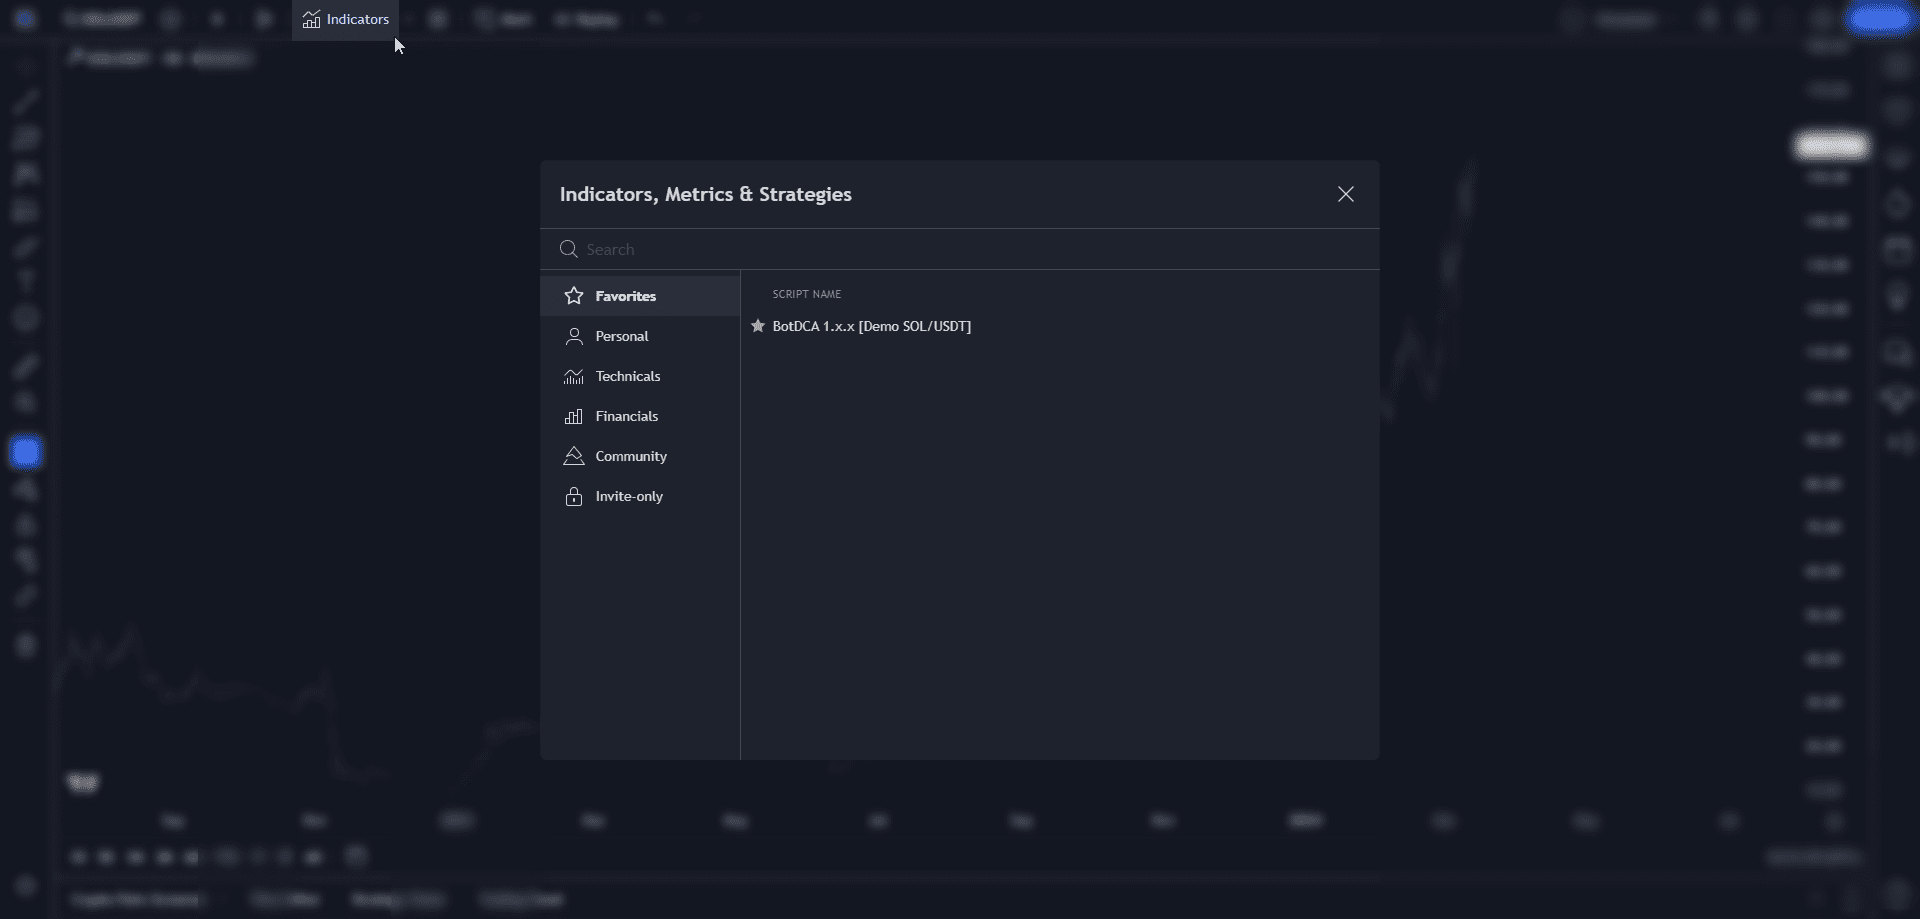
The demo script appears on the chart.
You can now consult the relevant parts of the documentation for configuration.
1/ TradingView account setup →
If you don’t have an account yet, this first step will help you create one so you can use our bot.
2/ Choice of a TradingView paid plan →
The choice of a TradingView paid plan depends on the BotDCA package you choose.
This second step gives you all the details.
3/ Choice and buy a Pack BotDCA →
The choice of BotDCA Pack depends on whether you want to use the bot semi-automatically or fully-automatically.
This third step will help you choose the package and guide you through the buy process.
4/ Access to BotDCA →
Once you’ve chosen your BotDCA Pack and have (or don’t have) an active TradingView subscription, this fourth step will help you add and access BotDCA from TradingView.
5/ Chart setup →
This fifth step is particularly useful for those who are new to TradingView.
You don’t have to follow the style settings word for word, as everyone has their own preferences.
Go to the TradingView website, and click on Join now for free.

Select Email to create the account.

You will receive an e-mail to activate your account.
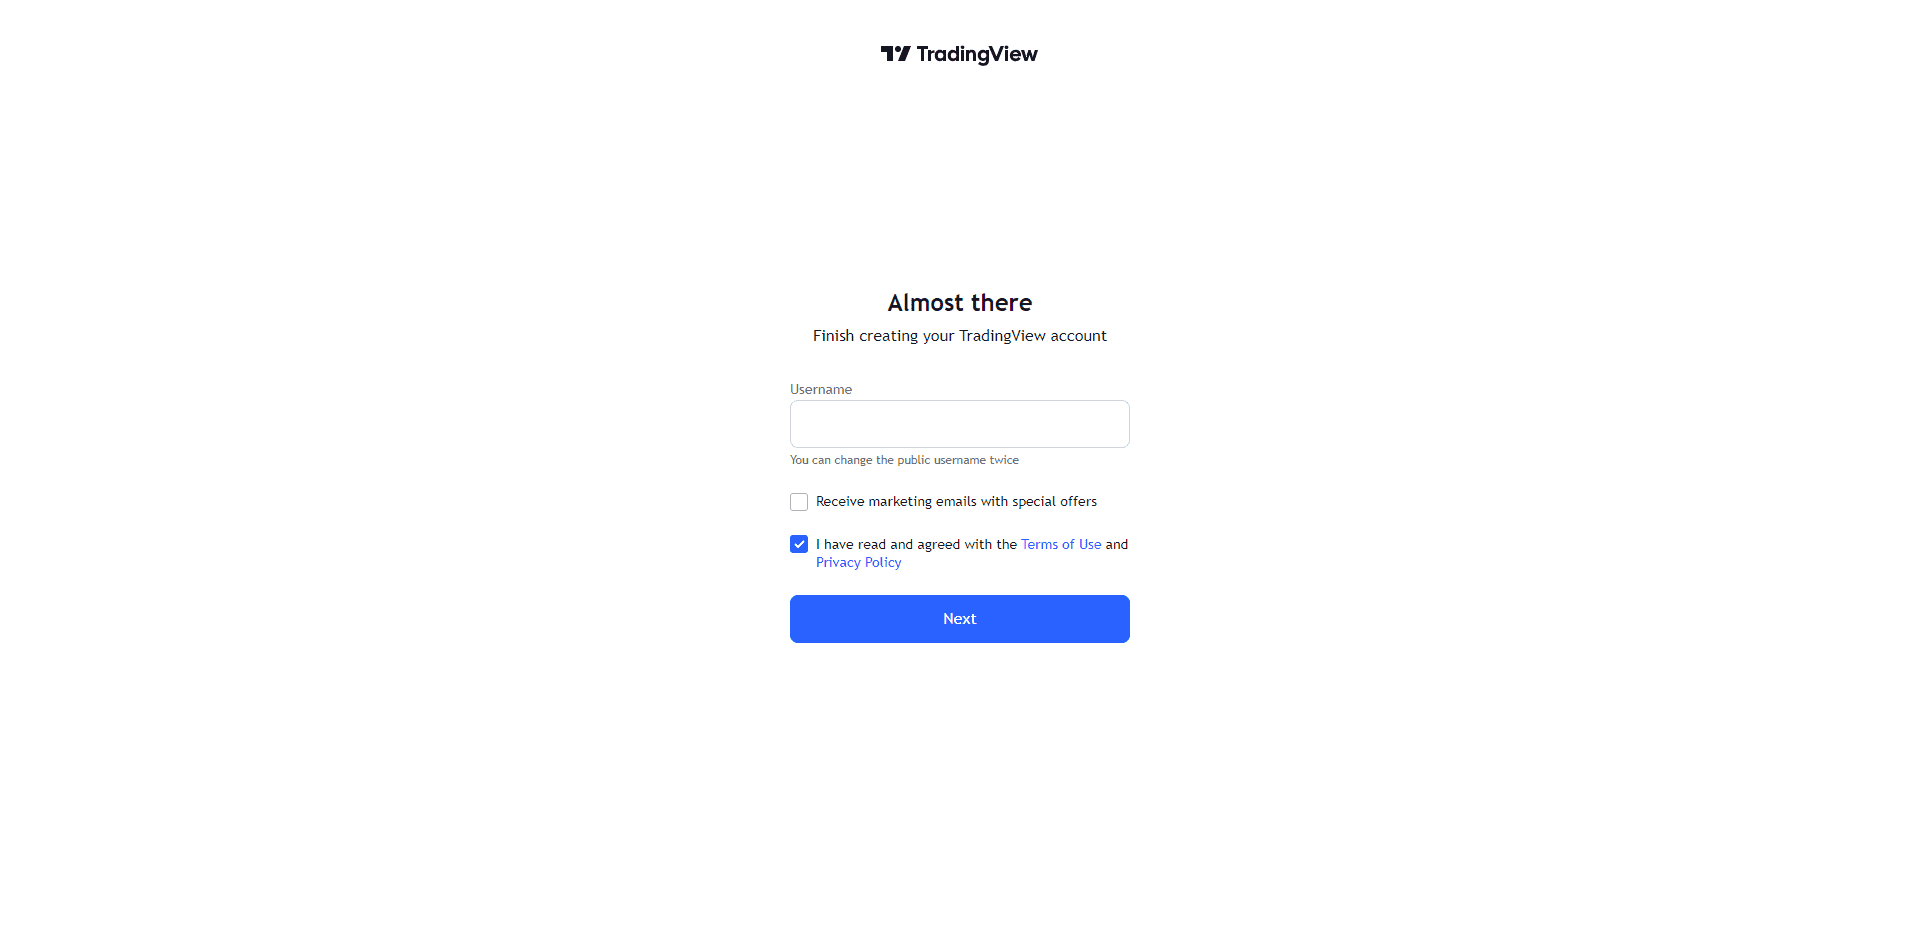
Choose a username.
This username will be useful for accessing the BotDCA script and benefiting from all future updates.
With this pack, no dedicated webhook address is included.
With this pack, no dedicated webhook address is included.
You receive position alerts from the bot, but you have to manually buy/sell on your exchange.
You receive position alerts from the bot, but you have to manually buy/sell on your exchange.
Stay informed anywhere, anytime, but receive TradingView buy/sell alerts in raw format.
Stay informed anywhere, anytime, but receive TradingView buy/sell alerts in raw format.
With this pack, no dedicated webhook address is included.
With this pack, no dedicated webhook address is included.
You receive position alerts from the bot, but you have to manually buy/sell on your exchange.
You receive position alerts from the bot, but you have to manually buy/sell on your exchange.
Stay informed anywhere, anytime, but receive TradingView buy/sell alerts in raw format.
Stay informed anywhere, anytime, but receive TradingView buy/sell alerts in raw format.
With this pack, no dedicated webhook address is included.
With this pack, no dedicated webhook address is included.
You receive position alerts from the bot, but you have to manually buy/sell on your exchange.
You receive position alerts from the bot, but you have to manually buy/sell on your exchange.
Stay informed anywhere, anytime, but receive TradingView buy/sell alerts in raw format.
Stay informed anywhere, anytime, but receive TradingView buy/sell alerts in raw format.
With this pack, you get a unique, personalized webhook address, hosted on a dedicated server.
Webhook system that connect BotDCA to the exchange and benefit from full-automatic trading.
With this pack, you get a unique, personalized webhook address, hosted on a dedicated server.
Webhook system that connect BotDCA to the exchange and benefit from full-automatic trading.
You receive position alerts from the bot, and buy/sell transactions are automatically executed on compatible exchanges (Binance, Coinbase, Kraken, KuCoin, MEXC, Gate.io, Bitget).
You receive position alerts from the bot, and buy/sell transactions are automatically executed on compatible exchanges (Binance, Coinbase, Kraken, KuCoin, MEXC, Gate.io, Bitget).
Stay informed anywhere, anytime, and receive personalized buy/sell alerts by e-mail, Telegram or Discord, in addition to TradingView notifications.
Stay informed anywhere, anytime, and receive personalized buy/sell alerts by e-mail, Telegram or Discord, in addition to TradingView notifications.
With this pack, no dedicated webhook address is included.
With this pack, no dedicated webhook address is included.
You receive position alerts from the bot, but you have to manually buy/sell on your exchange.
You receive position alerts from the bot, but you have to manually buy/sell on your exchange.
Stay informed anywhere, anytime, but receive TradingView buy/sell alerts in raw format.
Stay informed anywhere, anytime, but receive TradingView buy/sell alerts in raw format.
With this pack, you get a unique, personalized webhook address, hosted on a dedicated server.
Webhook system that connect BotDCA to the exchange and benefit from full-automatic trading.
With this pack, you get a unique, personalized webhook address, hosted on a dedicated server.
Webhook system that connect BotDCA to the exchange and benefit from full-automatic trading.
You receive position alerts from the bot, and buy/sell transactions are automatically executed on compatible exchanges (Binance, Coinbase, Kraken, KuCoin, MEXC, Gate.io, Bitget).
You receive position alerts from the bot, and buy/sell transactions are automatically executed on compatible exchanges (Binance, Coinbase, Kraken, KuCoin, MEXC, Gate.io, Bitget).
Stay informed anywhere, anytime, and receive personalized buy/sell alerts by e-mail, Telegram or Discord, in addition to TradingView notifications.
Stay informed anywhere, anytime, and receive personalized buy/sell alerts by e-mail, Telegram or Discord, in addition to TradingView notifications.
With this pack, no dedicated webhook address is included.
With this pack, no dedicated webhook address is included.
You receive position alerts from the bot, but you have to manually buy/sell on your exchange.
You receive position alerts from the bot, but you have to manually buy/sell on your exchange.
Stay informed anywhere, anytime, but receive TradingView buy/sell alerts in raw format.
Stay informed anywhere, anytime, but receive TradingView buy/sell alerts in raw format.
With this pack, you get a unique, personalized webhook address, hosted on a dedicated server.
Webhook system that connect BotDCA to the exchange and benefit from full-automatic trading.
With this pack, you get a unique, personalized webhook address, hosted on a dedicated server.
Webhook system that connect BotDCA to the exchange and benefit from full-automatic trading.
You receive position alerts from the bot, and buy/sell transactions are automatically executed on compatible exchanges (Binance, Coinbase, Kraken, KuCoin, MEXC, Gate.io, Bitget).
You receive position alerts from the bot, and buy/sell transactions are automatically executed on compatible exchanges (Binance, Coinbase, Kraken, KuCoin, MEXC, Gate.io, Bitget).
Stay informed anywhere, anytime, and receive personalized buy/sell alerts by e-mail, Telegram or Discord, in addition to TradingView notifications.
Stay informed anywhere, anytime, and receive personalized buy/sell alerts by e-mail, Telegram or Discord, in addition to TradingView notifications.
With Pack SEMI Auto, a paid TradingView plan is recommended.
Consider a TradingView paid plan , which mainly increase the number of alerts and therefore the number of bots (several pairs).
With a free plan, you’re only allowed a single alert and therefore a single bot (one pair).
With Pack FULL Auto, a paid TradingView plan is required.
With a TradingView paid plan, the main benefit is to use the webhook system that connect BotDCA to the exchange and benefit from full-automatic trading.
Depending on the paid plan chosen, you can also increase the number of alerts and therefore the number of bots (several pairs).
With Pack SEMI Auto, you’ll receive alerts when the bot detects a buy or sell signal, but you’ll have to place the order manually from the exchange.
In addition, you’ll only have access to TradingView’s basic notifications in raw format.
With Pack FULL Auto, you’ll receive alerts when the bot detects a buy or sell signal, and our webhook will place the order automatically from the exchange.
All you have to do is deposit the required funds as you go along.
You’ll also have access to custom notifications by e-mail, Telegram or Discord.
Once you’ve chosen the Pack you want, you’ll be redirected to the order page.
Enter your personal details and don’t forget to add your TradingView Username.
This Username is required to add you to the TradingView bot whitelist.
Choose a payment method, accept the Terms & Conditions and click on the Complete order button to finalize your order.
Note : You can add a Referral code if you have one.
Once your order payment has been validated and your bot access is operational, you will receive a confirmation e-mail.
First of all, you can change the language and theme color by clicking on your profile logo on the TradingView website.
The tutorial uses the dark theme.
At the top of the TradingView website, click on Products, then on Supercharts.
Once on the chart, we’ll go to the data for a cryptocurrency, such as BTC/USDT from the Binance exchange.
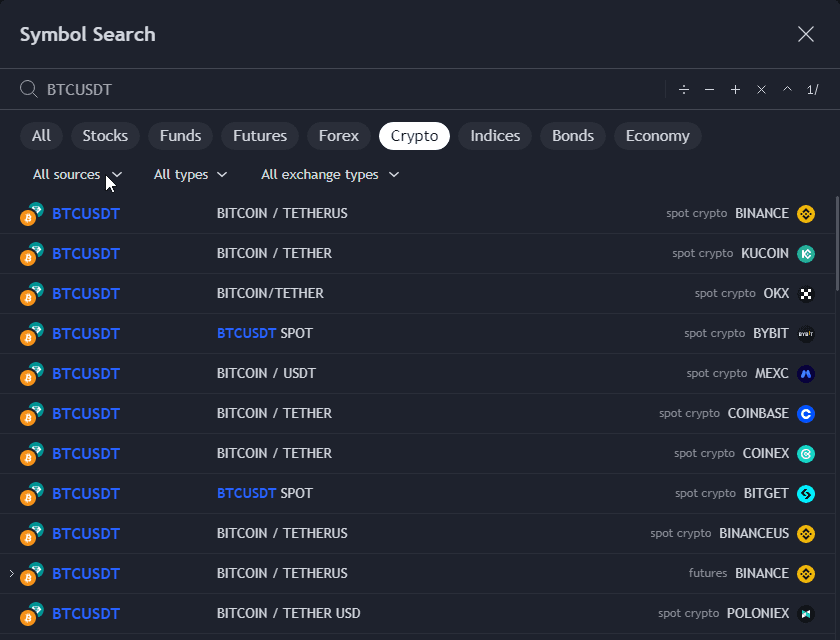
To do this, click on Symbol search.
Enter BTCUSDT in the text box, then choose the result with Binance as exchange.
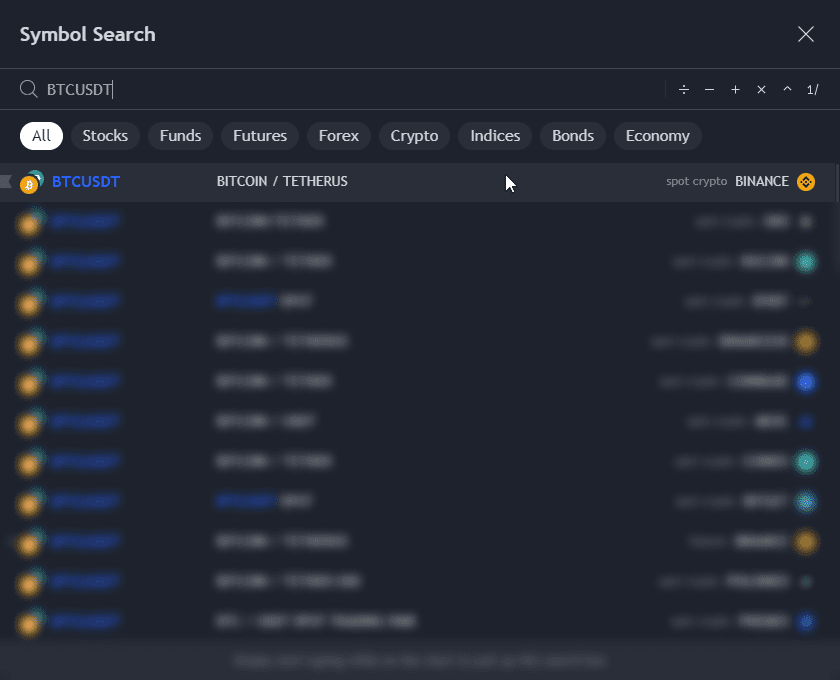
Then, if it isn’t already the case, switch to timeframe D (Daily) or H4 (4 hours).
Note : You can add one or more time units to your favorites by right-clicking on the star.
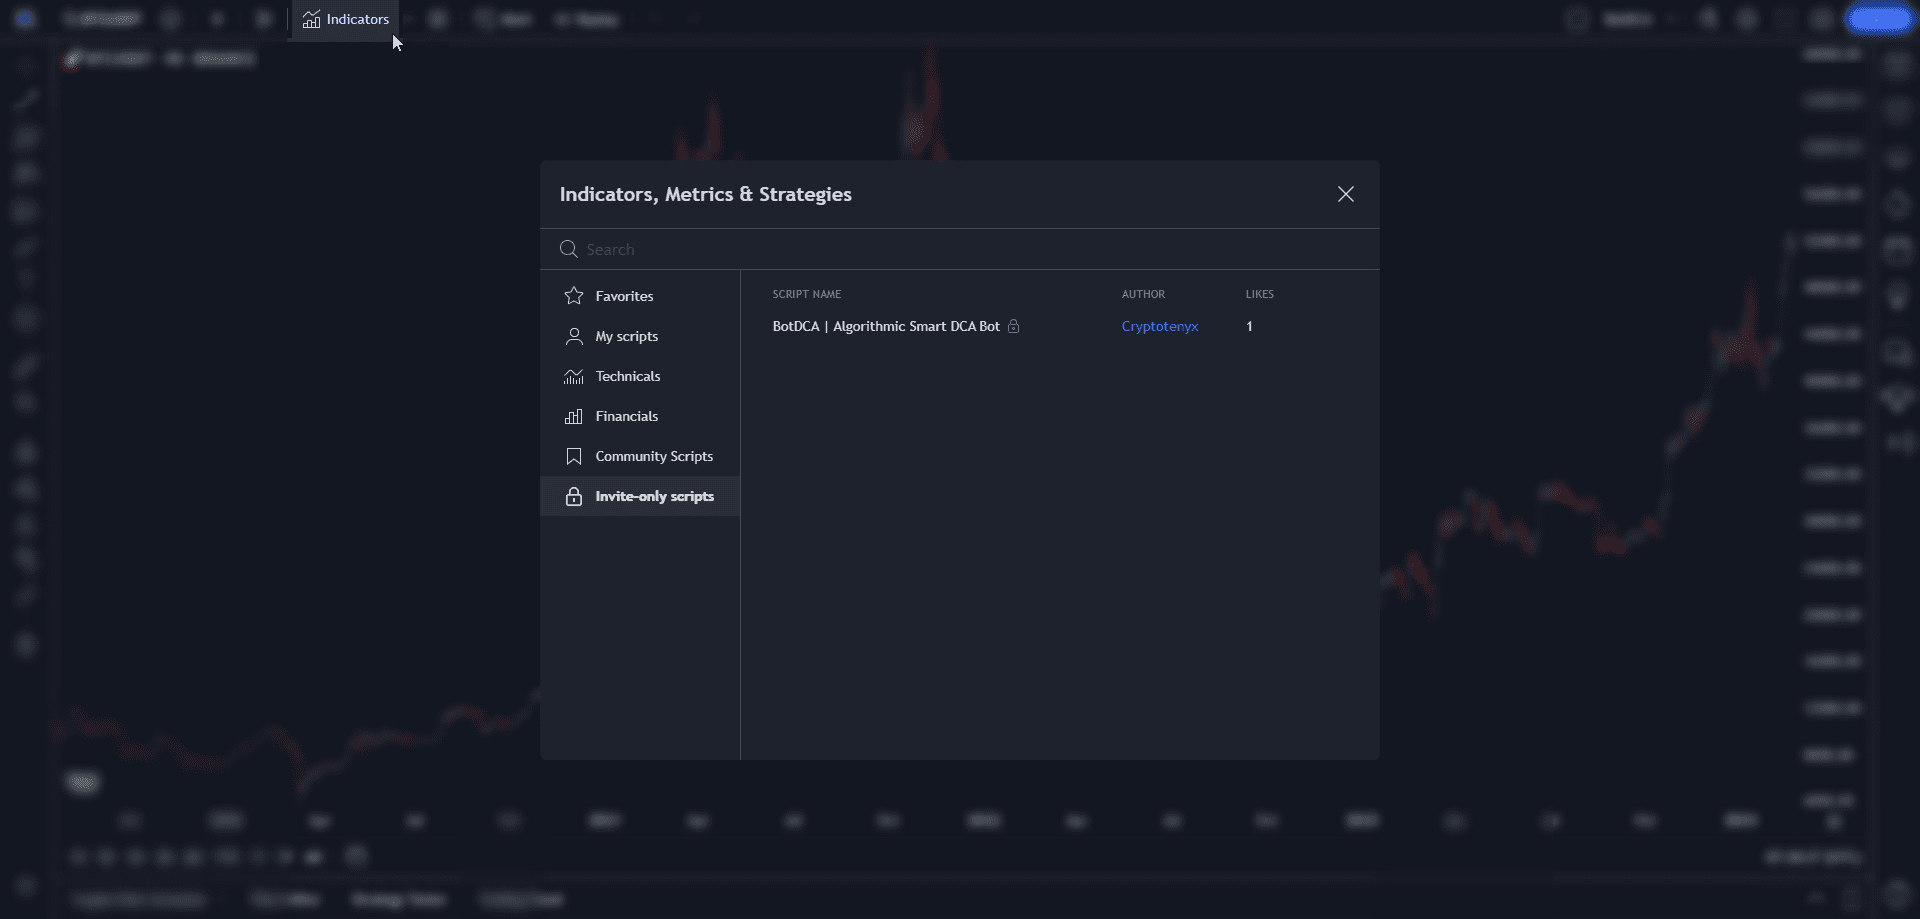
The last step is to add the bot to the chart.
To do this, click on Indicators, go to the Invite-only scripts tab and click on the BotDCA script name.
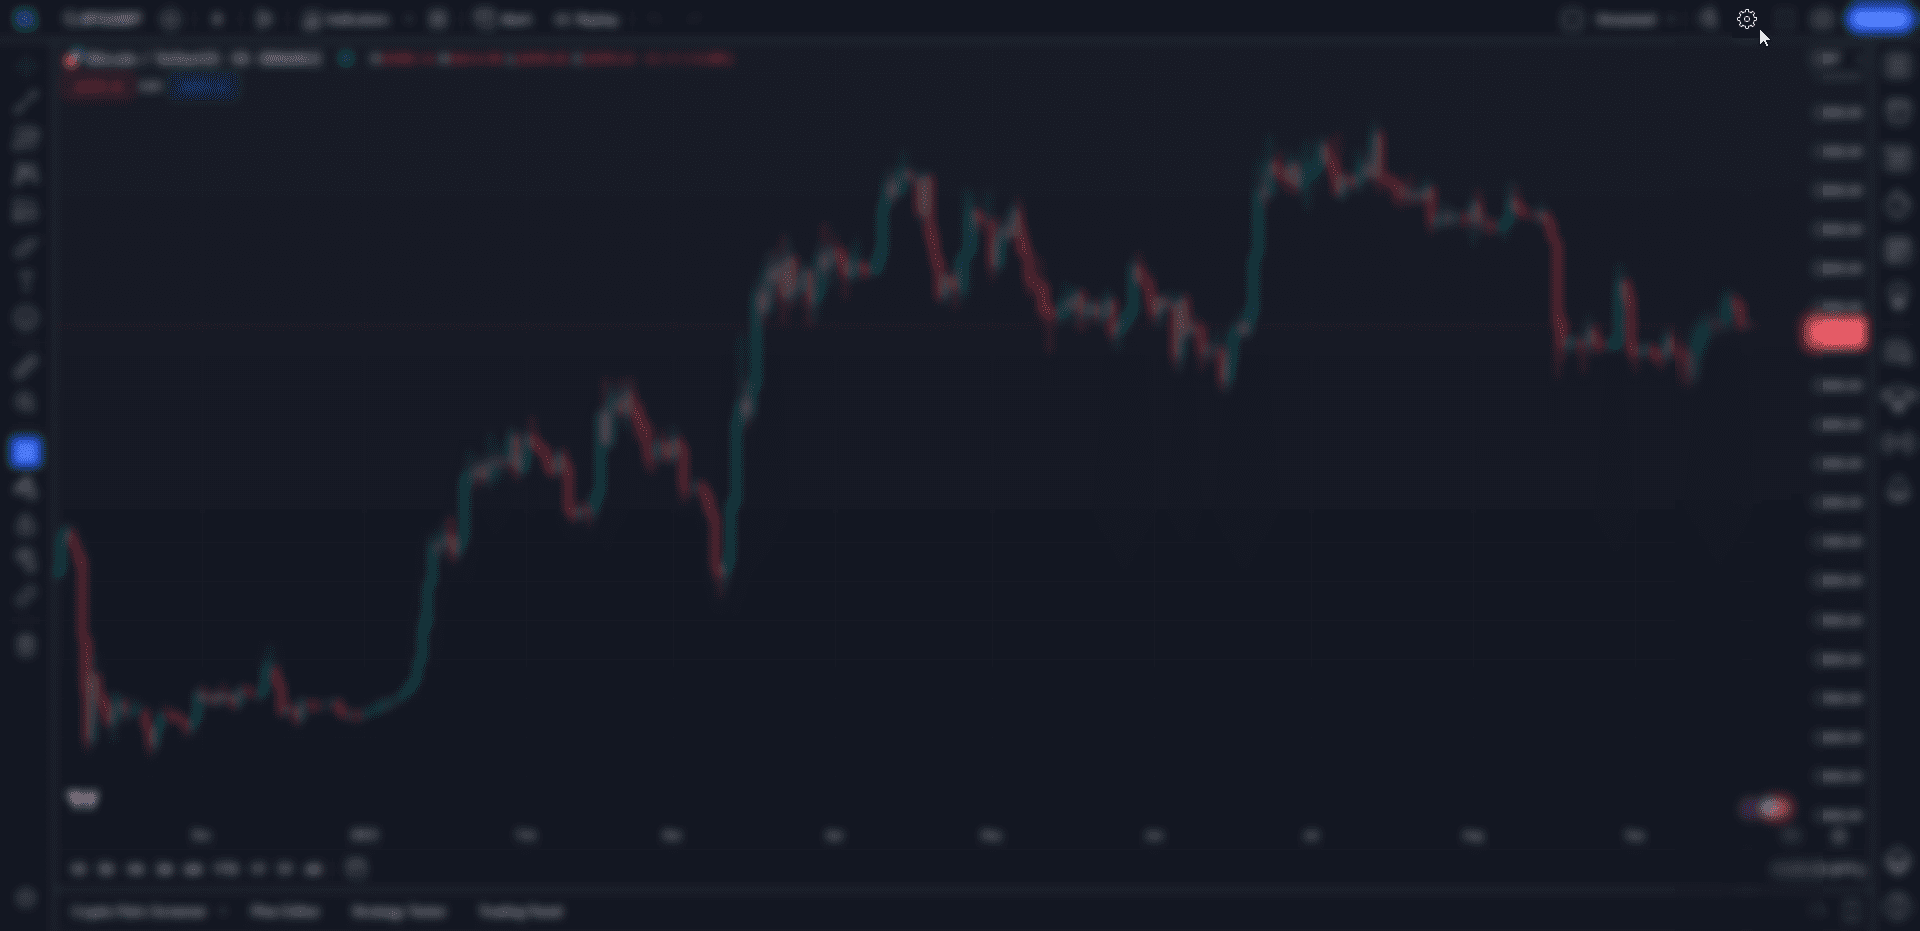
Once the TradingView chart is open, click on the gearwheel at top right to open the parameters.
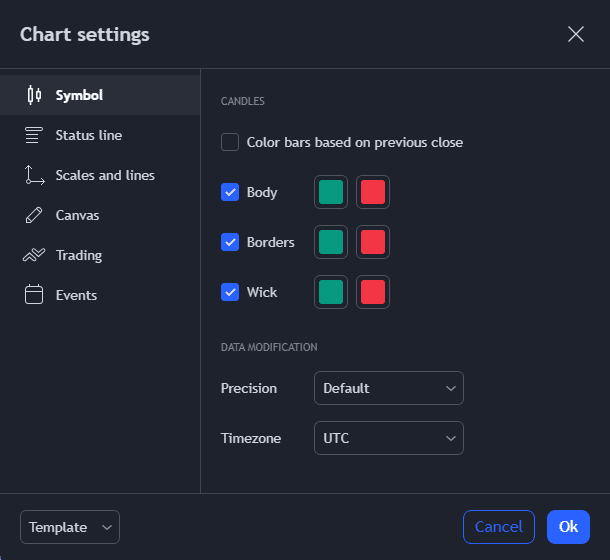
Note : Be sure to set Timezone in UTC.
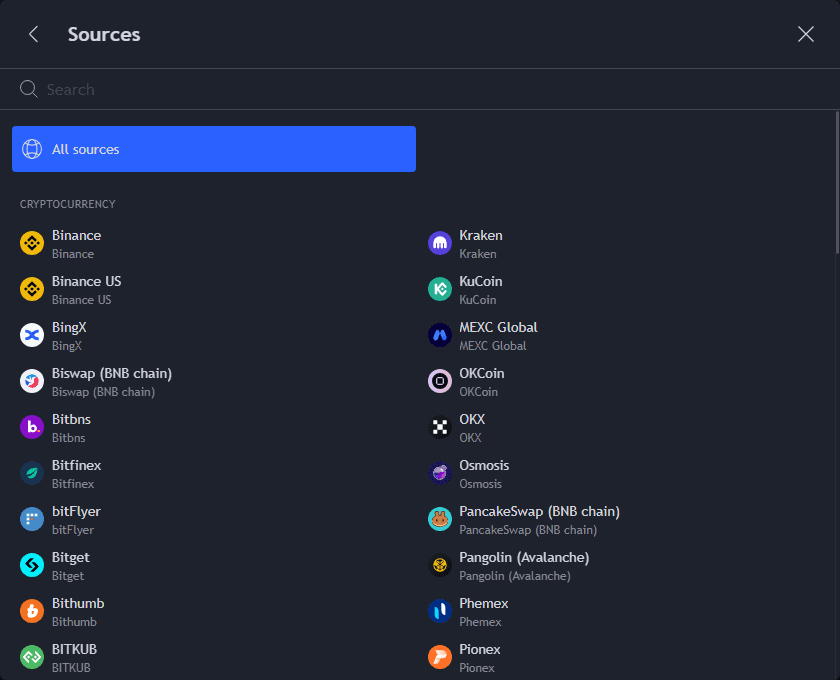
To do this, click on Symbol search in the top left-hand corner.
Then select the Crypto tab, and click on All sources.
Select the exchange you want to link to the bot.
1/ First, choose the start date (preferably today’s date if it’s a first launch) and select an end date.
Leaving the default end date means that the bot will run indefinitely.
If you don’t have a TradingView Premium plan, remember to check every 2 months when the Alerts expire.
More details : 📆 Date
2/ Depending on your preferences, you can choose specific trading days, or default to all days of the week.
More details : ⏲️ Trading session
3/ According to the exchange you have chosen, you can define the fees and also define a price spread.
More details : 🏛️ Exchange
5/ Finally, you can define the bot’s appearance on the graph.
More details : 🎨 Visual
Once you’ve chosen your settings, you can define a simulation price.
More details : 🕹️ Simulator
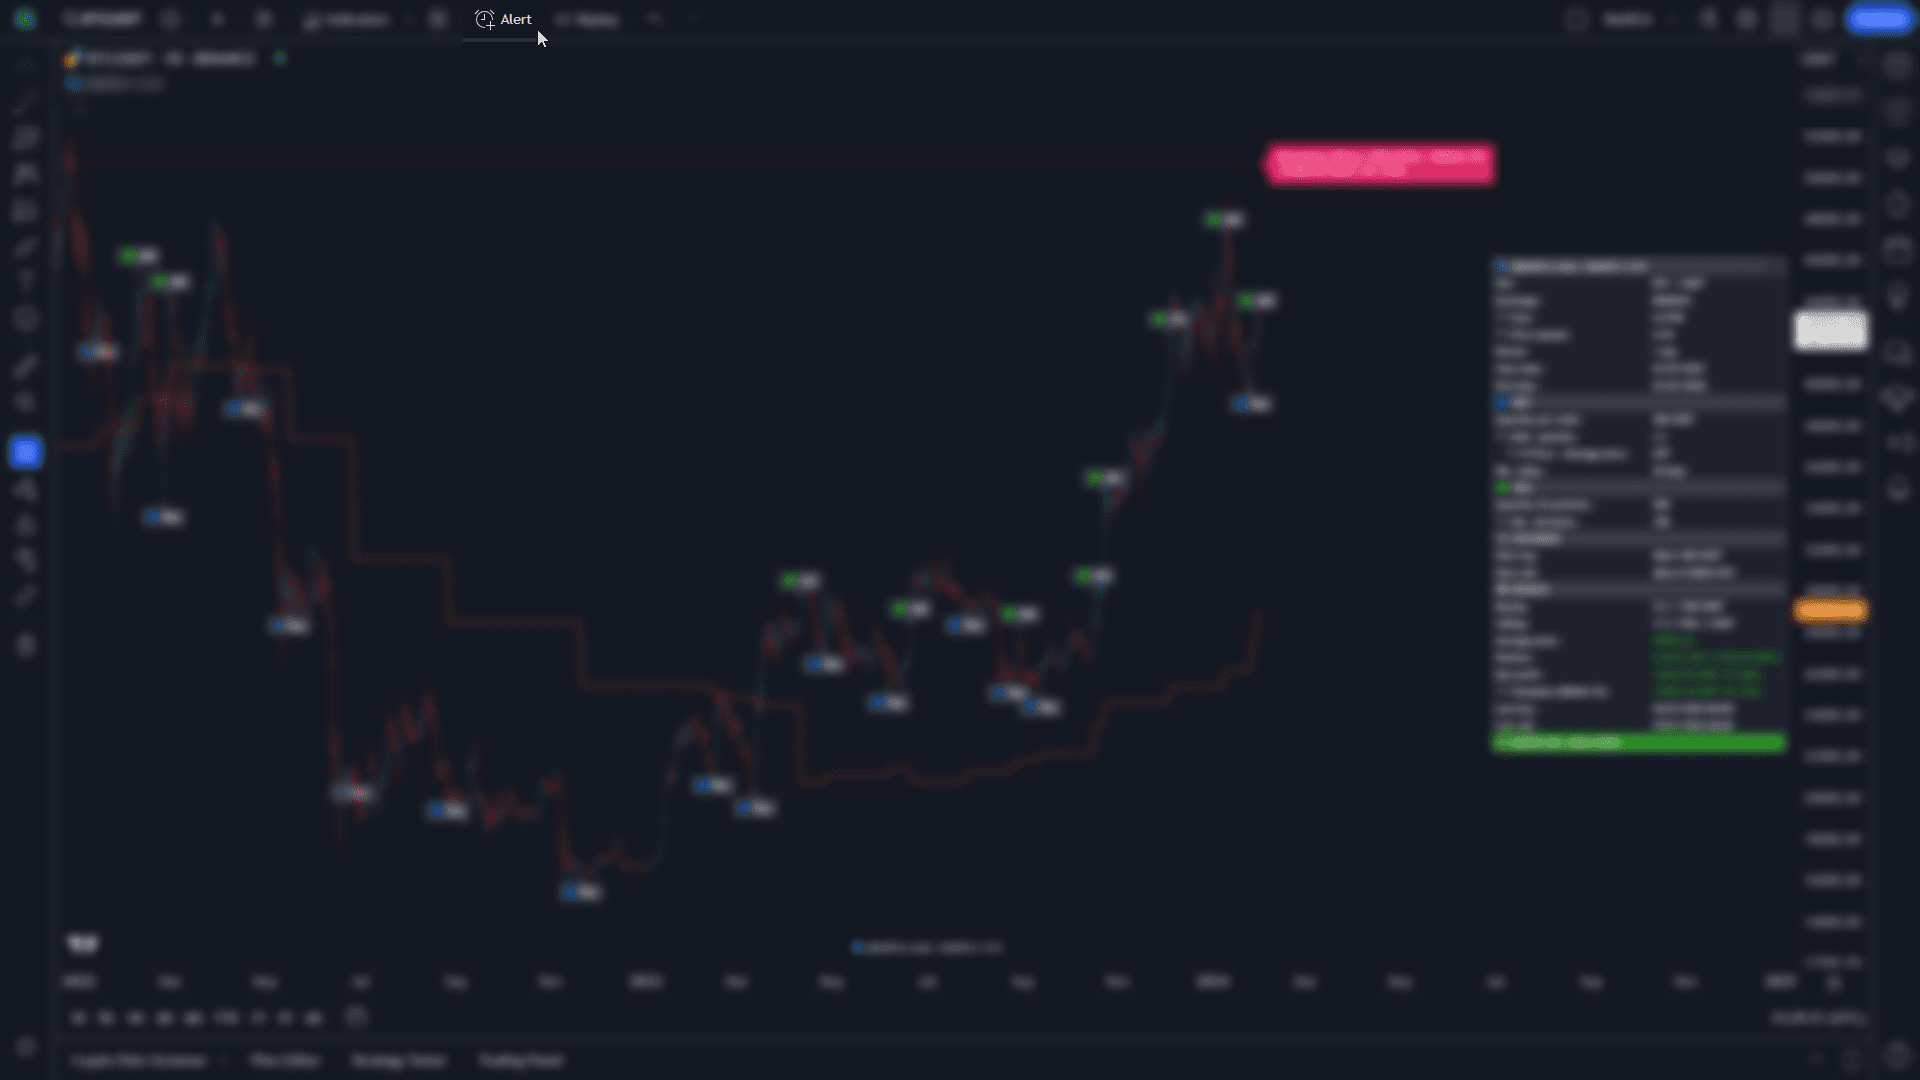
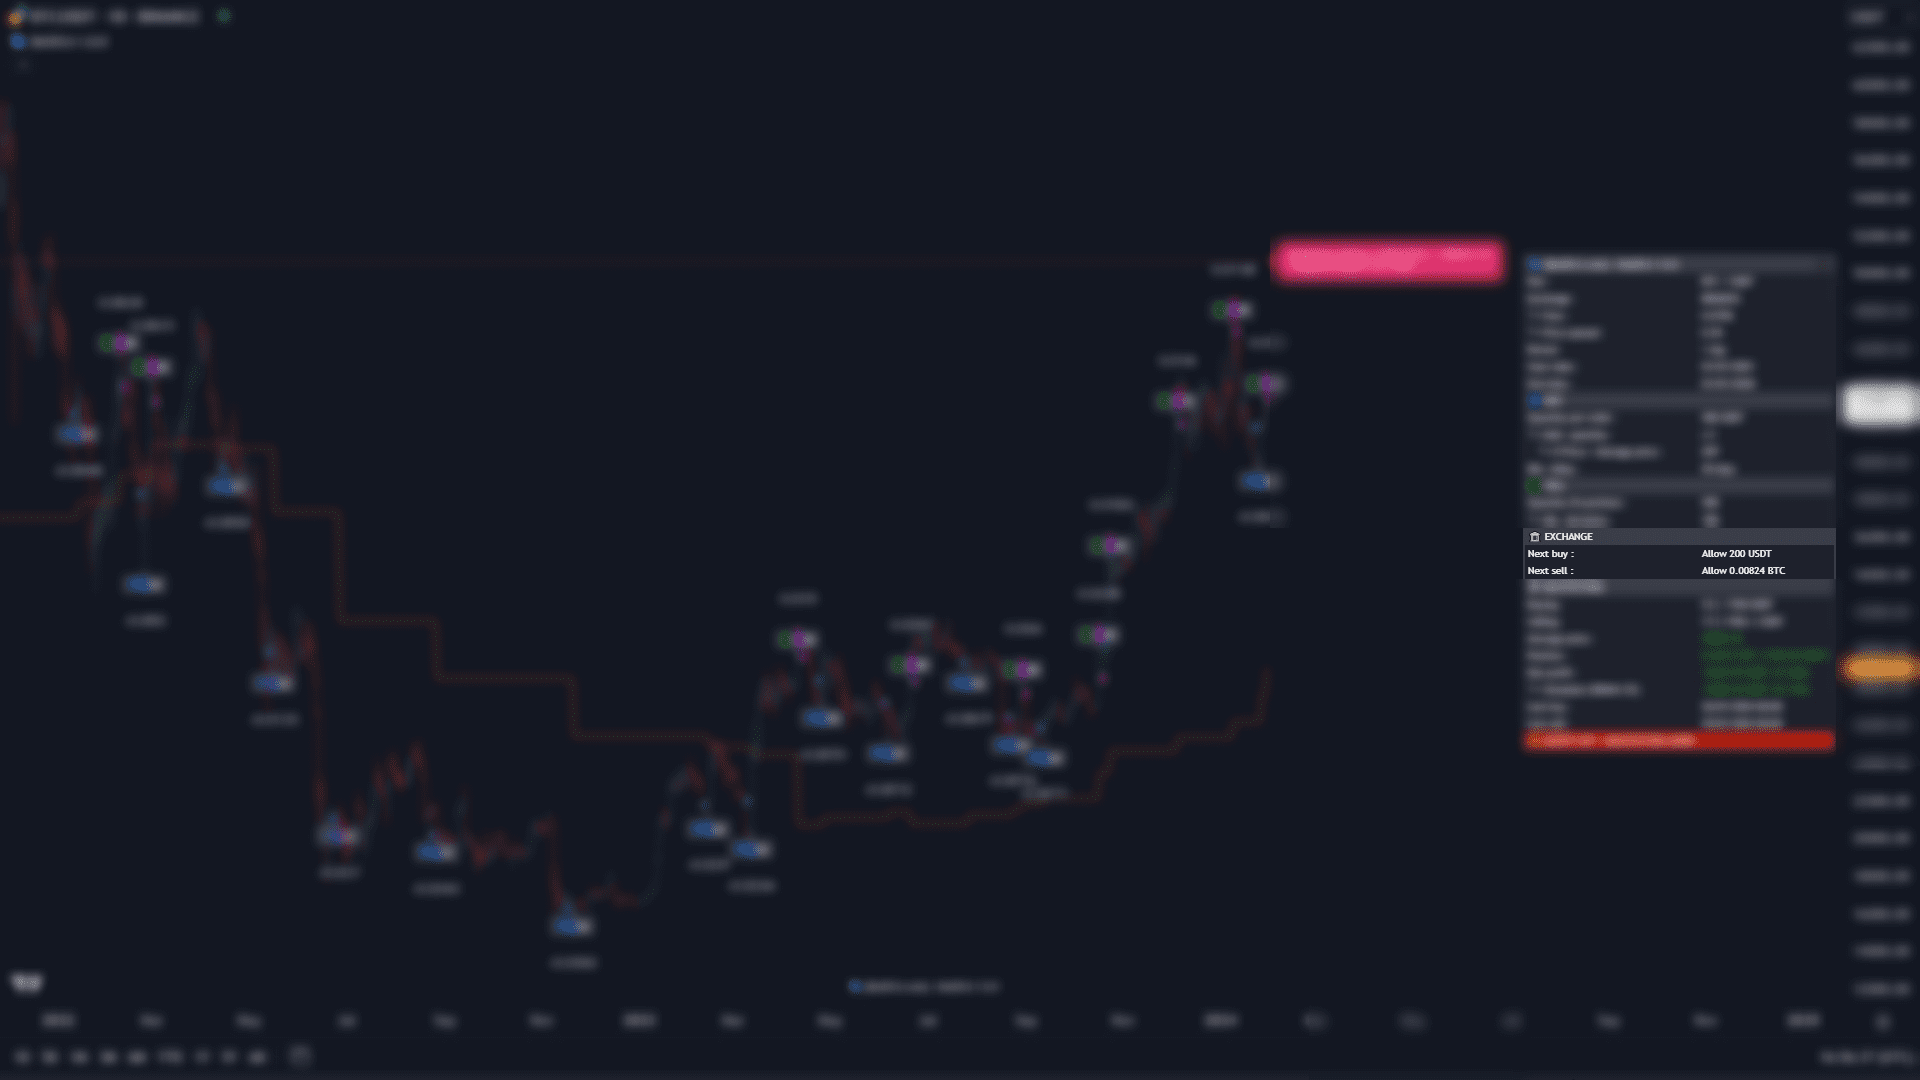
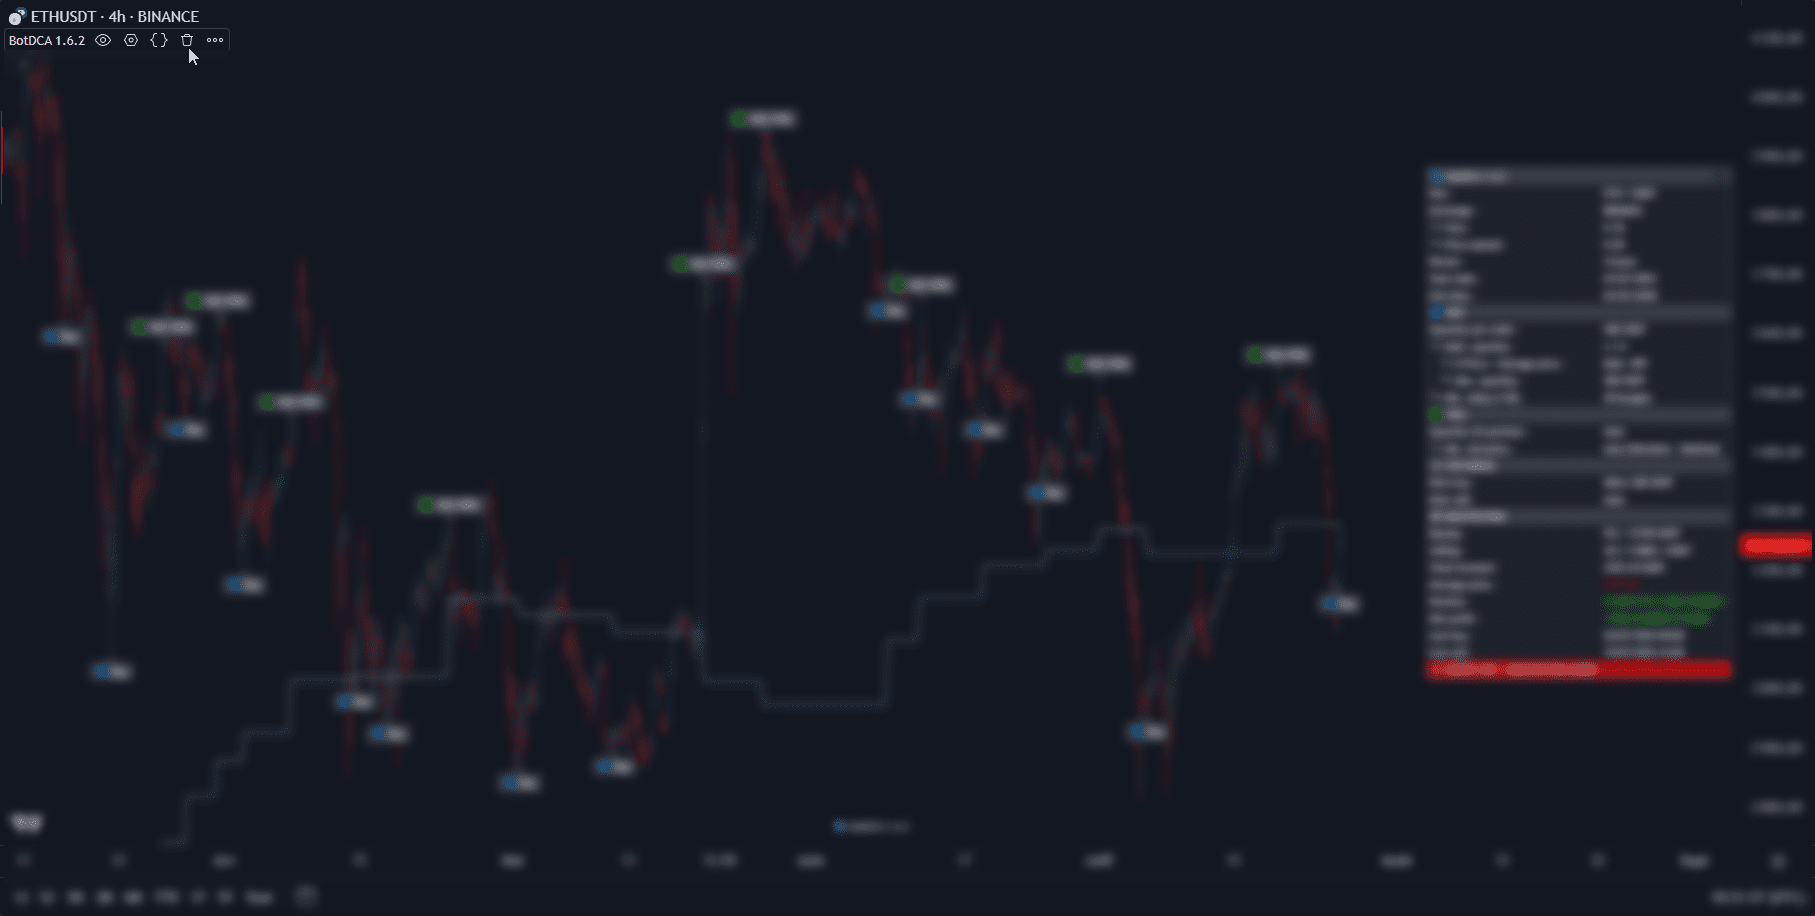
You can view your backtest results on the panel to the right of the graph.
If you have a Pack FULL Auto, you can set automatic exchange connection via API and manage your notification preferences when the bot takes a buy or sell position, directly from your account.
Exchange connection (API) →
This section helps you automatically connect the bot to exchanges.
Notifications →
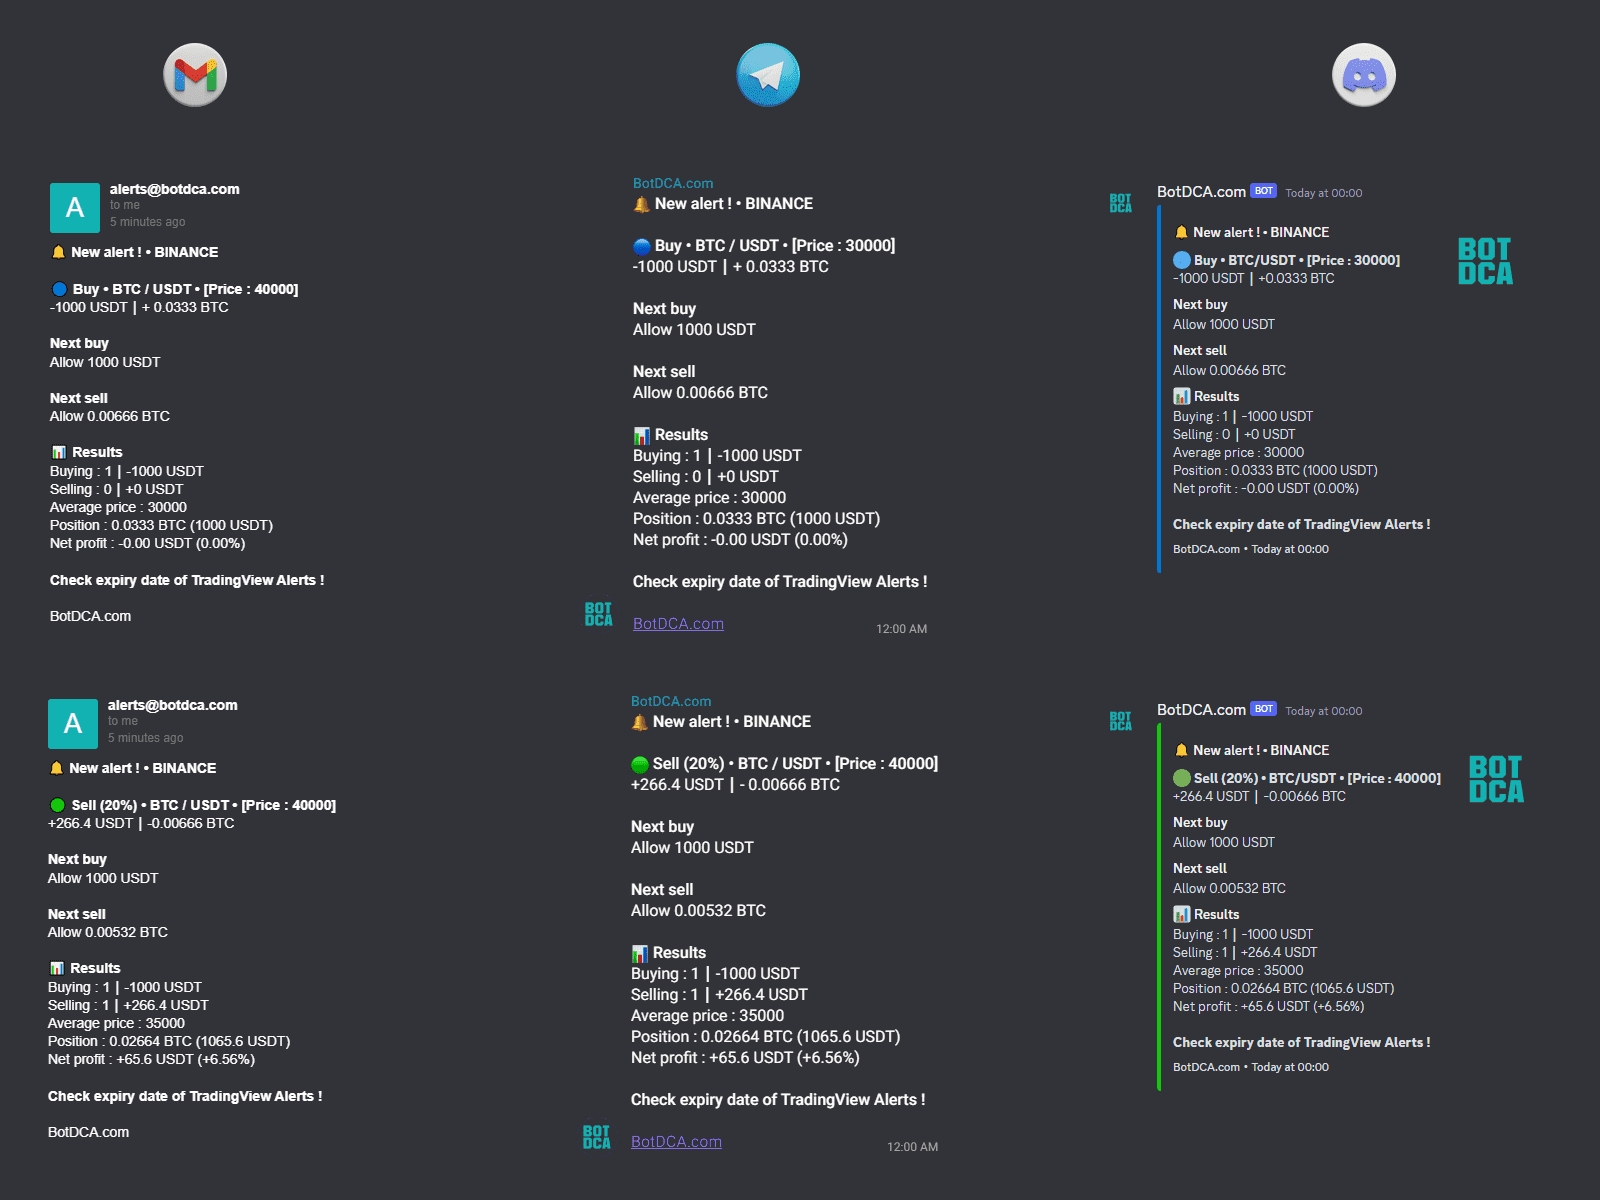
Configure bot buy/sell notifications via Mail, Discord or Telegram.
Errors →
List of the various errors you may encounter.
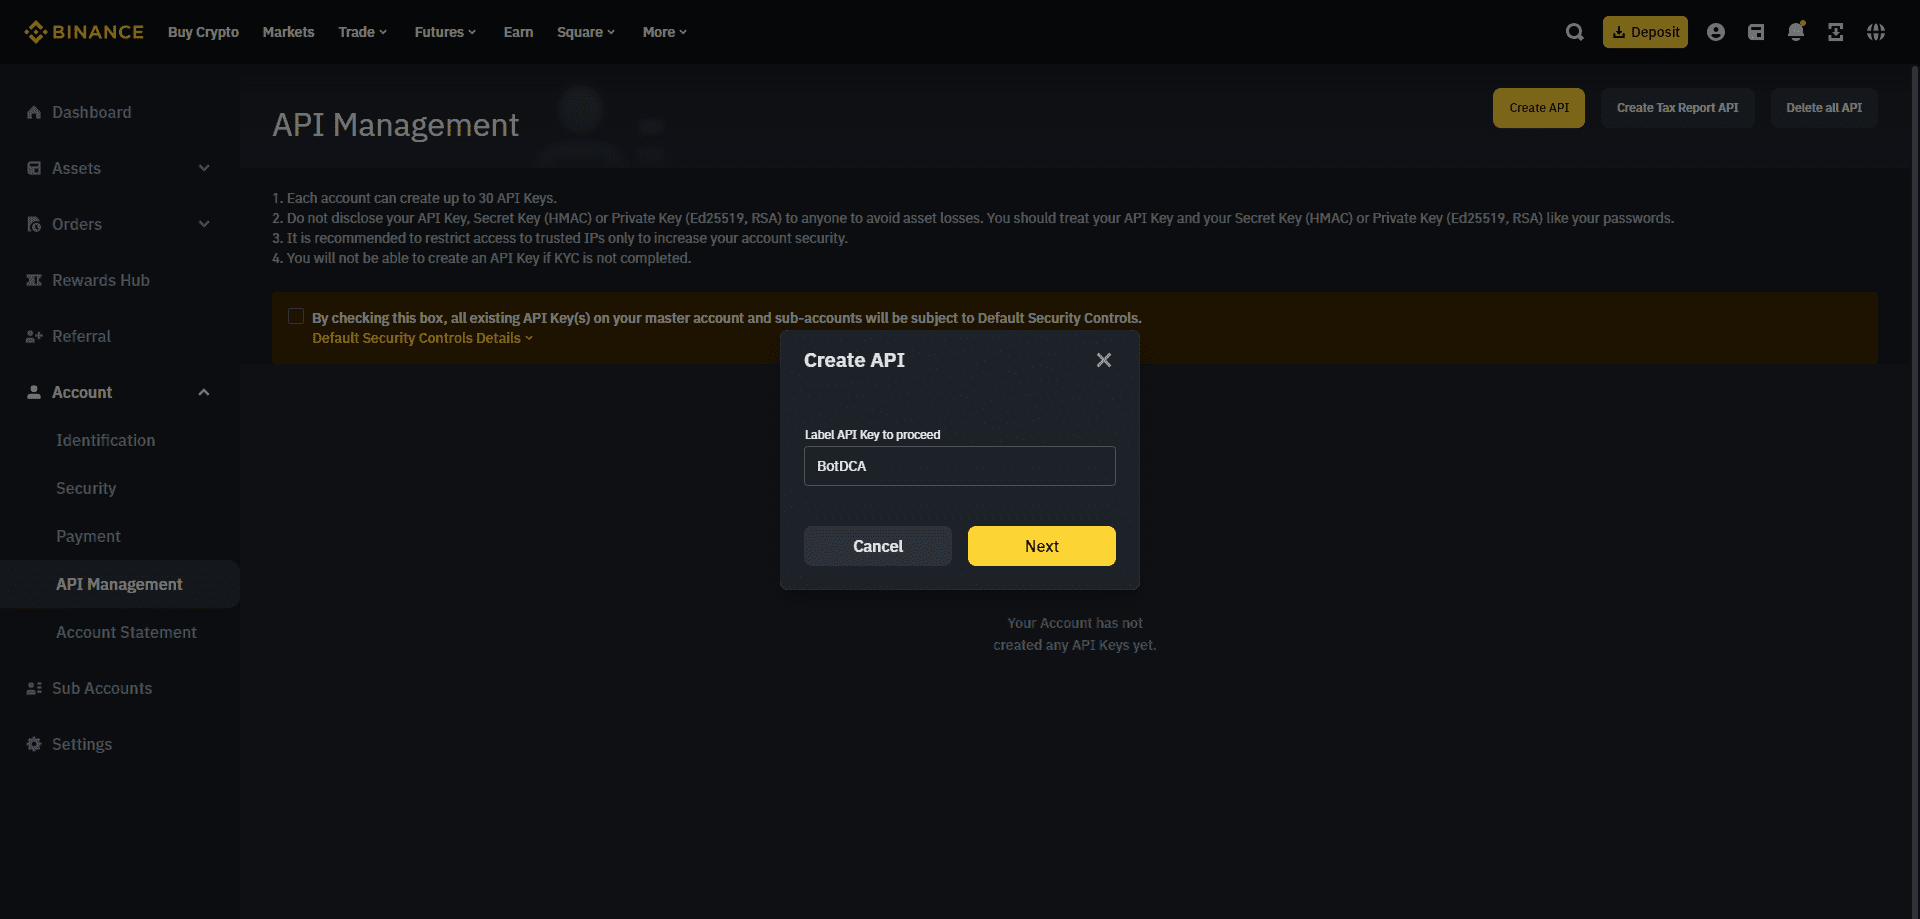
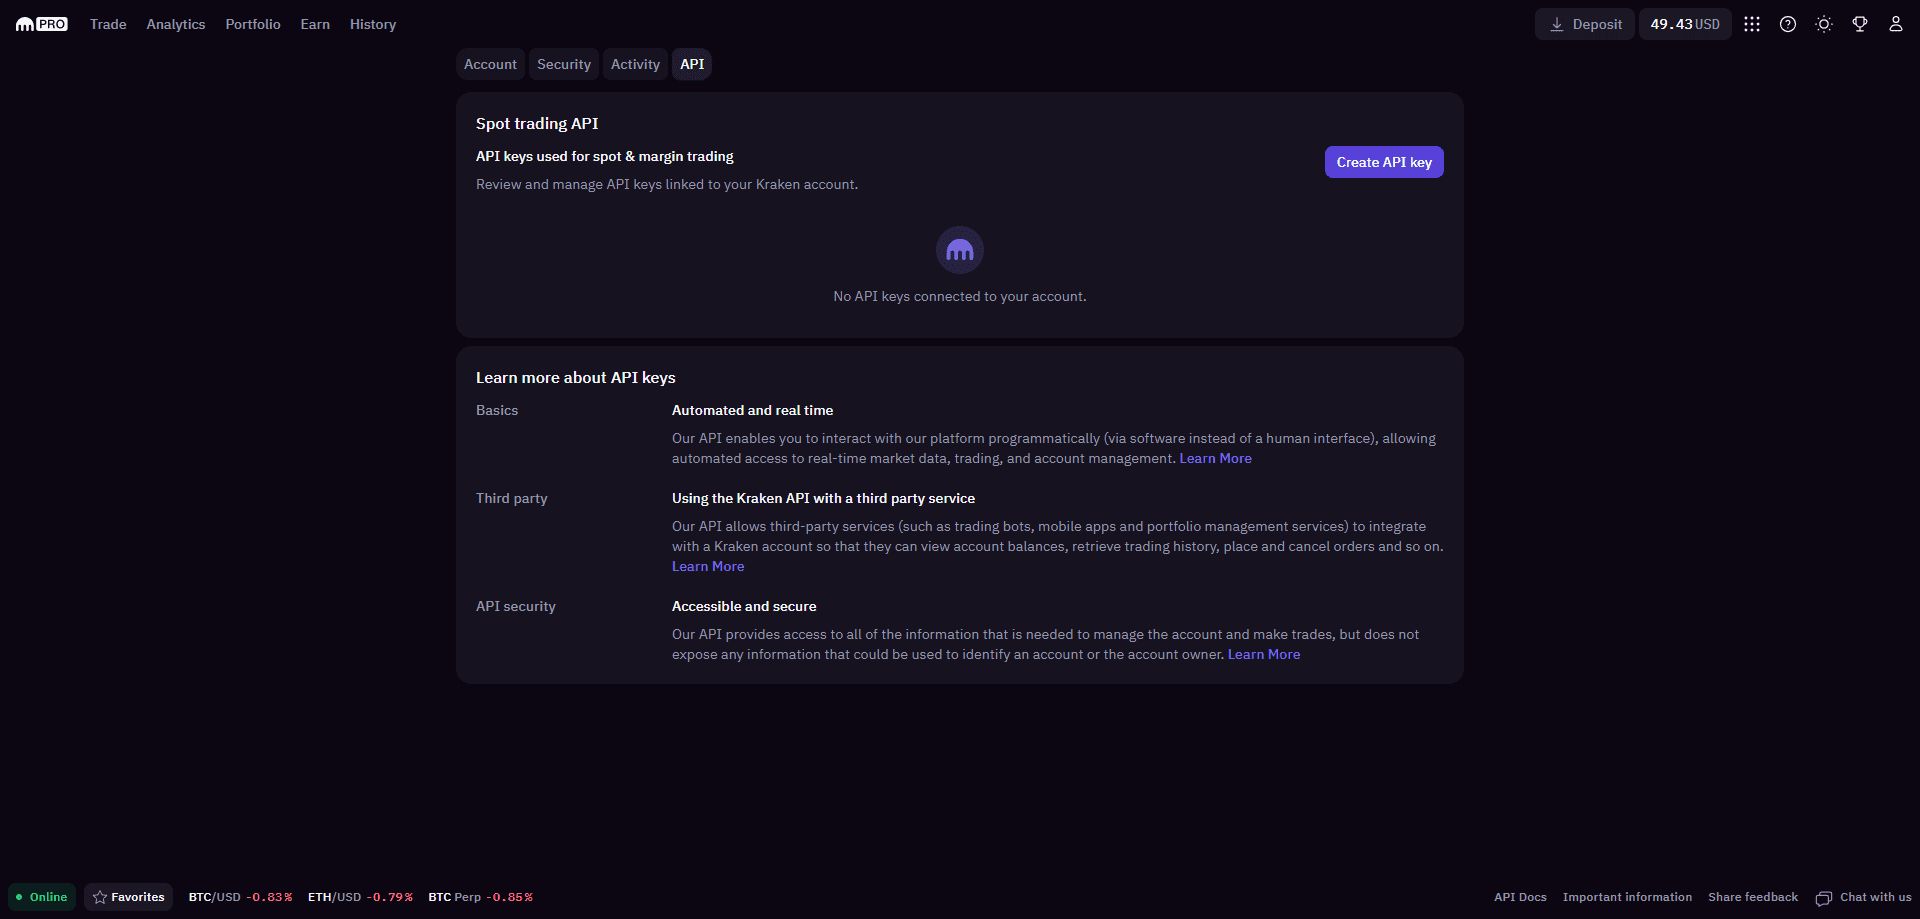
Go to your Binance account and click on API Management :
https://www.binance.com/en/my/settings/api-management
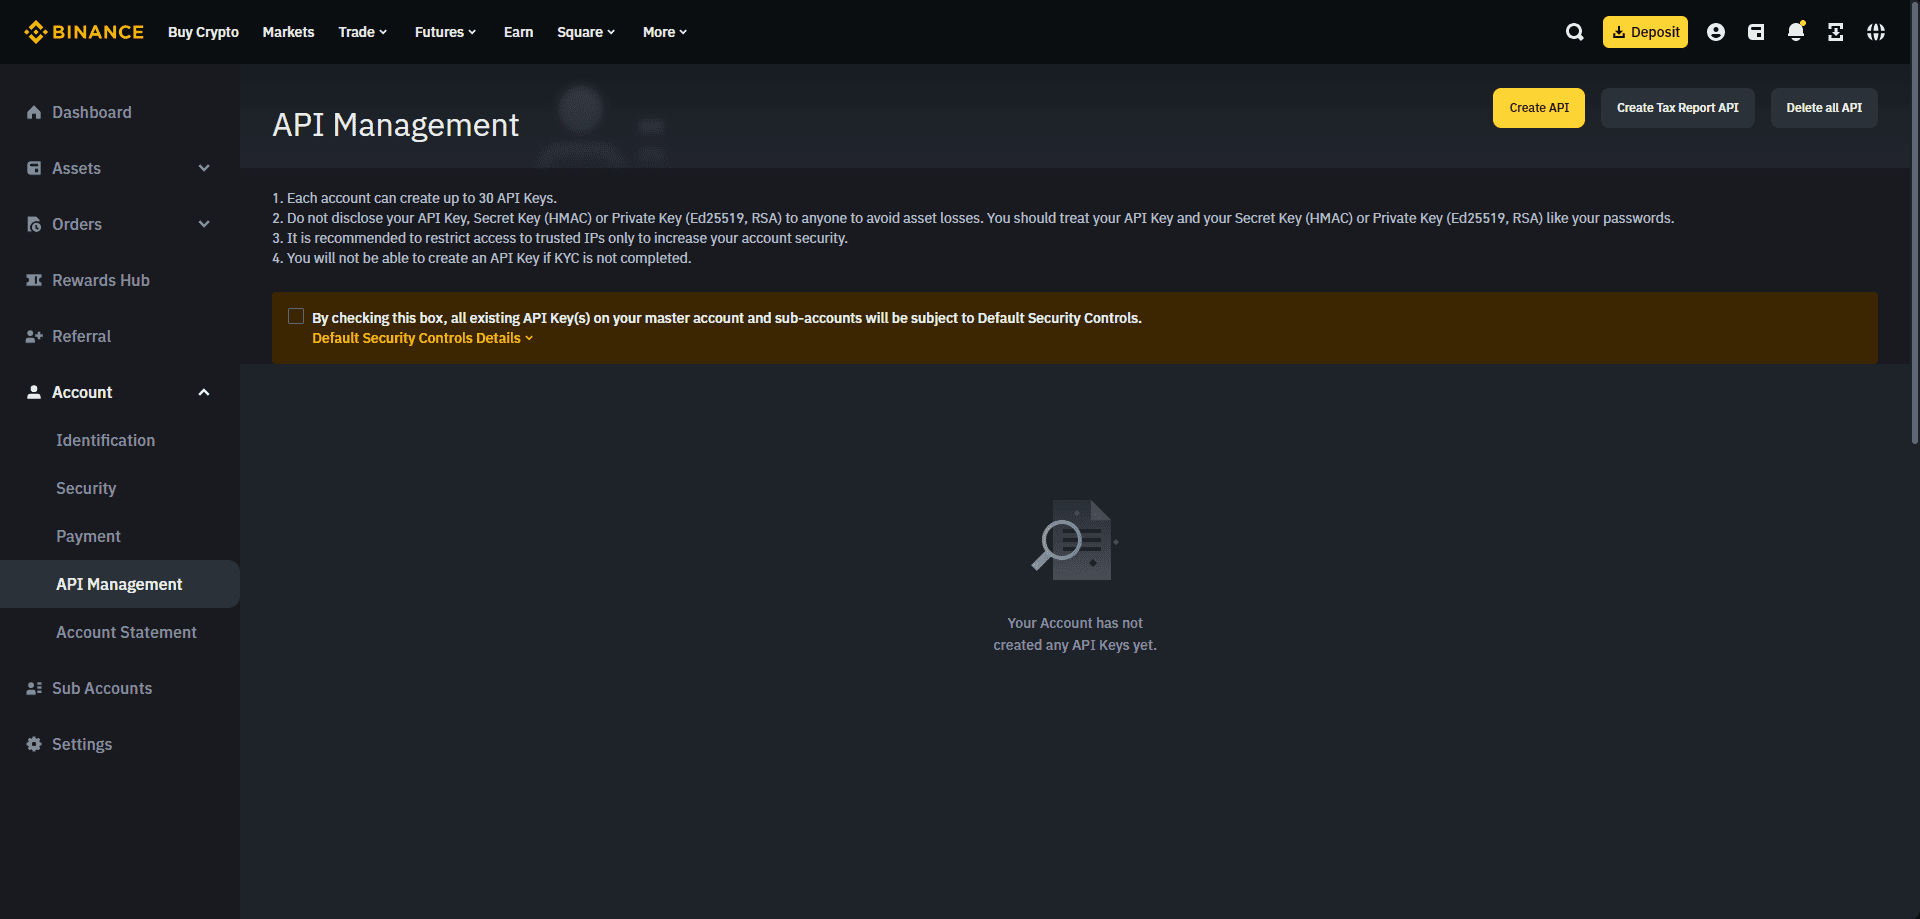
Uncheck By checking this box, all existing API Key(s) on your master account and sub-accounts will be subject to Default Security Controls.
Click on Create API and choose System generated.
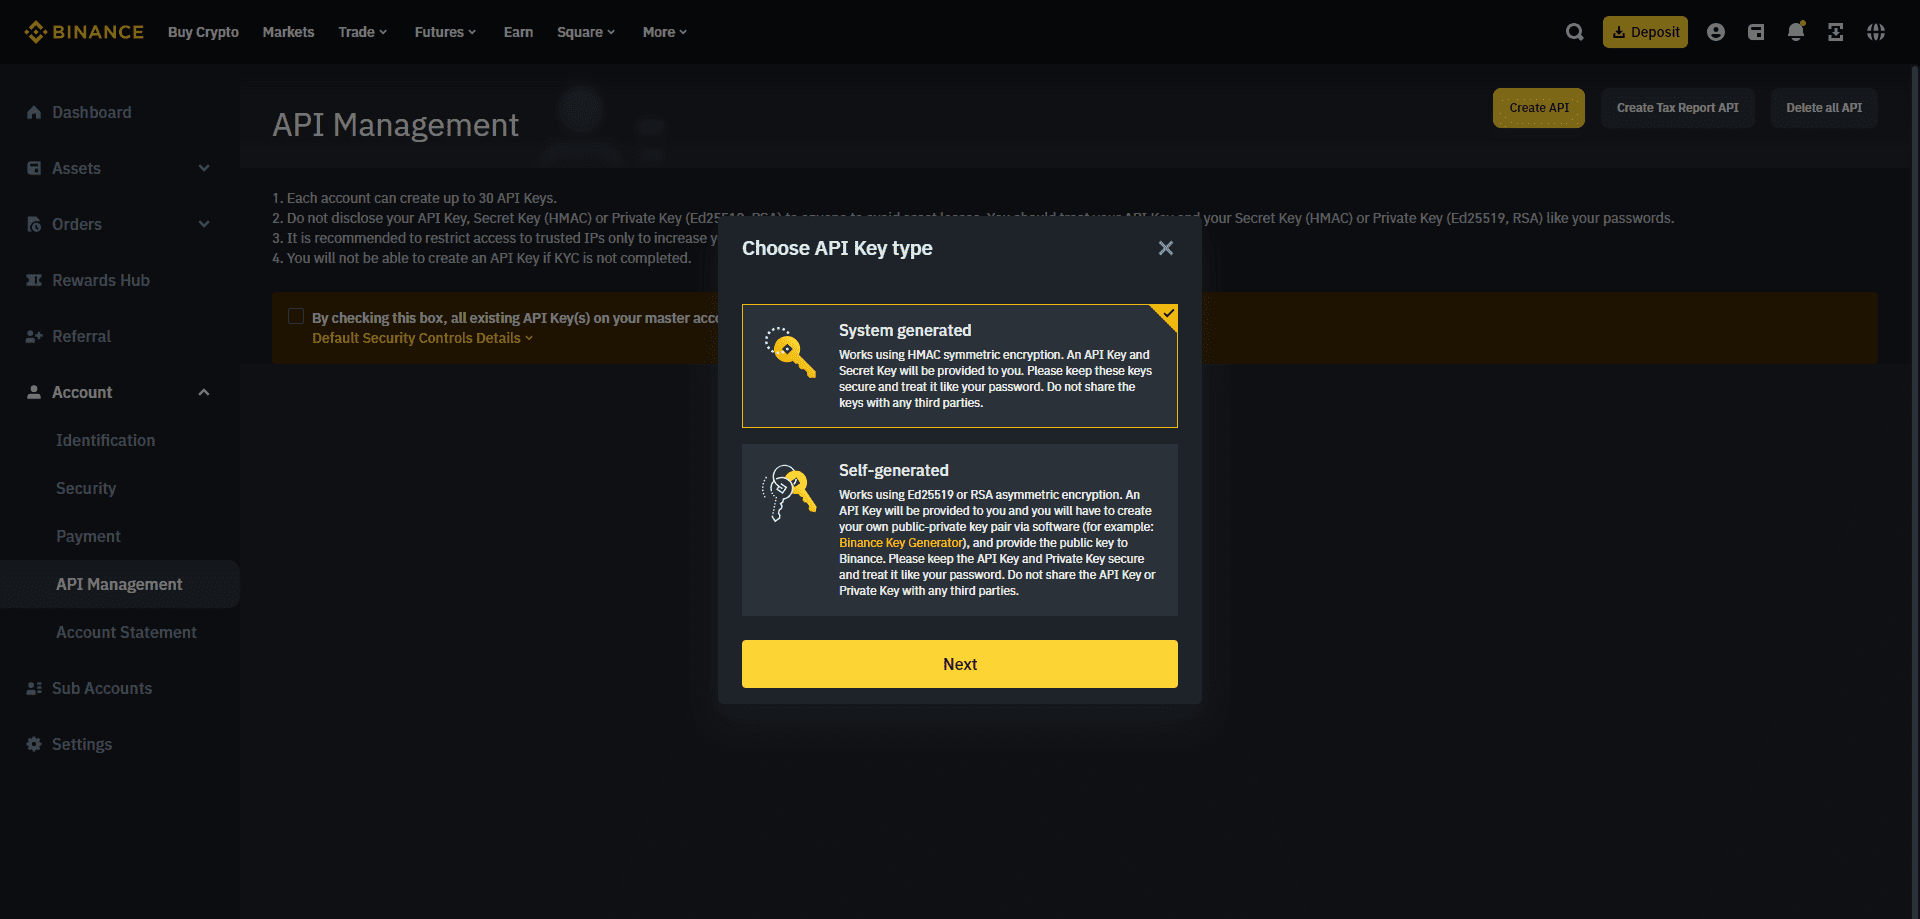
Give a name to this API key and click Next.
Once the new API appears, click on Edit restrictions.
API restrictions : Check the Enable Spot & Margin Trading box.
IP access restrictions : Select Restrict access to trusted IPs only (Recommended) and enter the IP of your webhook.
You can find this IP in your account, and it’s the part made up of numbers only.

Click on Confirm, then on Save.

Note : Checking only Enable Spot & Margin Trading allows the bot to use only this function and not to take any other risky action with your money and tokens.
In addition, IP restriction allows only your dedicated server (only you have this IP) to interact with this API, which significantly enhances security.
Now, you can enter your API & Secret Key on your account in the appropriate section.

Go to your Coinbase account and click on API :
https://www.coinbase.com/settings/api
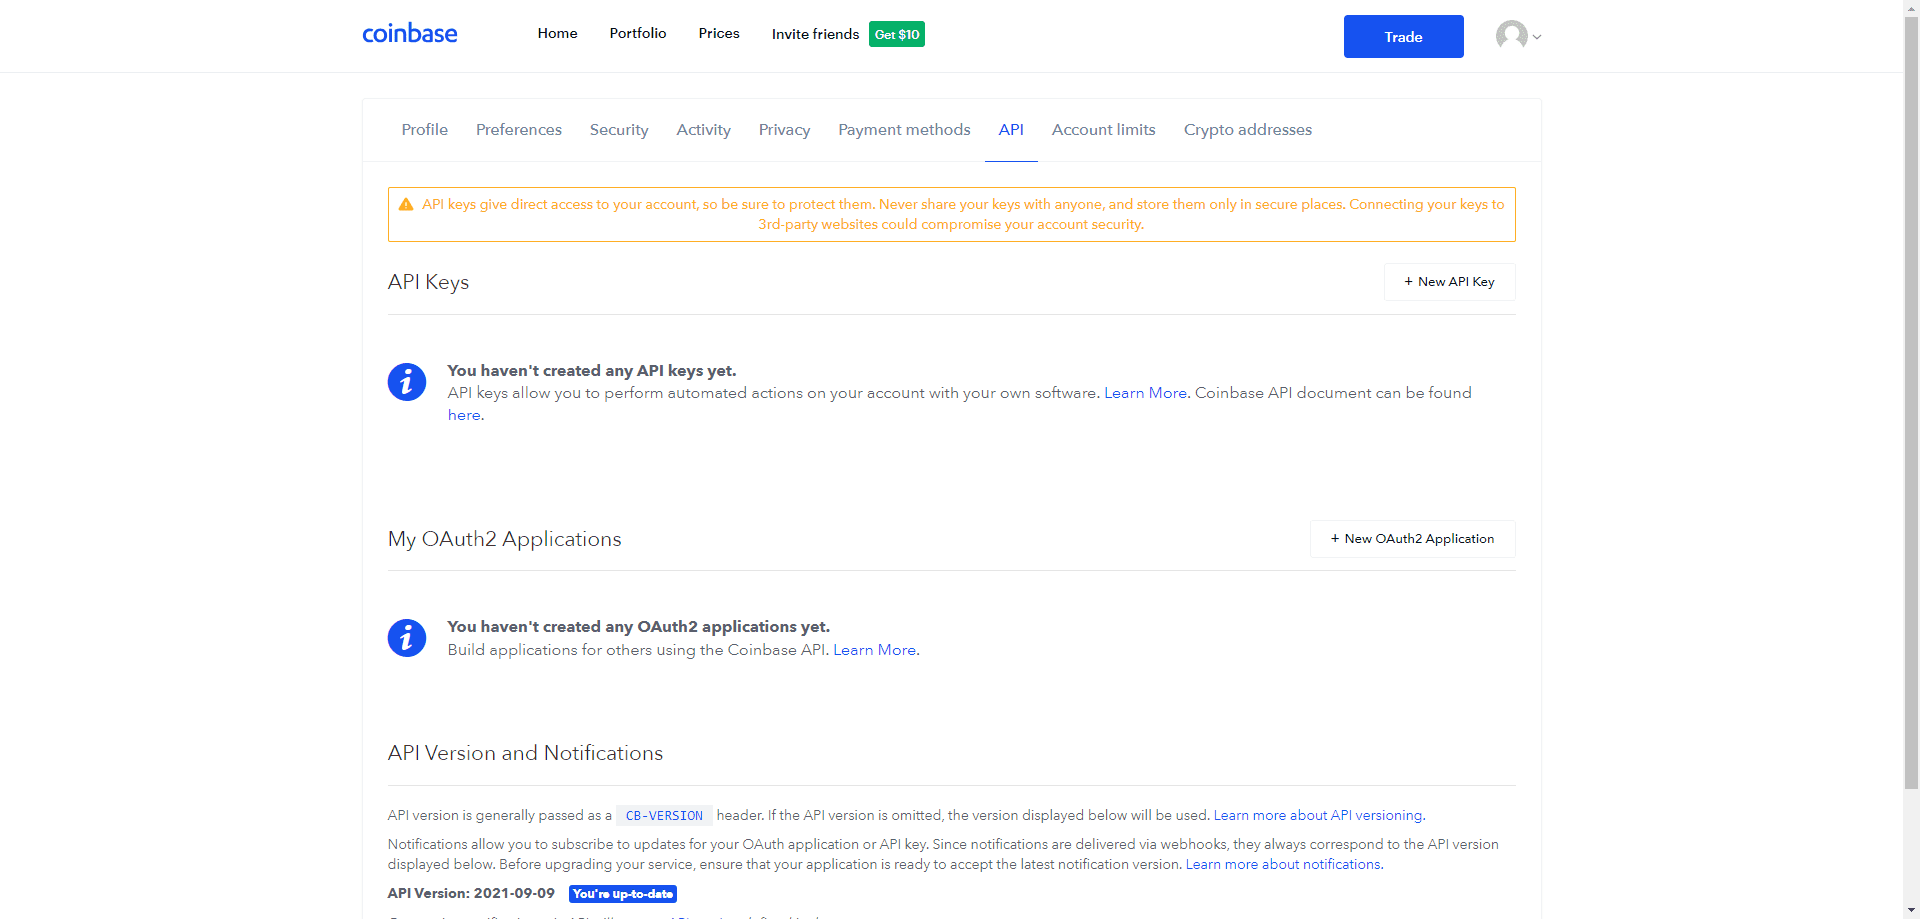
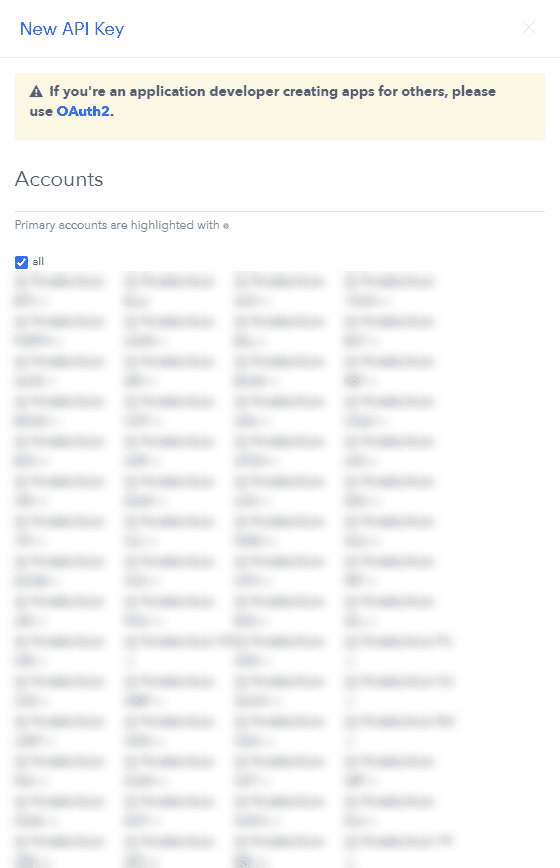
Click on New API Key.
Accounts : Check all.
Permissions : Check wallet:buys:create and wallet:sells:create.
Security settings : Enter the IP of your webhook.
You can find this IP in your account, and it’s the part made up of numbers only.
Click on Create.
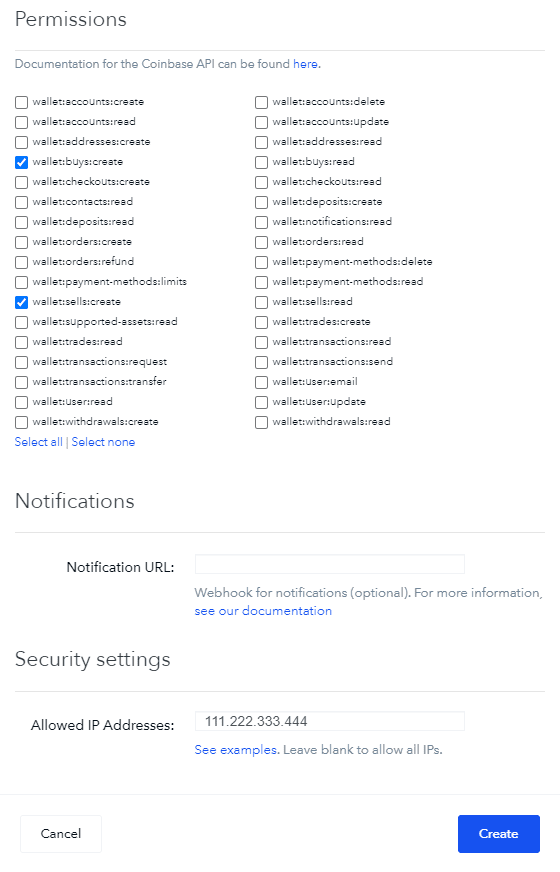
Note : Checking only wallet:buys:create and wallet:sells:create allows the bot to use only these functions and not to take any other risky action with your money and tokens.
In addition, Allowed IP Addresses allows only your dedicated server (only you have this IP) to interact with this API, which significantly enhances security.
Now, you can enter your API & Secret Key on your account in the appropriate section.

Go to your Kraken Pro account and click on API :
https://pro.kraken.com/app/settings/api
Click on Create API key.
Name : Give a name to this API key.
IP address restriction : Switch on ON and enter the IP of your webhook.
You can find this IP in your account, and it’s the part made up of numbers only.
Click on Generate key.
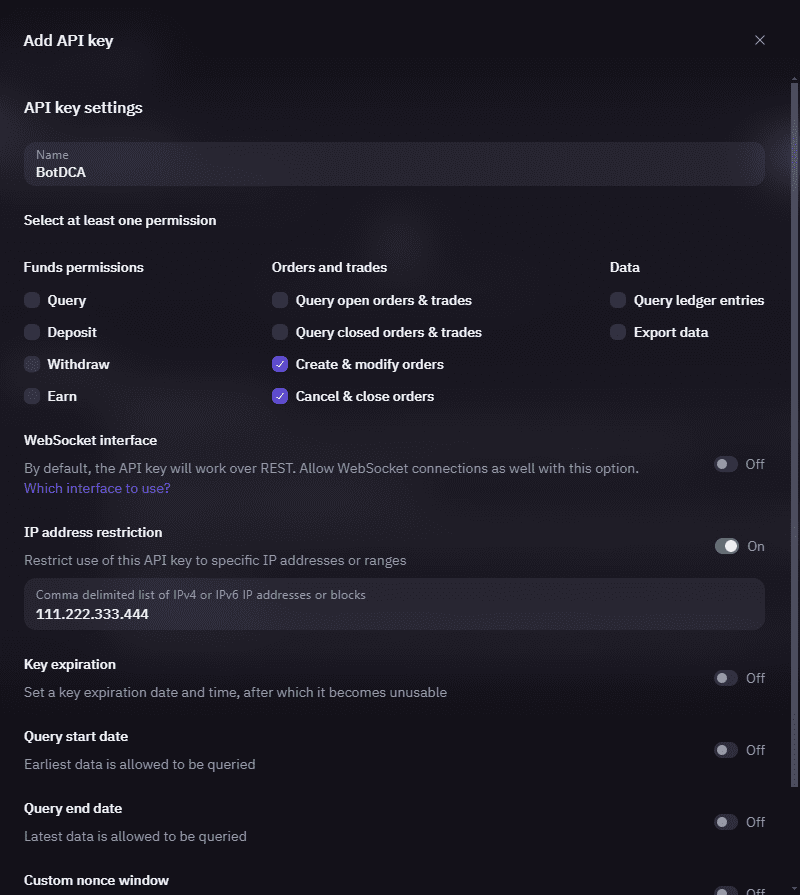
Note : Checking only Create & modify orders and Cancel & close orders allows the bot to use only these functions and not to take any other risky action with your money and tokens.
In addition, IP address restriction allows only your dedicated server (only you have this IP) to interact with this API, which significantly enhances security.
Now, you can enter your API & Secret Key on your account in the appropriate section.

Go to your KuCoin account and click on API Management :
https://www.kucoin.com/account/api
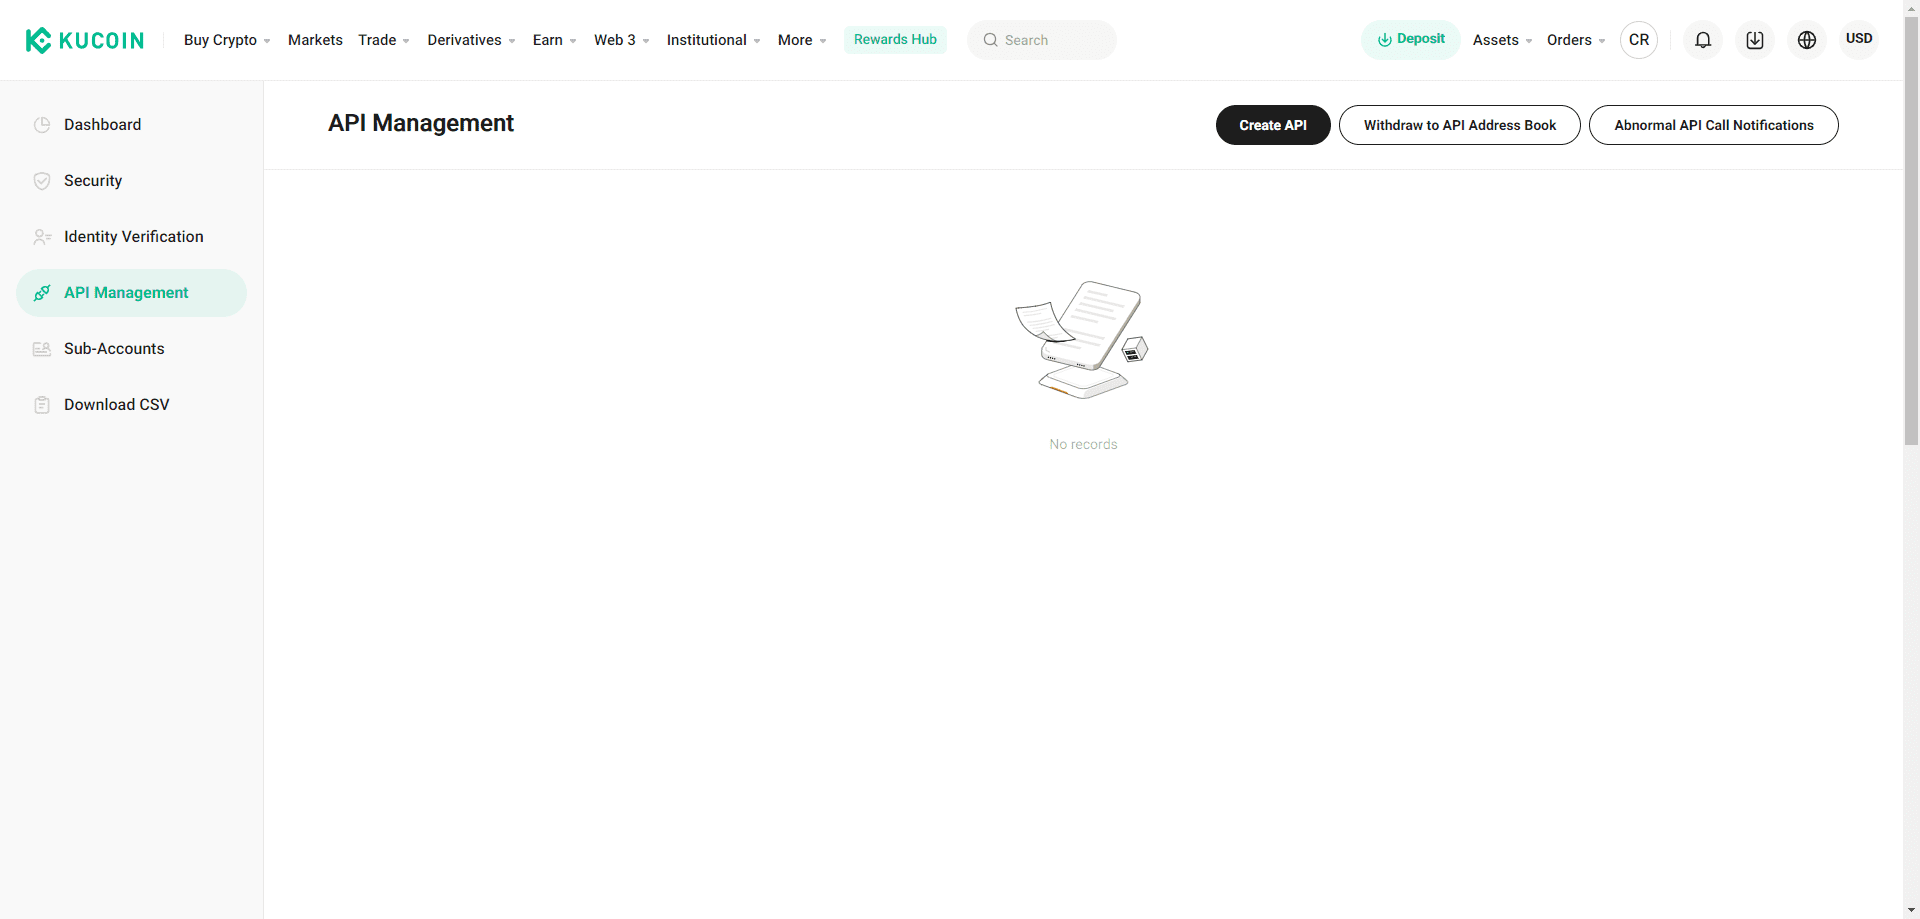
Click on Create API.
API Name : Give a name to this key.
API Passphrase : Enter a passphrase you’ll need to memorize.
API Restrictions : Check Spot Trading.
IP Restriction : Enter the IP of your webhook.
You can find this IP in your account, and it’s the part made up of numbers only.
Click on Add, then on Next.
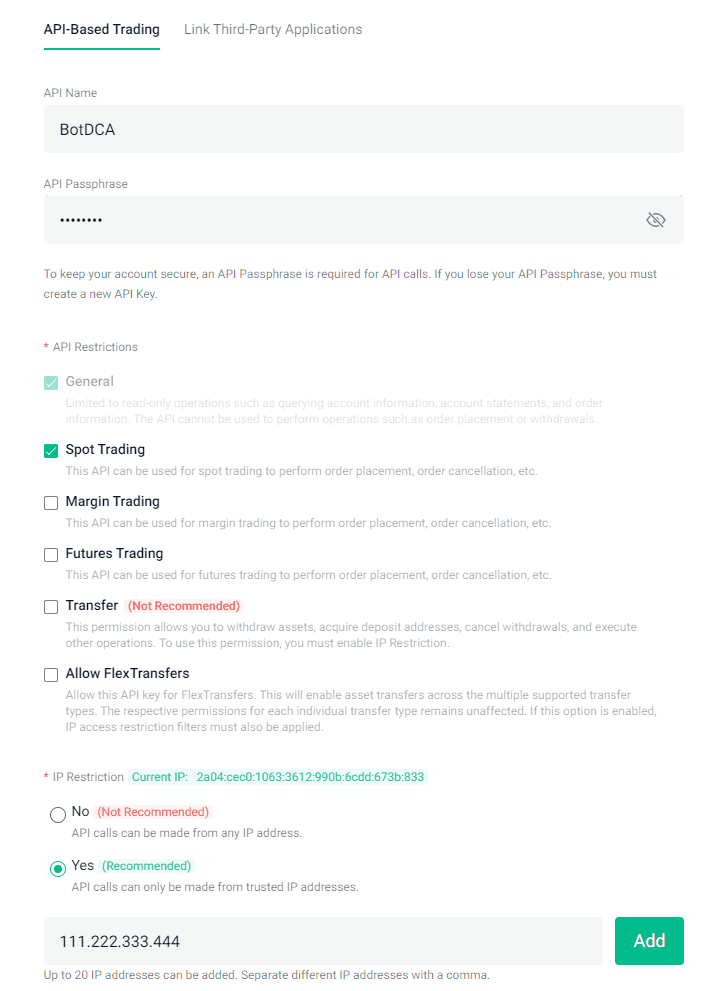
Note : Checking only Spot Trading allows the bot to use only this function and not to take any other risky action with your money and tokens.
In addition, IP Restriction allows only your dedicated server (only you have this IP) to interact with this API, which significantly enhances security.
Now, you can enter your API, Secret Key & Passphrase on your account in the appropriate section.

Go to your MEXC account and click on API Management :
https://www.mexc.com/user/openapi
Spot : Check Trade : Trade.
Notes (Required) : Give a name to this API key.
Link IP Address (optional) : Enter the IP of your webhook.
You can find this IP in your account, and it’s the part made up of numbers only.
Check the box I have read and agree to the Risk Reminders for API Users.
Click on Create.
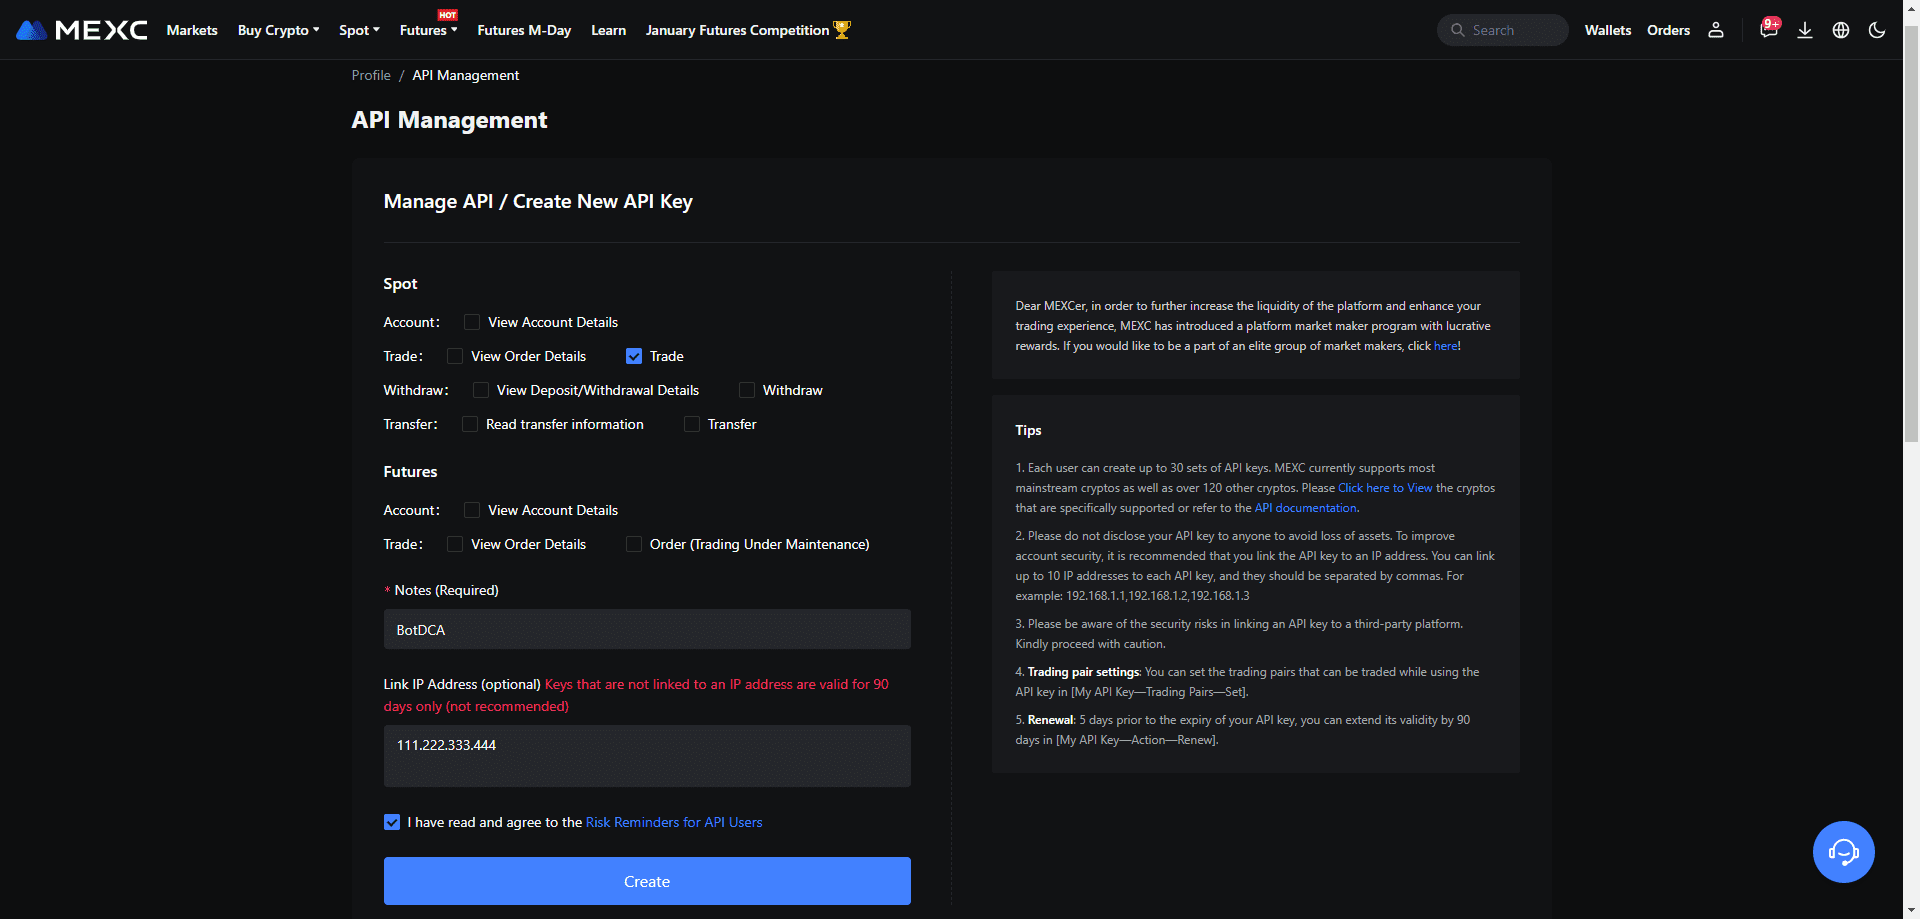
Note : Checking only Trade allows the bot to use only this function and not to take any other risky action with your money and tokens.
In addition, Link IP Address allows only your dedicated server (only you have this IP) to interact with this API, which significantly enhances security.
Now, you can enter your API & Secret Key on your account in the appropriate section.

Go to your Gate.io account and click on API Management :
https://www.gate.io/myaccount/api_key_manage
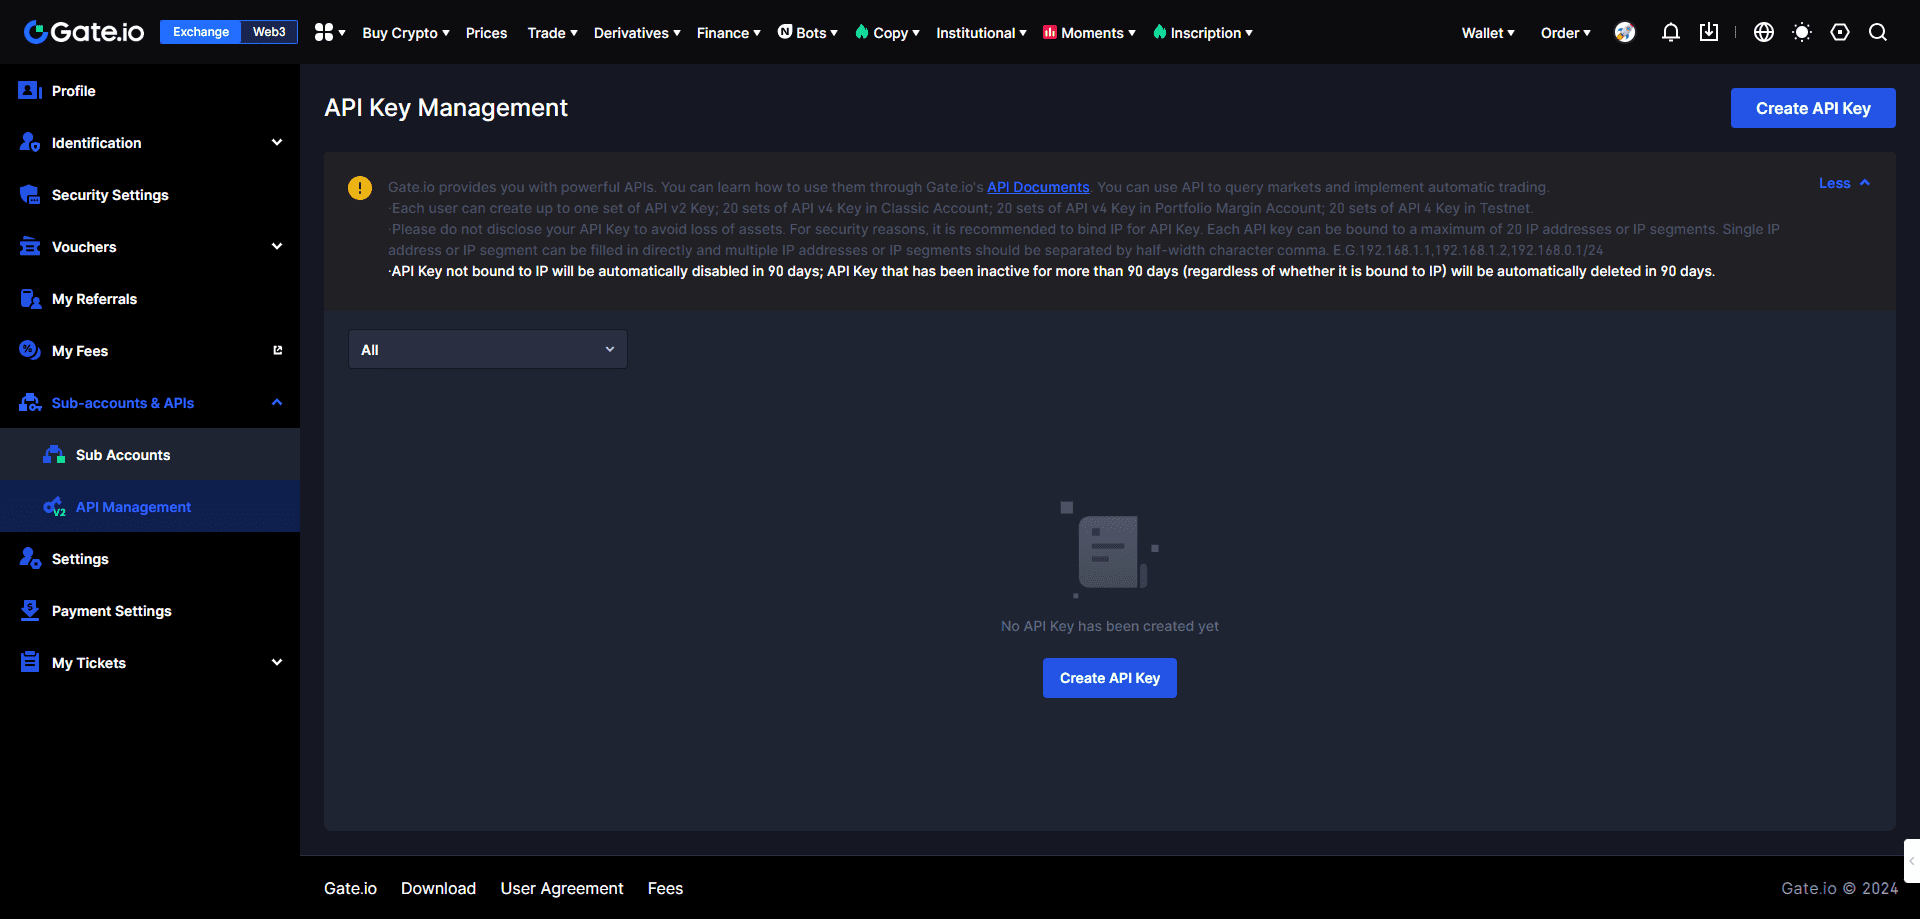
Click on Create API Key.
API Key Remark : Give a name to this API key.
IP Permissions : Select Bind IP and enter the IP of your webhook.
You can find this IP in your account, and it’s the part made up of numbers only.
API Key Type : Select API v4 Key.
Account Type : Select Trading Account.
Permissions : Activate Spot Trade and select Read And Write.
Click on Submit.
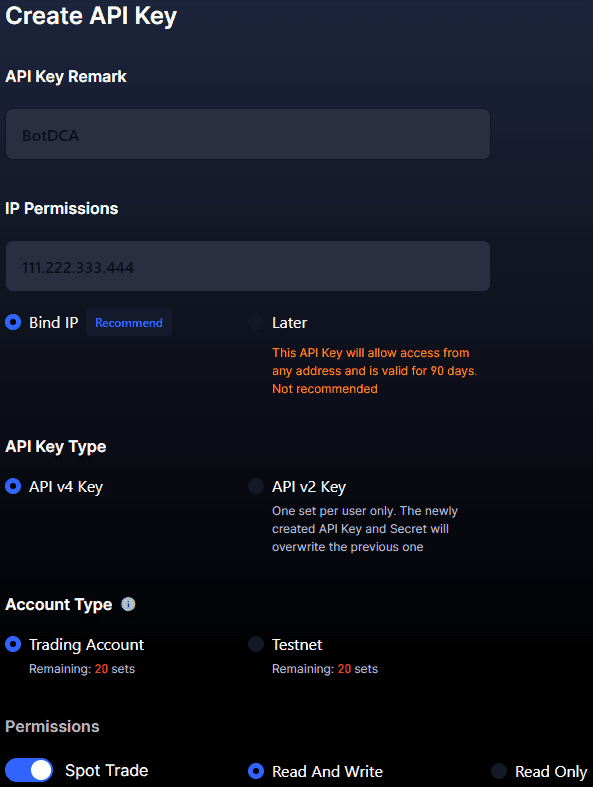
Note : Checking only Spot Trade allows the bot to use only this function and not to take any other risky action with your money and tokens.
In addition, IP Permissions allows only your dedicated server (only you have this IP) to interact with this API, which significantly enhances security.
Now, you can enter your API & Secret Key on your account in the appropriate section.

Go to your Bitget account and click on API keys :
https://www.bitget.com/account/newapi
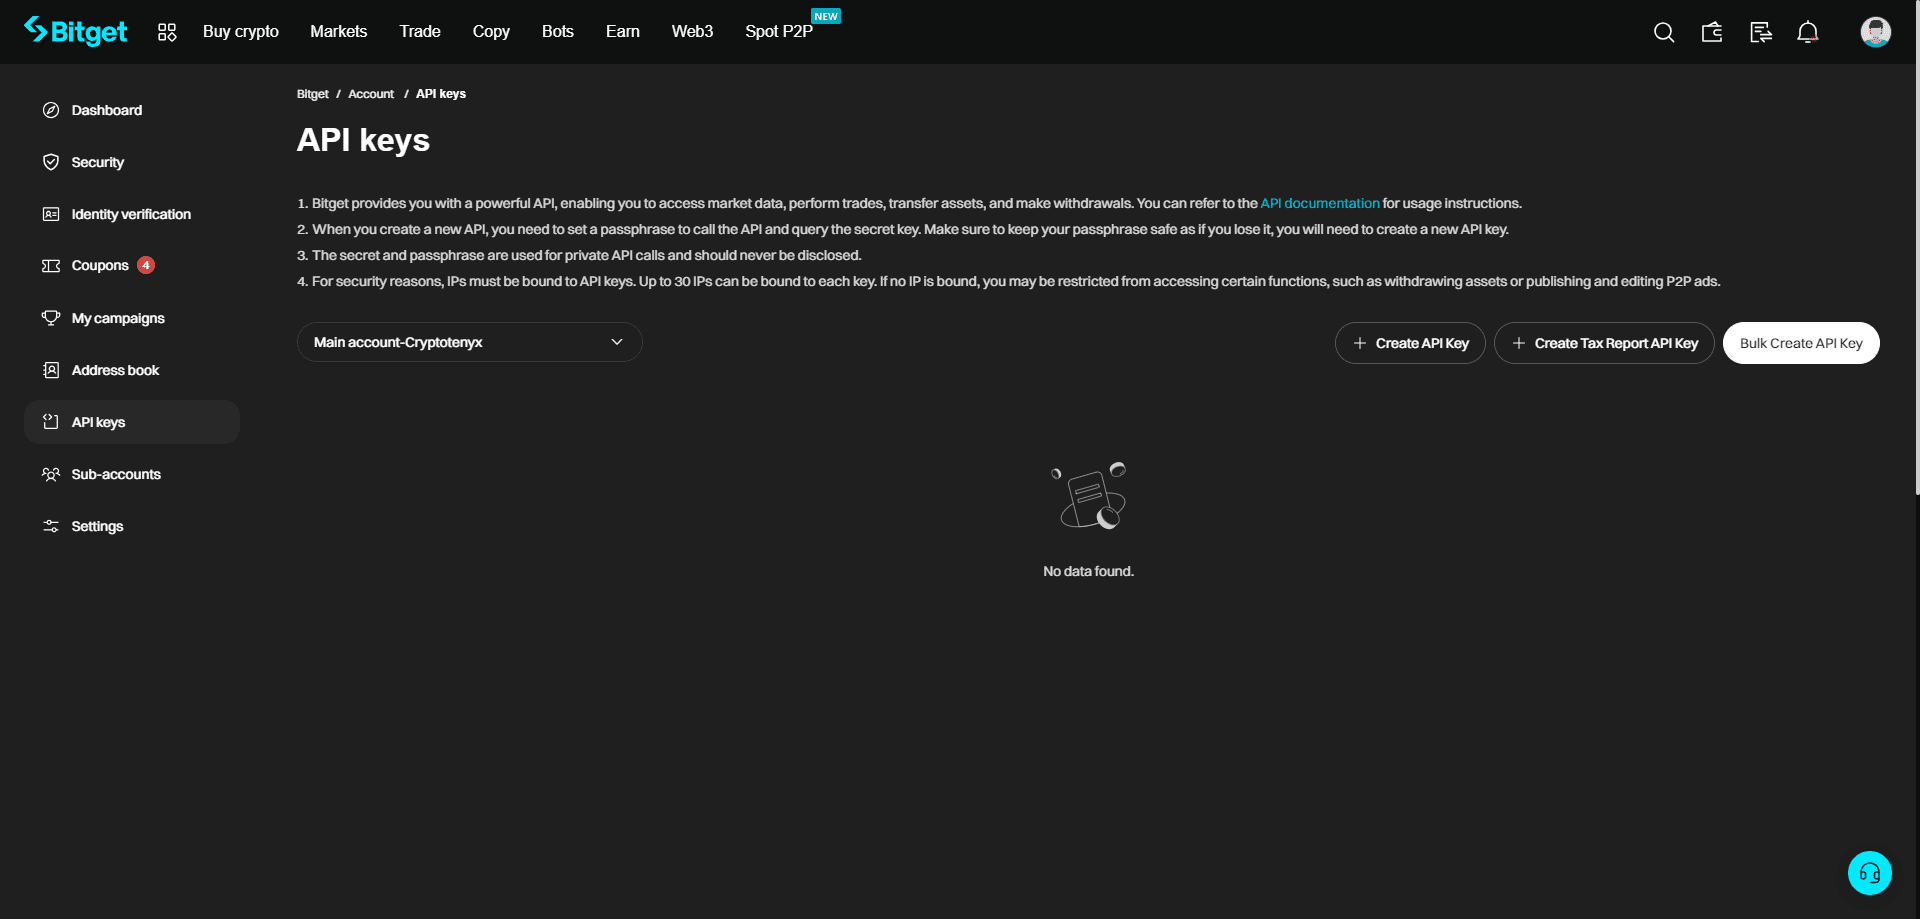
Click on Create API Key and choose System-generated API key.
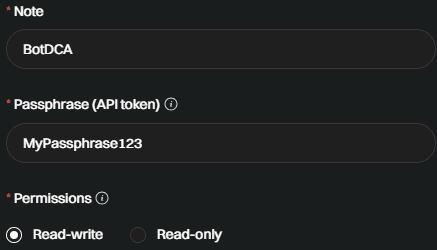
Note : Give a name to this API key.
Passphrase (API token) : Enter a passphrase you’ll need to memorize.
Permissions : Select Read-write.
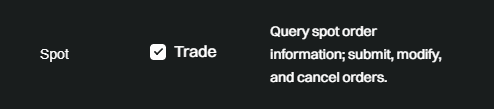
Spot : Check Trade.
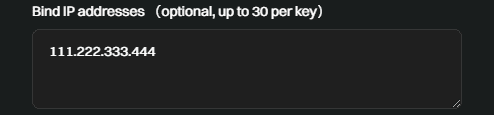
Bind IP addresses : Enter the IP of your webhook.
You can find this IP in your account, and it’s the part made up of numbers only.
Click on Next.
Note : Checking only Trade allows the bot to use only this function and not to take any other risky action with your money and tokens.
In addition, Bind IP addresses allows only your dedicated server (only you have this IP) to interact with this API, which significantly enhances security.
Now, you can enter your API, Secret Key & Passphrase on your account in the appropriate section.

Simply enter your e-mail address.
Create a text channel on a Discord server of your choice where you have admin rights.
Once this channel has been created, right-click on it, then on Edit Channel.
Next, click on the Integrations tab, then on Webhooks.
Click on Create Webhook, and give it a name and an image (optional).
Finally, click on Copy Webhook URL.
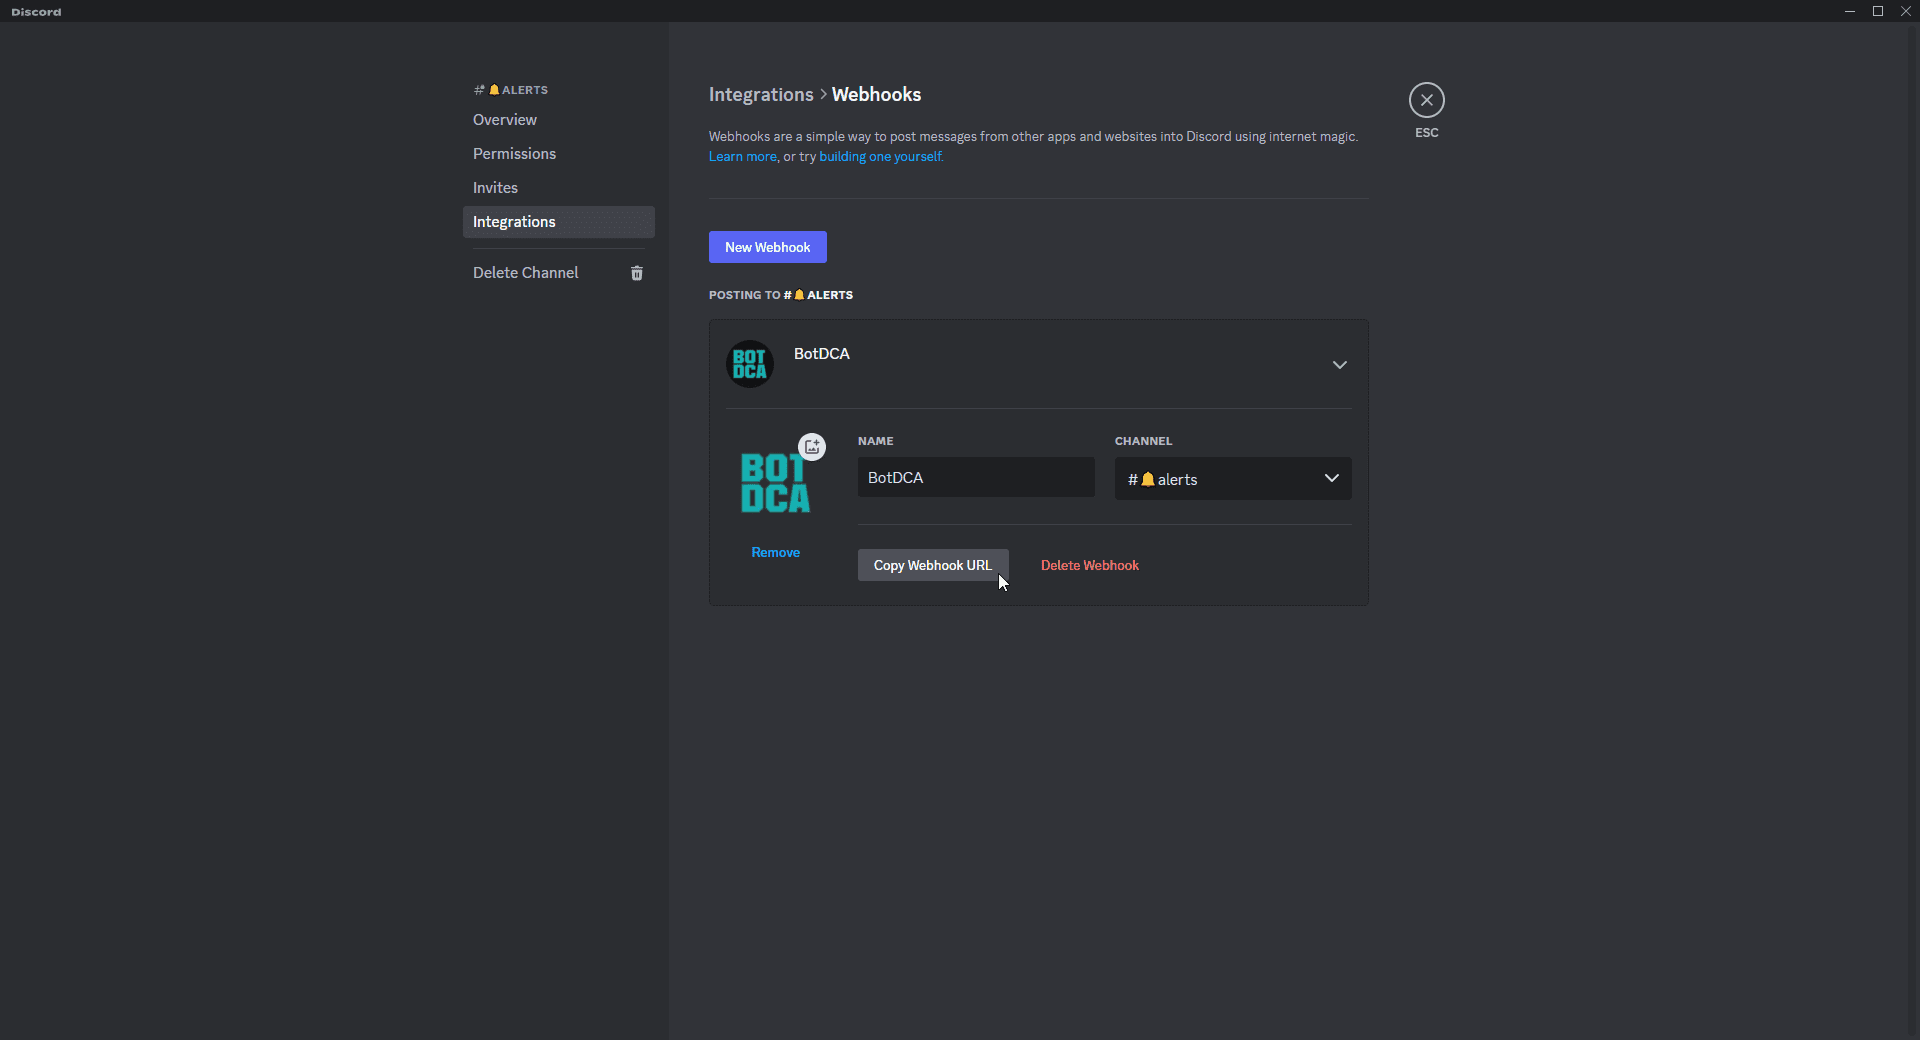
Now, you can enter your Discord Webhook URL on your account in the appropriate section.

This tutorial is realized for the Telegram application on computer.
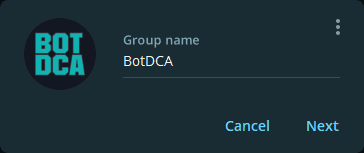
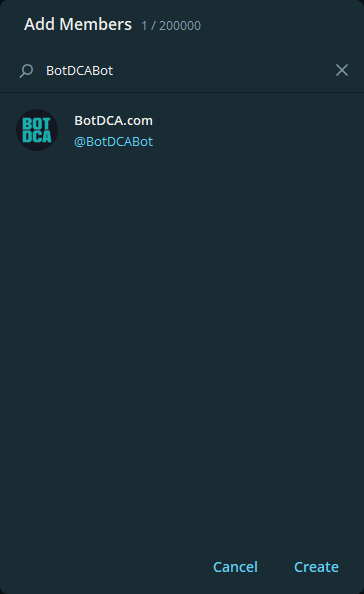
Create a new Telegram group (not channel).
Give it a name and an image (optional), then click Next.
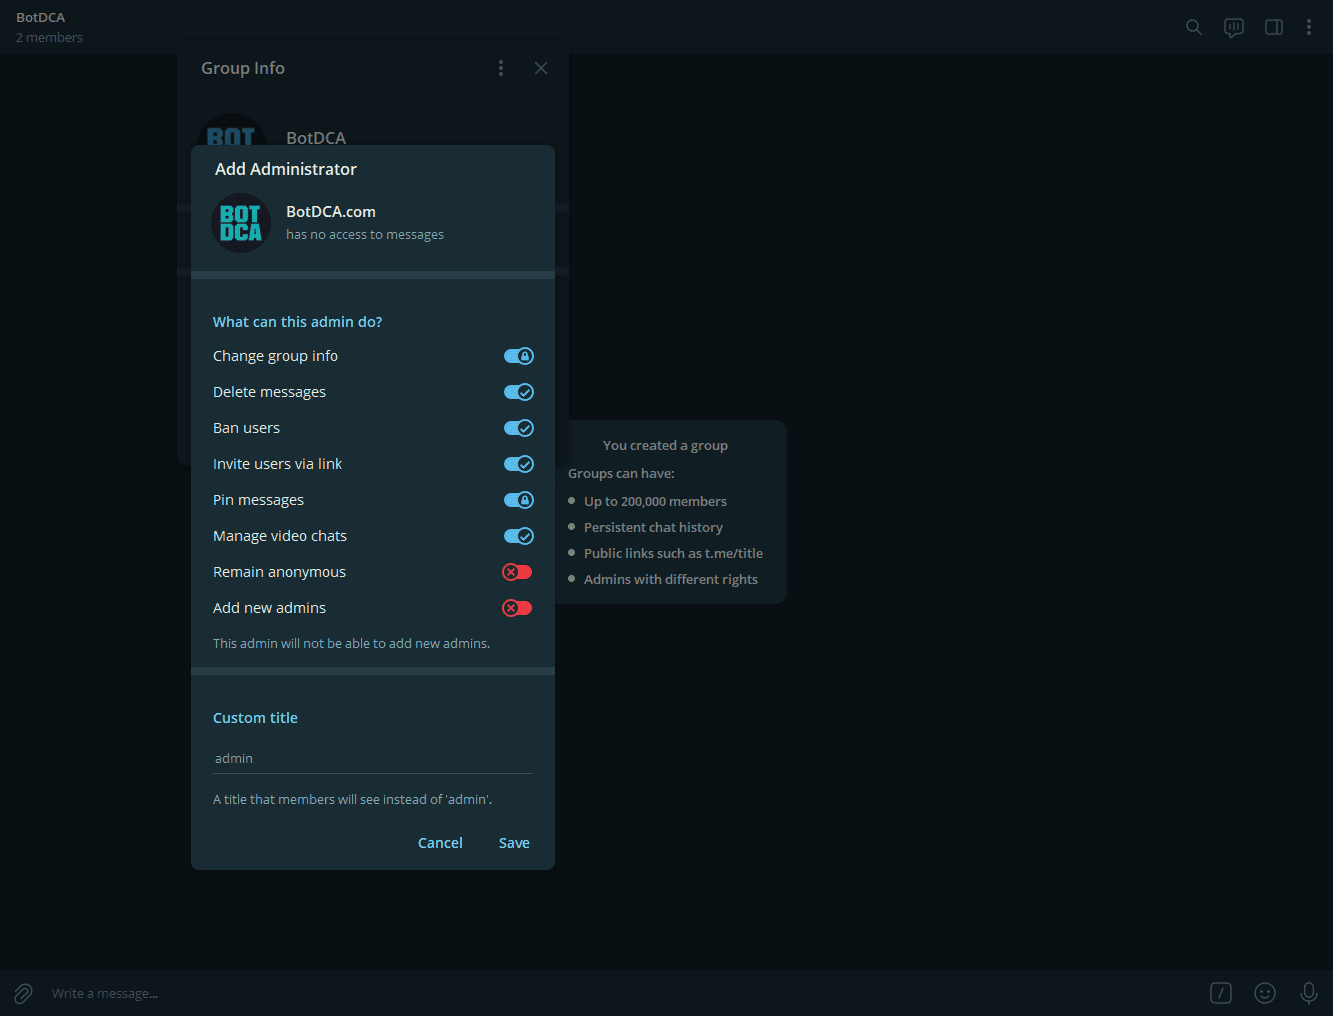
To give the bot access rights to messages, at the top right of the group, click on the three small dots, then on View group info.

Right-click on BotDCABot, then on Promote to admin.
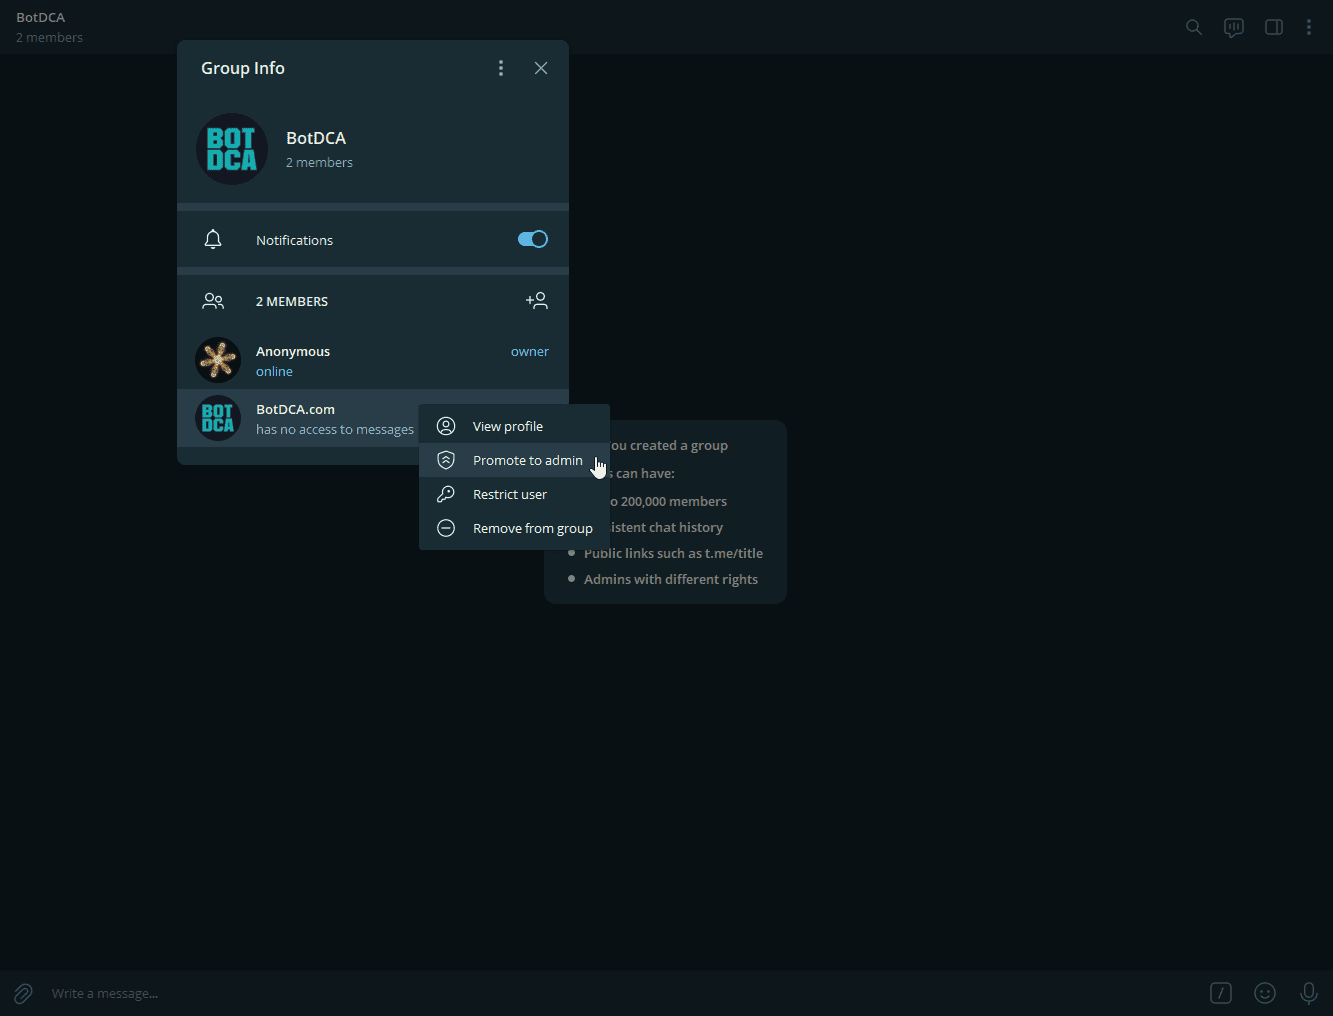
Next, click on Save.
Finally, to retrieve the Telegram Token ID, go to your browser at the following address :
https://web.telegram.org/
Log in to your account, then click on the group you’ve created.
You’ll find the ID in the URL.
ID starts with a – sign followed by numbers.
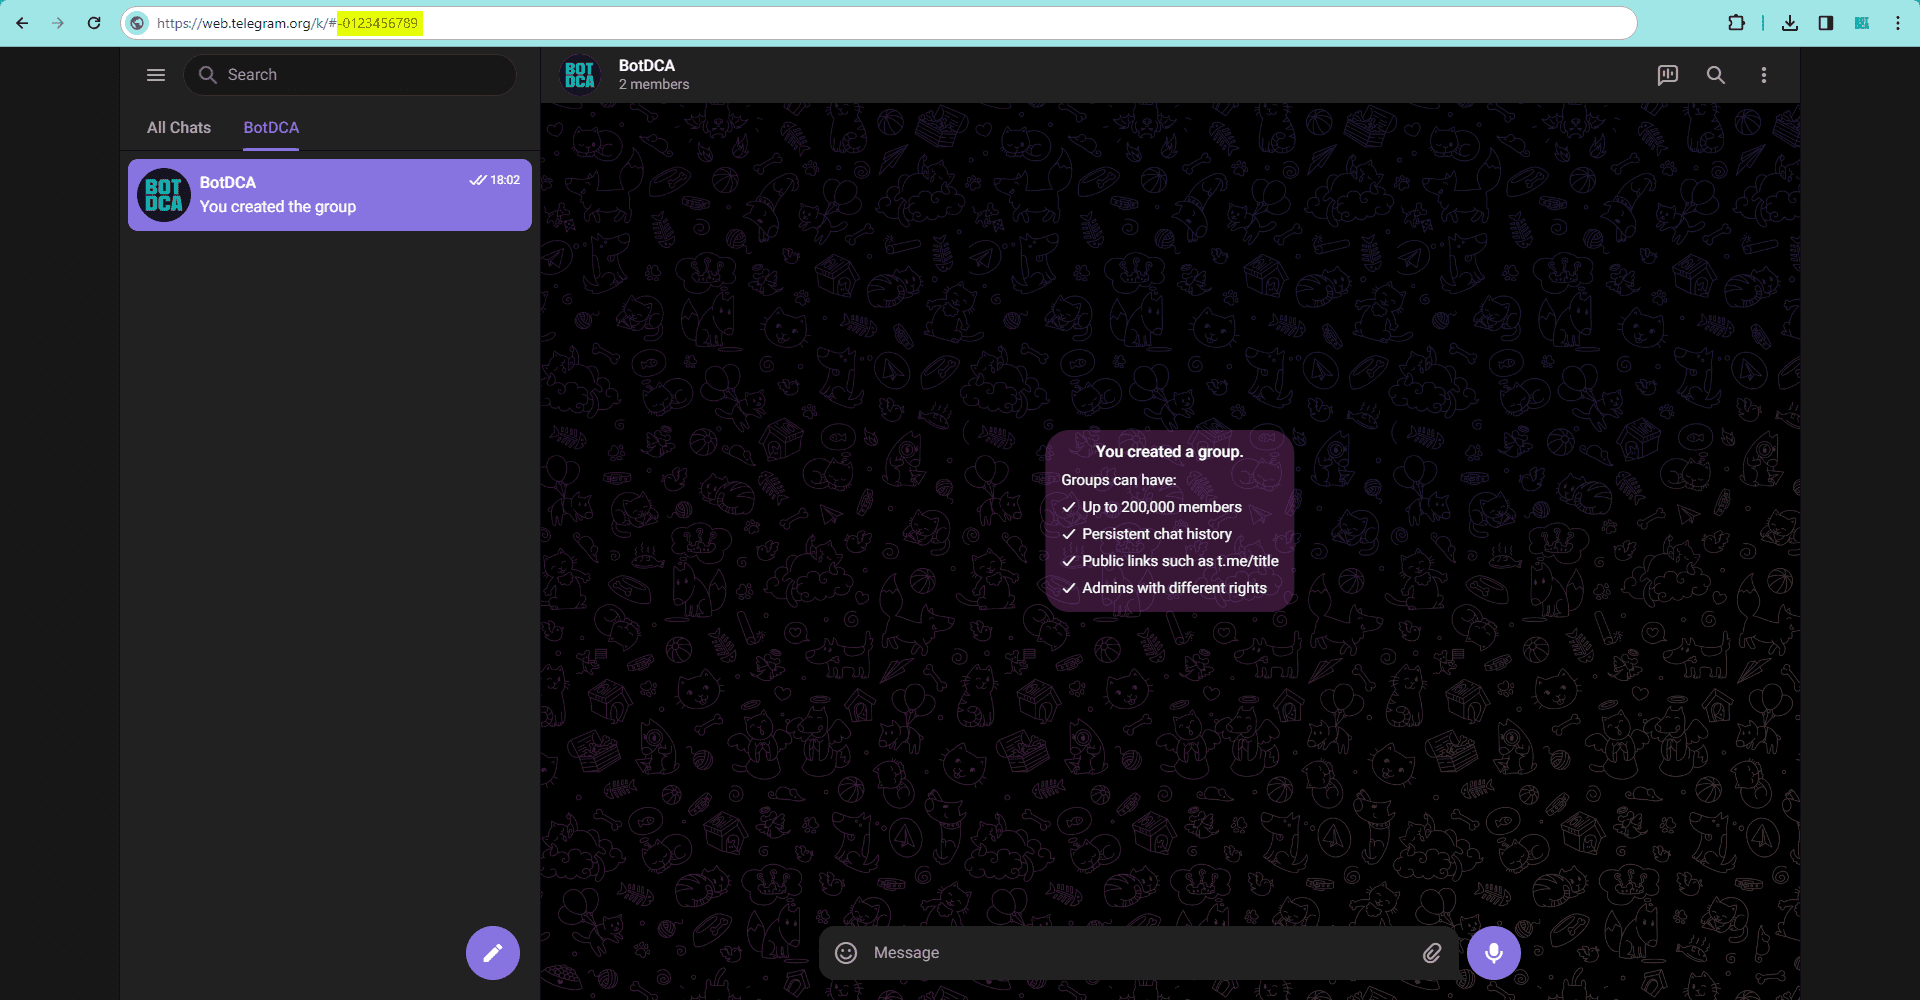
Now, you can enter your Telegram Chat ID on your account in the appropriate section.

If you have a Pack FULL Auto and the bot has detected a signal, but your exchange has not taken this position automatically, there may be several reasons for this :
• PIN Code FULL Auto is not the same on the bot settings and on your account.
• You don’t have enough funds/tokens to make the buy or sell.
• Your API Key or Secret is not valid.
• You haven’t activated Trading for the API.
• Pair to be traded is not correct or not supported by the exchange API.
• Exchange account is not activated.
• Exchange account is suspended.
• Order could not be executed on the exchange side (rare).
• Exchange is under maintenance (rare).
If you have activated notifications (E-mail, Discord or Telegram), you will receive a message depending on whether the error concerns the Exchange or the PIN Code.
If you don’t receive any notifications (E-mail, Telegram or Discord) when the bot has taken a trade, it’s probably because you haven’t entered the necessary information in your account.
Once you’ve set your settings, you’re ready to launch the bot in real mode.
Check the box START THE BOT ? ALERTS ON : REAL MODE to activate TradingView alerts and switch the bot to real mode.
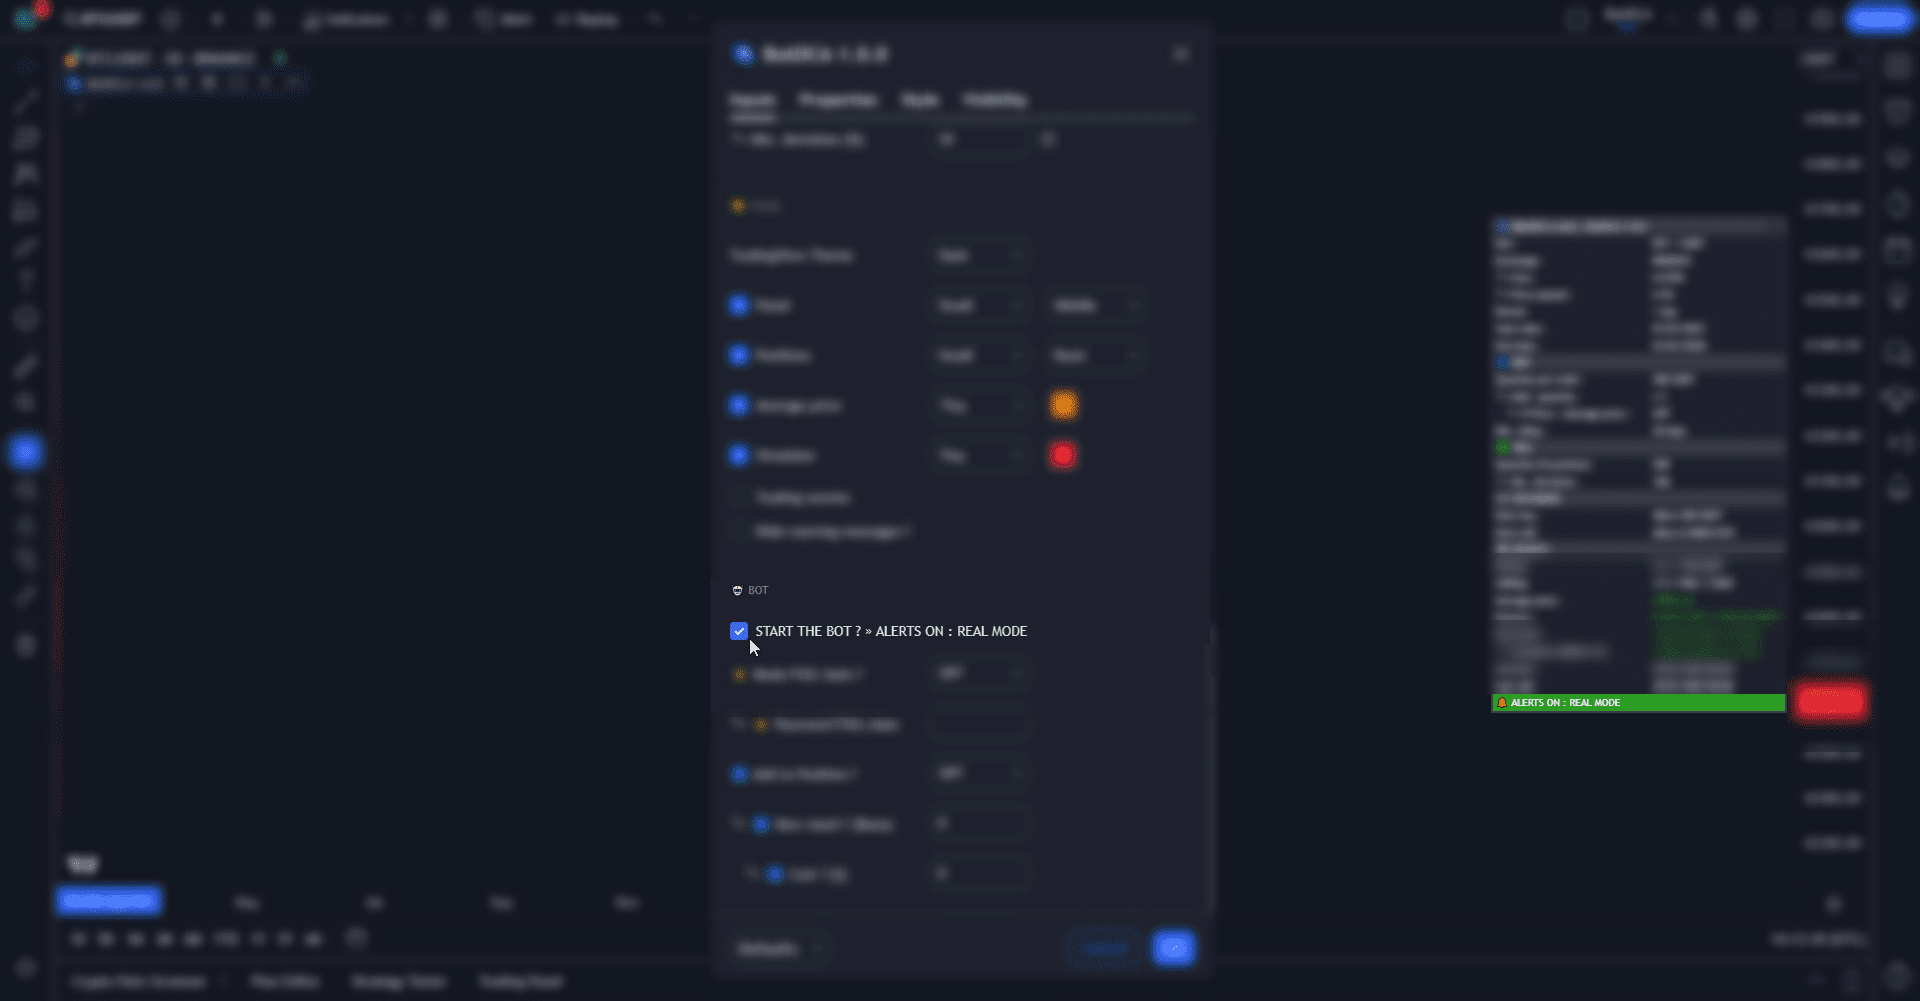
Note : If you don't enable this option, the bot and alerts will not work in real mode.
If you have a FULL Auto Pack, set the ⭐ Mode FULL Auto ? option to ON and also enter the ⭐ PIN Code FULL Auto (must be the same as on your account).

If you want to add crypto to the Position, turn ON the 🔄 Add to Position ? option, enter the amount and how much it cost.
More details : 🤖 Bot
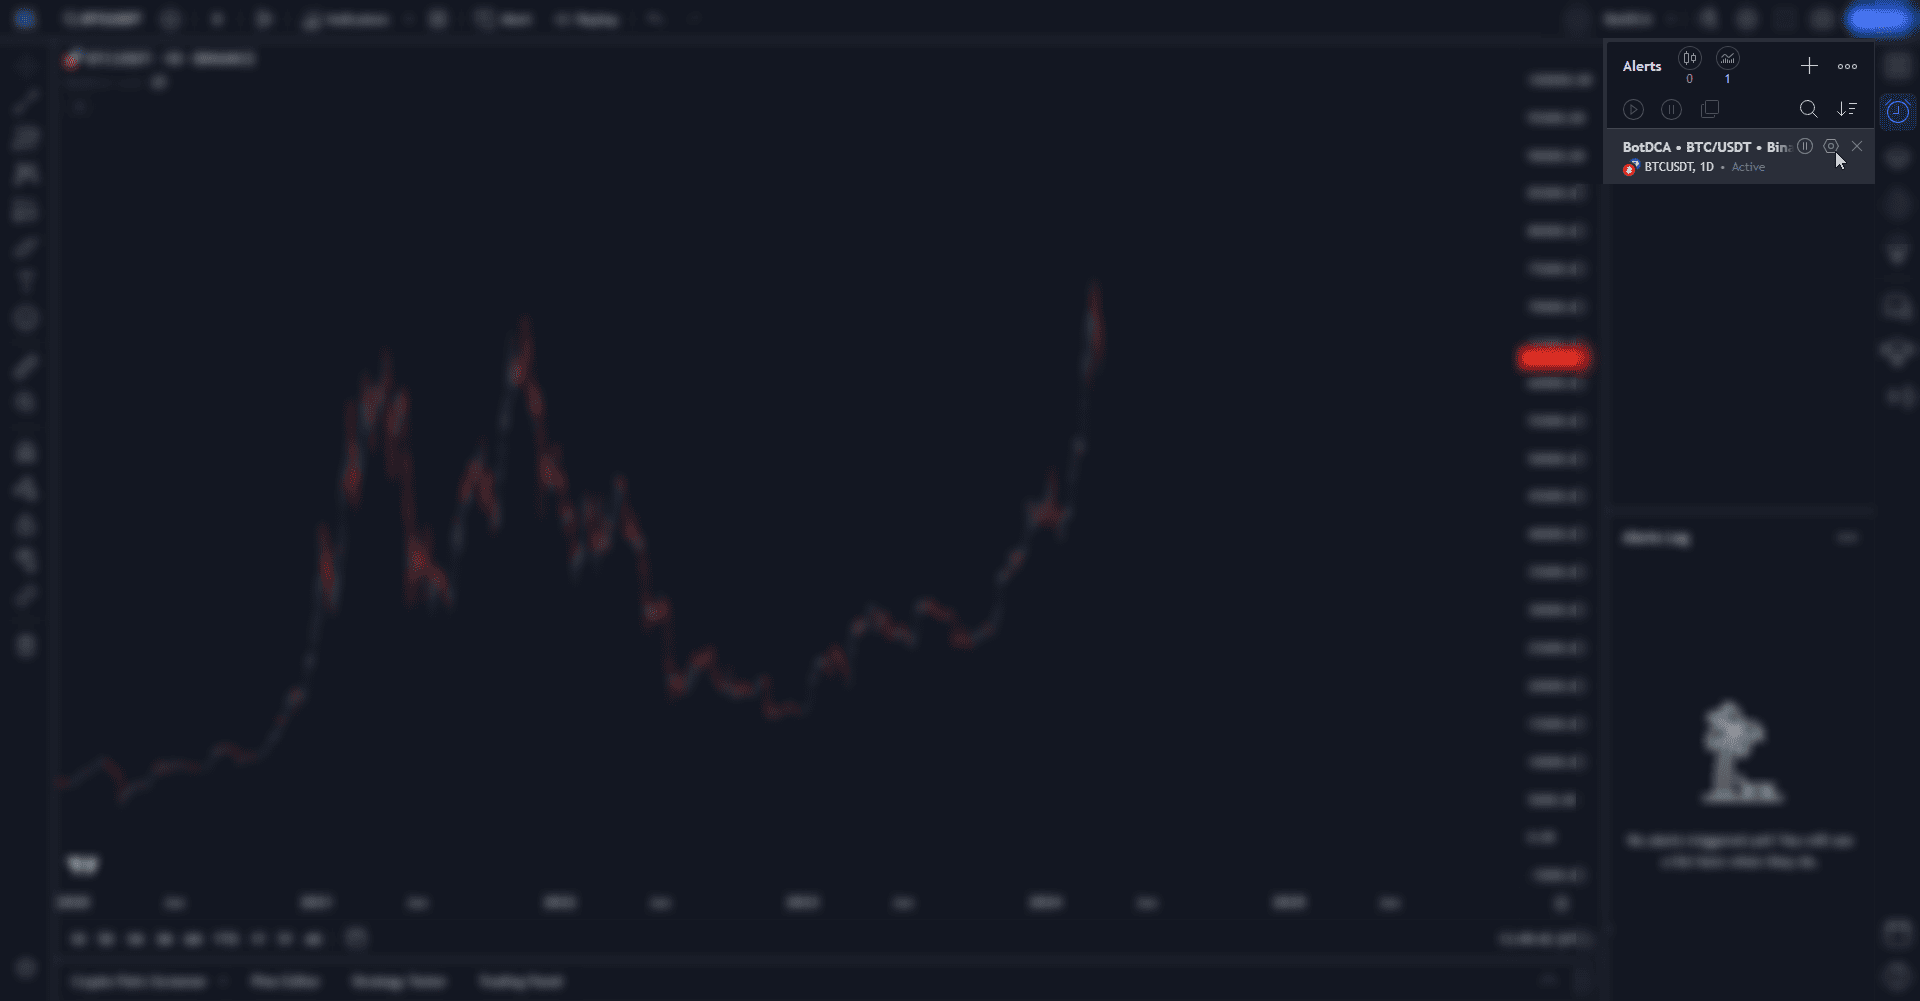
Once this has been done, you need to create a TradingView alert.
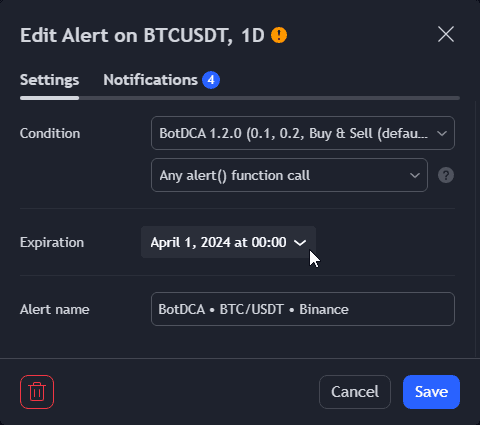
To do this, click on Alert at the top of the window.
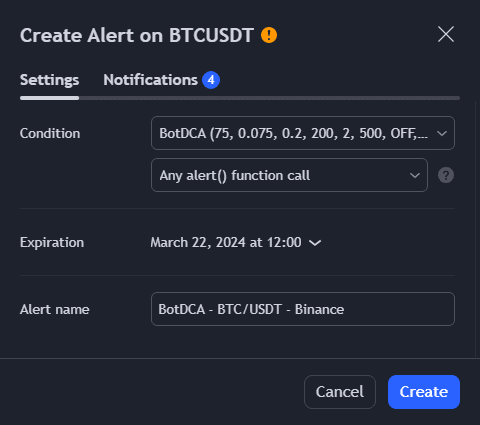
Condition : Choose BotDCA and select Any alert() function call from the dropdown menu.
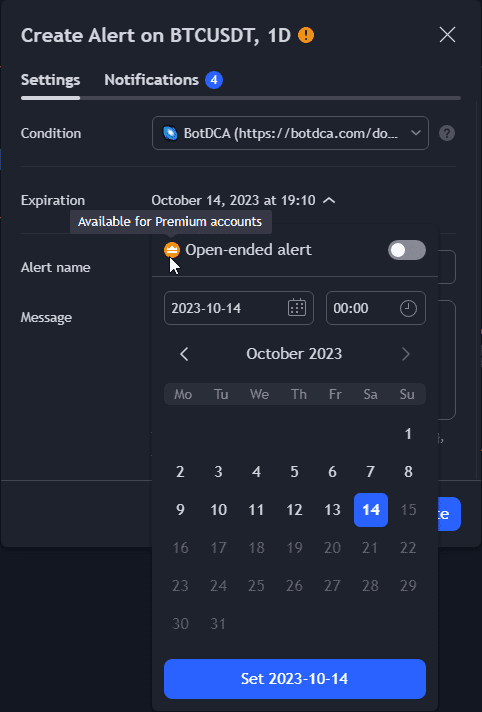
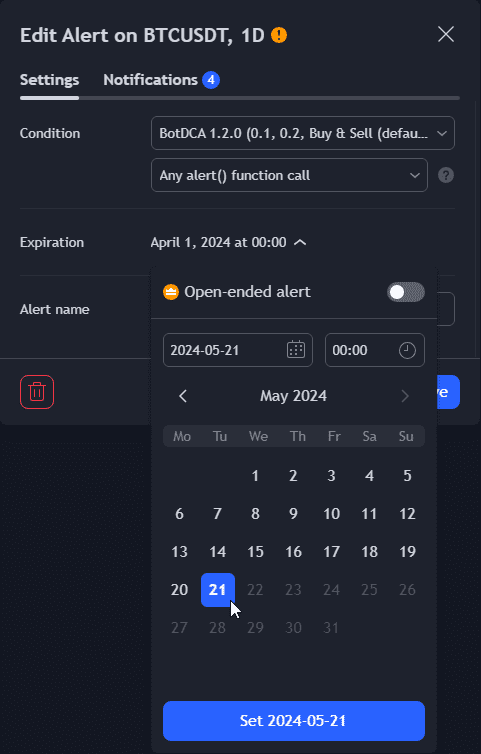
Expiration : Choose the longest expiry date (2 months) or check the Open-ended alert option if you have a TradingView Premium plan.
Note : When you launch your bot in real time, and your end date exceeds 2 months, you'll have to relaunch the alert (with one click), because TradingView's plans (Free, Essential and Plus) have this limit.
Only the Premium plan has an unlimited alert duration.
Alert name : Give a name to this alert.
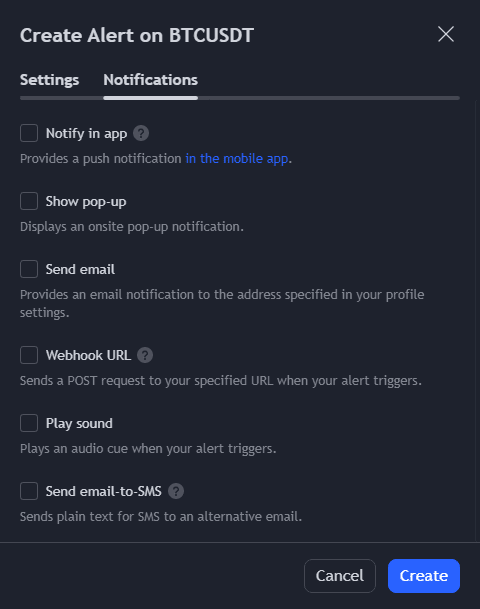
Next, click on the Notifications tab at the top of the window, then choose how you want to receive these notifications from TradingView.
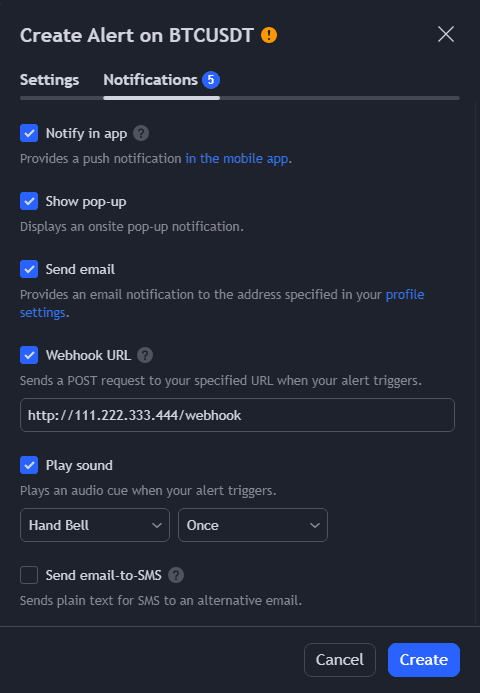
Note : If you have a Pack FULL Auto, you must enter the webhook address that you can find in your account, otherwise the Mode FULL Auto will not work.
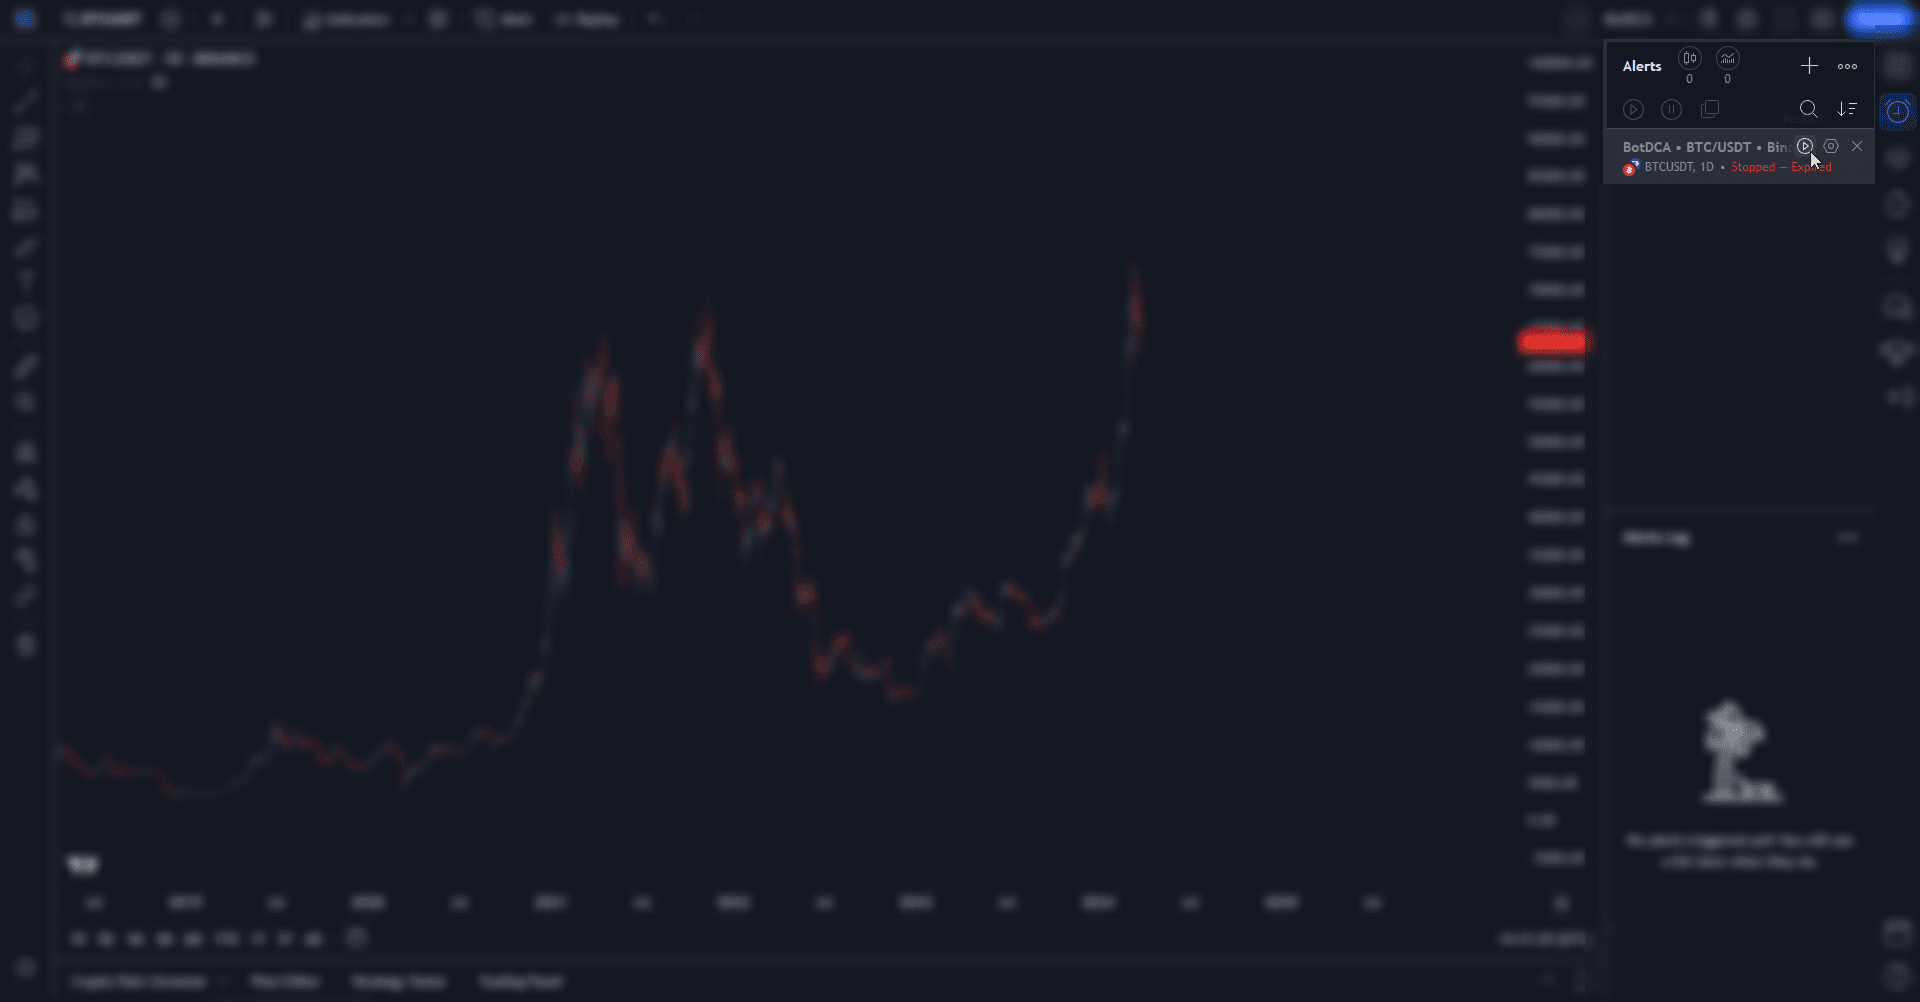
Finally, click on the Create button.
Your alerts will appear in the section on the right.
That’s all !
Now all you have to do is check your exchange to make sure you have the funds for the next purchases and sales, and keep an eye on the expiry of your TradingView alerts.
For information on the funds to be allocated to the exchange, please refer to the Panel.
If you want to save your configuration, it’s very simple :
If you have a Pack FULL Auto, and have configured notifications, a backup of configuration is sent automatically when the bot is launched.
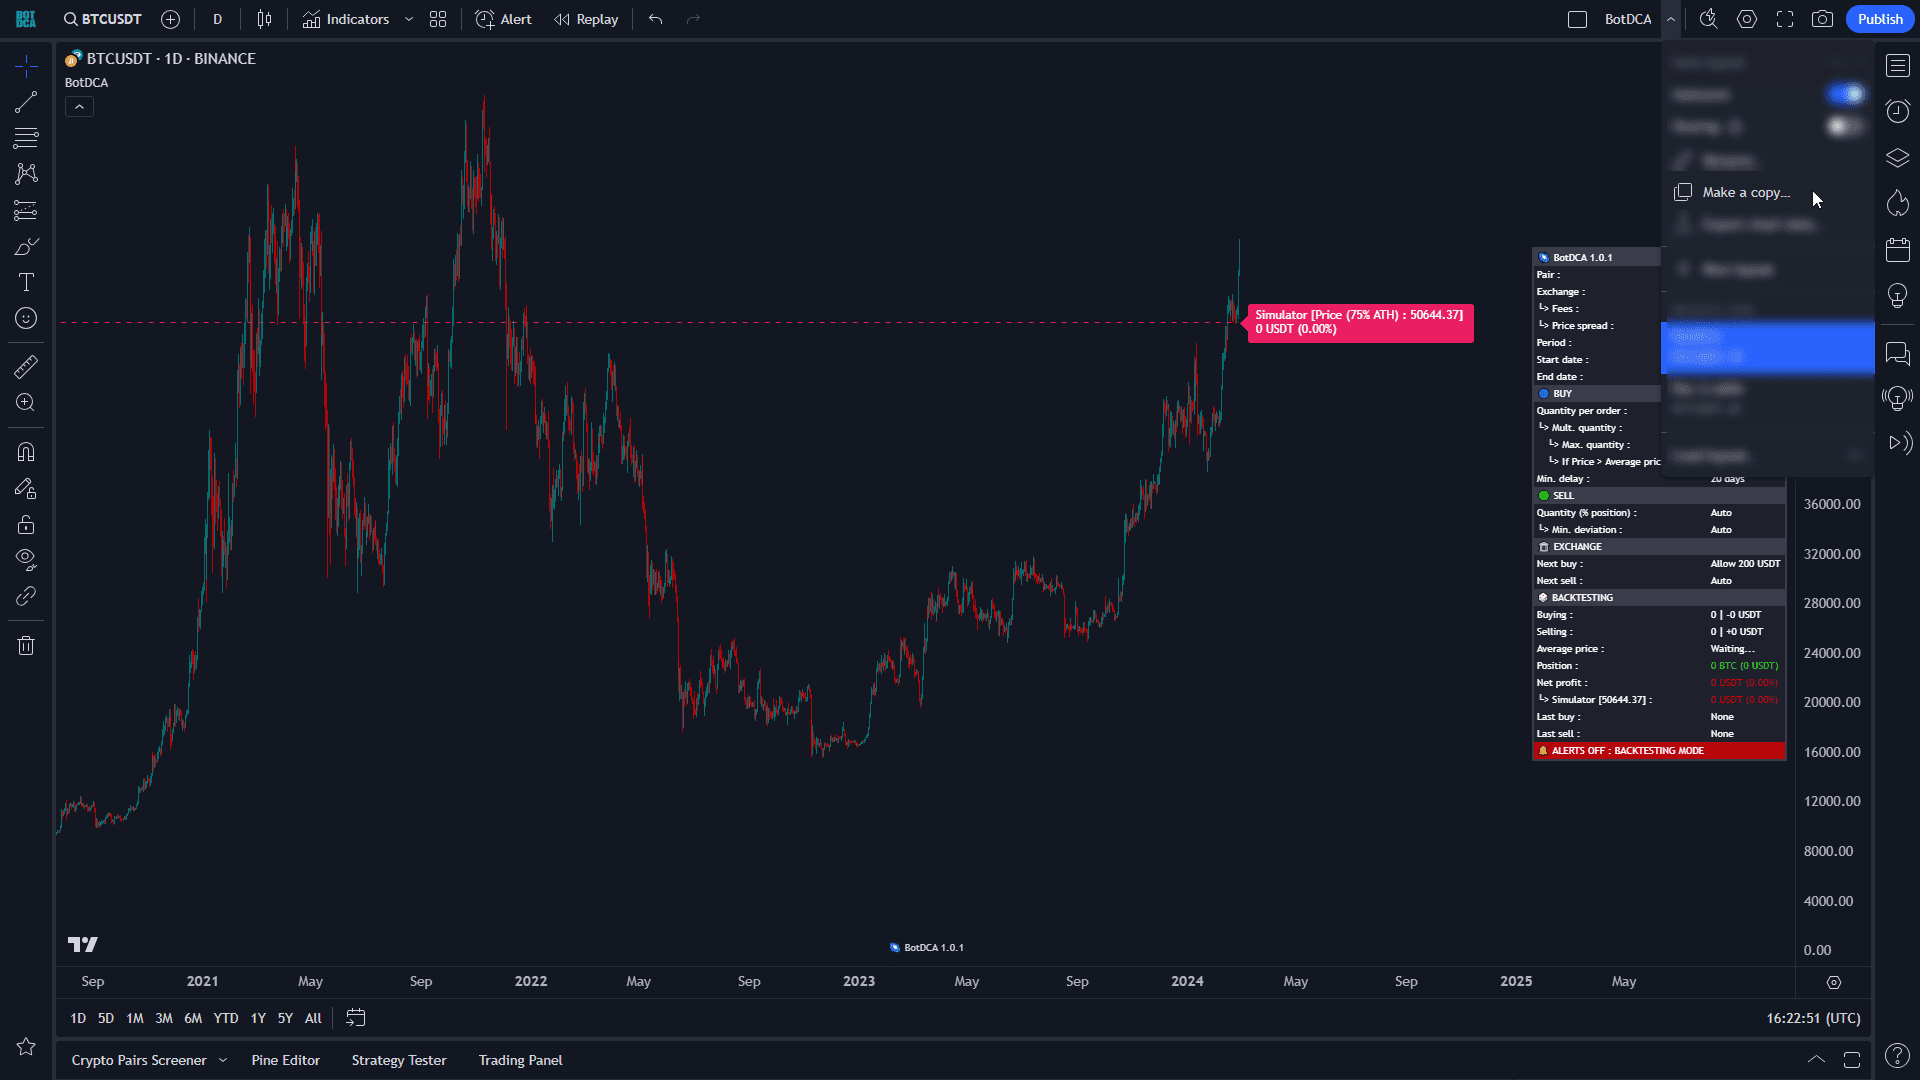
Click on the little arrow next to the name of your current layout, then click on Make a copy…
In future, by selecting this layout, you can track the bot’s progress on this token.
Click on the camera in the top right-hand corner of the TradingView window.

To update BotDCA to the latest version, simply remove the script from the chart and add it again.
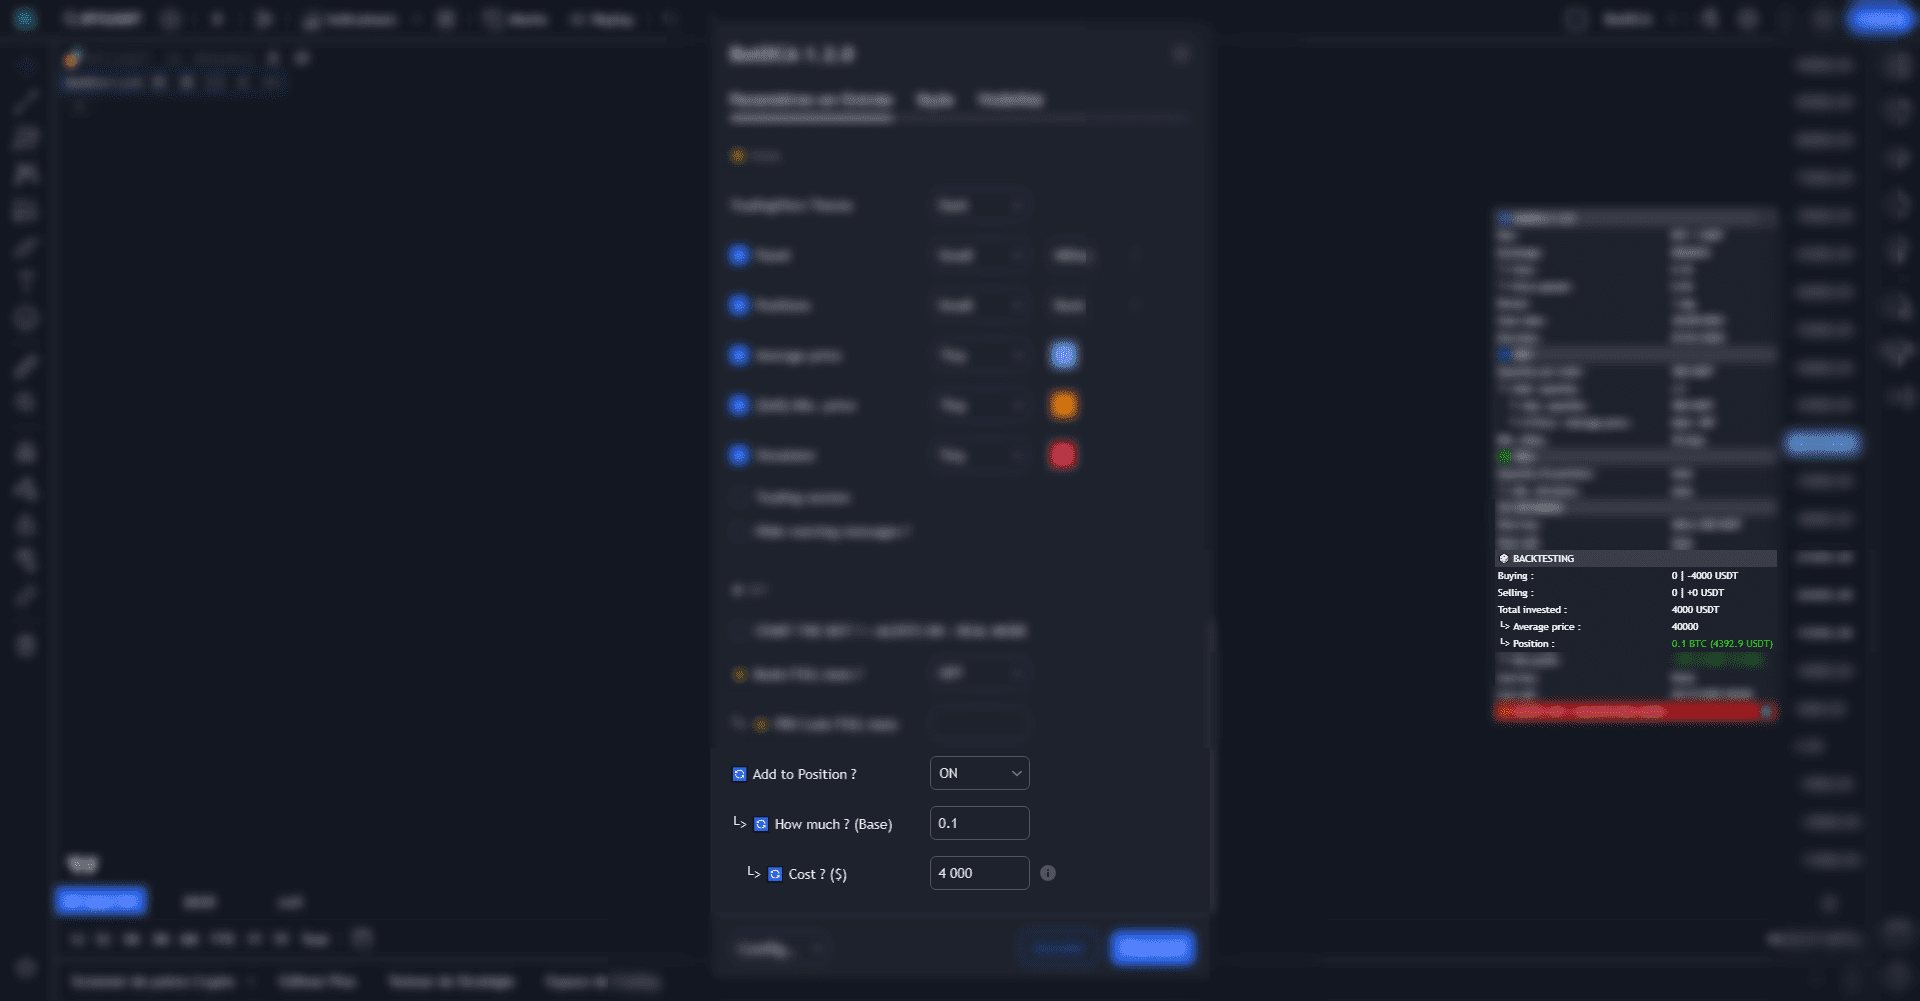
Do you want to edit your bot’s settings to keep the same average price and the same number of tokens in position when you relaunch a new bot ?
All you have to do is define your new settings and add tokens in position
You need two informations from the previous configuration when the bot stopped :
• The last average price
• How much you had left in position
If you’ve saved your previous bot’s configuration, it’s easy.
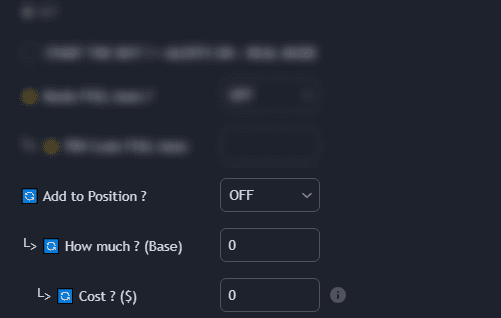
🔄 Add to Position ? : Set to ON.
🔄 How much ? (Base) : Enter how much you had left in position.
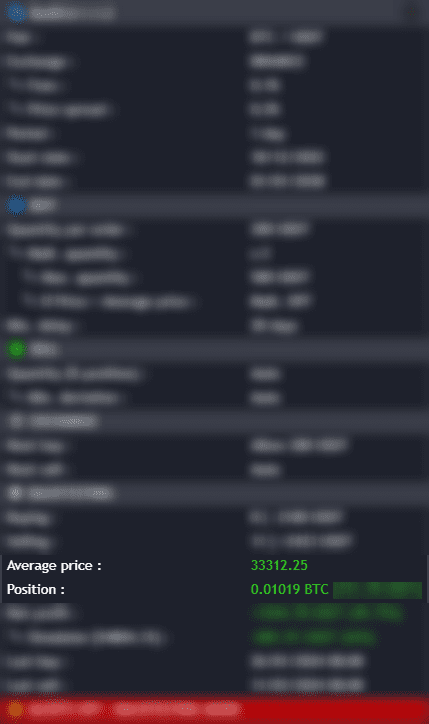
Example : If we take as the value what is displayed on the screen above, we need to enter : 0.01019 for 🔄 How much ? (Base) and 339.45 (0.01019 x 33312.25) for 🔄 Cost ? ($).
Note : Remember to set the start date to today's date (on the last candle on the chart), otherwise it won't send you the backup notification.
Note : Don't forget to delete your old TradingView alert and recreate a new one to apply the new settings !
That’s all ! Your bot is ready to be relaunched.
If the TradingView alert has not yet expired, you can extend it manually.
To the right of the window, click on the alarm icon.
Then click on the Edit button.
To select the new date manually, click next to Expiration.
Choose the expiry date (preferably the longest), and click on Set then Save.
Simply click on the Restart button, to resume the alert for another month, or click on the Edit button and choose an expiry date manually (max. 2 months).
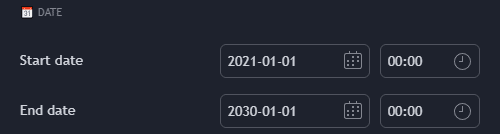
The choice of start/end date is useful both for backtest mode and for launching the bot in live mode.
Start date : For backtesting, as indicated.
For live bot launch, please indicate the bot launch date.
If it’s a new bot, you must choose today’s date before creating your alert.
End date : For backtest, as indicated.
For live bot launch, please indicate the date when you want the bot to stop.
Note : When you launch your bot in real time, and your end date exceeds 2 months, you'll have to relaunch the alert (with one click), because TradingView's plans (Free, Essential and Plus) have this limit.
Only the Premium plan has an unlimited alert duration.

By default, the bot trades every day.
If you don’t want to open a position on a particular day, you can simply uncheck the corresponding box.
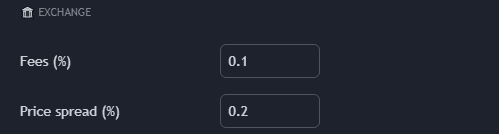
Fees (%) : Fees must correspond to your exchange’s fees.
It’s calculated in the backtesting results.
The value must be indicated as a percentage.
Price spread (%) : Modifies the price spread for buy/sell orders.
This allows to define a security spread to ensure that on the exchange, the order is executed at the price closest to the bot price.
Note : If value is set to 0 : No Fees / Price spread

Signals : Generates Buy & Sell orders (by default), Buy orders only, or Sell orders only.
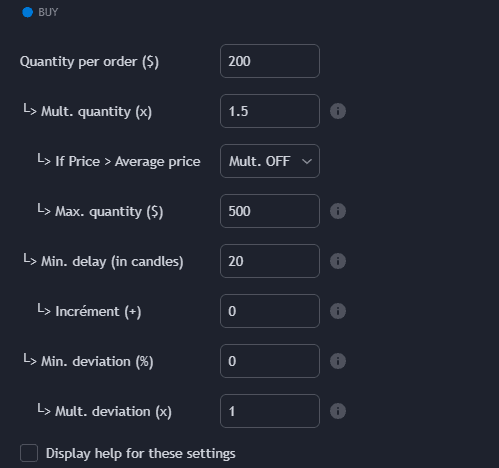
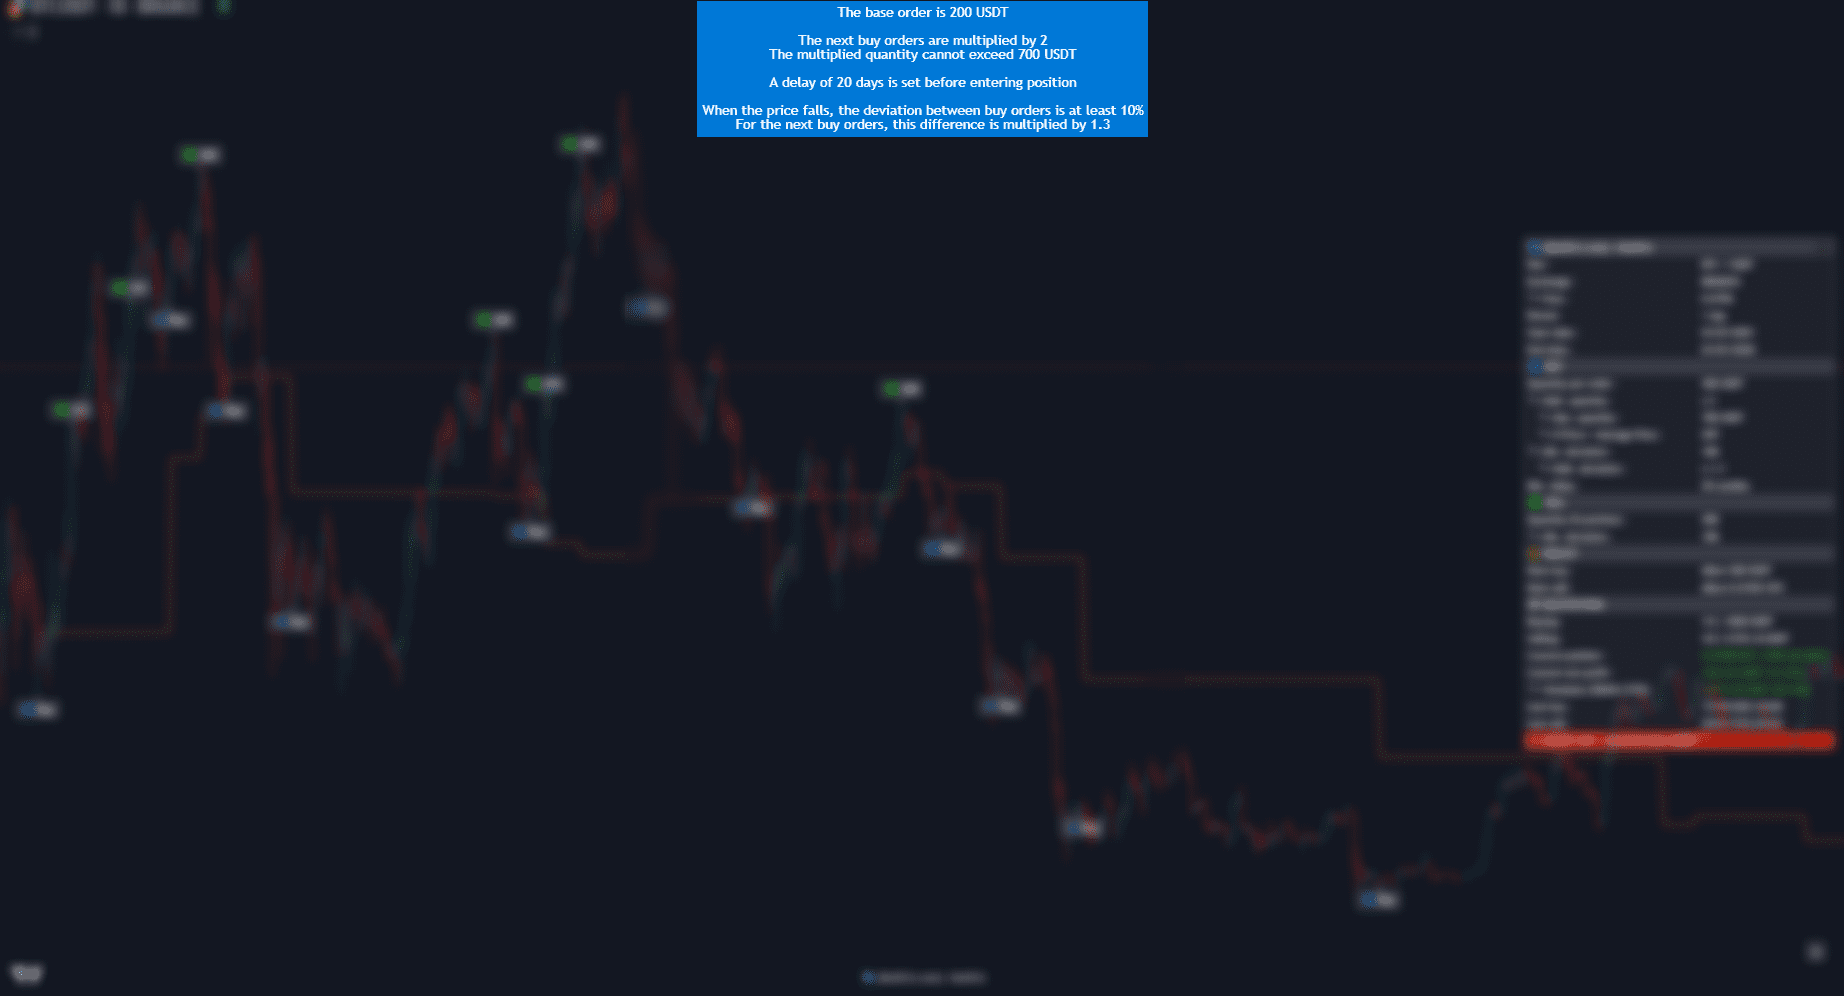
Quantity per order ($) : Quantity invested in stable coins ($) for the first buy order at bot launch, and for each buy order preceded by a sell order.
A higher amount increases net profit, but increases the amount of money to be invested.
Mult. quantity (x) : Multiply the quantity for each buy order following the first buy order at bot launch, and for each buy order following a buy order preceded by a sell order.
A high multiplier reduces the average price and increases net profit, but increases the amount of money to be invested.
Example : If Quantity per order is $200 and Mult. quantity is x2, then the second buy order will be $400, the third buy order will be $800, the fourth buy order will be $1600 ...
After a sell order, the multiplier is cancelled.
Note : If value is set to 1 : Disabled
If Price > Average price : Enables or disables the multiplier if the price is higher than the average price.
Setting this option to ON will increase net profit , but increase average price and increases the amount of money to be invested.
Max. quantity (x) : Maximum quantity that can be invested for a buy order, even after the multiplier has been calculated.
This allows you to define a maximum amount according to your budget.
A higher amount increases net profit, but increases the amount of money to be invested.
Example : If Quantity per order is $200, Mult. quantity is x2, and Max. quantity is $700, then the second buy order will be $400, the third buy order will be $700, the fourth buy order will be $700 ...
Note : If value is less than Quantity : Disabled
Min. delay (in candles) : Minimum delay between purchase orders.
This allows you to better control your budget by spacing out your investments.
A higher delay avoids overinvestment, reduces amount of money to be invested, but reduces the number of buys and reduces net profit.
Example : By default the time interval for the bot is set to D, so if you set 20 as the value, the bot will wait at least 20 days between buy orders before entering a position.
Note : If value is set to 0 : Disabled
Increment (+) : Adds an increment to the Min. delay for each new buy order.
Reset after a sell order.
A higher increment avoids overinvestment, and reduces amount of money to be invested, but reduces the number of buys and reduces net profit.
Very useful for H4 timeframe.
Example : If Min. delay is 20 and Increment is +10, then the difference between the first and second sell orders will be 20, then between the second and third, it will be 30, then between the third and fourth, it will be 40...
Note : If value is set to 0 : Disabled
Min. deviation (%) : Set a minimum downside percentage for each buy order following the first buy order at bot launch, or for each buy order following a buy order preceded by a sell order.
The value must be indicated as a percentage.
A higher deviation reduced the average price and reduces amount of money to be invested, but reduces the number of buys and reduces net profit.
Note : If value is set to 0 : Disabled
A higher multiplier reduces amount of money to be invested, but reduces the number of buys and reduces net profit.
Example : If Mult. deviation is 10% and Min. deviation is x2, then between the first and second buy orders the minimum deviation will be 10%, between the second and third buy orders the minimum deviation will be 20%, between the third and fourth buy orders the minimum deviation will be 40%...
After a sell order, the multiplier is cancelled.
Note : If value is set to 1 : Disabled

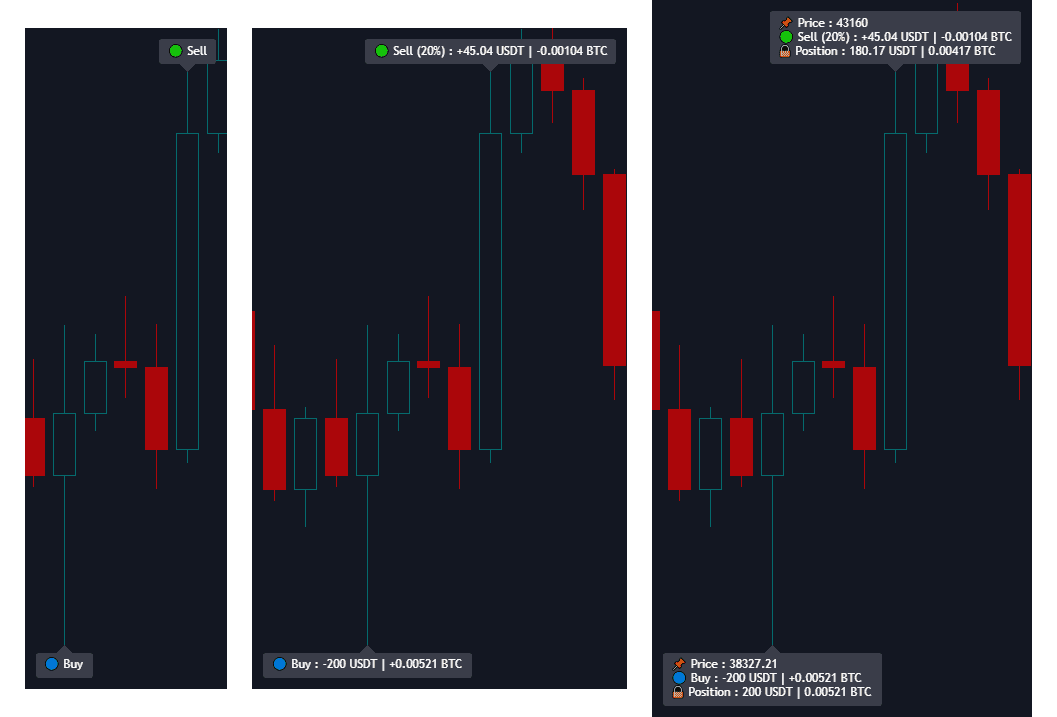
Quantity (% position) : Quantity sold (percentage of position) for each sell order.
Example : If the first buy order is 0.1 BTC and the second buy order is 0.2 BTC, then the position is 0.3 BTC.
If Quantity (% position) is set to 20, then the first sell order will be 0.06 BTC (20% of 0.3 BTC), the second sell order will be 0.048 BTC (20% of 0.24 BTC) ...
Auto ? : If this option is enabled, the bot will automatically sell part of your position.
The quantity sold depends on the volatility of the last 30 candles : the higher the volatility, the more it sells, and the lower the volatility, the less it sells.
The minimum sale defined is 10%, while the maximum sale will not exceed 50%.
Min. to sell ($) : Minimum quantity to be sold in stable coins ($) for each sell order.
The bot can only execute sell orders above this value.
Min. deviation (%) : Set a minimum profit percentage between the average price and the first sell order or between sell orders.
The value must be indicated as a percentage.
Example : If Average price of BTC is 30 000 USDT and Min. deviation is 10%, then the first sell order will be at least 33 000 USDT, the second sell order will be at least 36 300 USDT ...
Note : If value is set to 0 : Disabled
Auto ? : If this option is activated, the bot automatically determines the sell minimum deviation percentage.
The deviation set depends on the volatility of the last 30 candles : the higher the volatility, the higher the deviation, and the lower the volatility, the lower the deviation.
[Auto] Variation : Determines the variation level for sell orders.
In the long term, a low variation will increase the number of sell orders, realizing faster but smaller profits.
Conversely, a high variation will lead to a reduction in sell orders, realizing slower but greater profits.
Min. price : Set a minimum price for sell orders.
Example : If you want to sell your BTC and take profits only above 30,000$, simply enter this price in the input.
The bot will only generate sell orders above this price.
Note : If value is set to 0 : Disabled

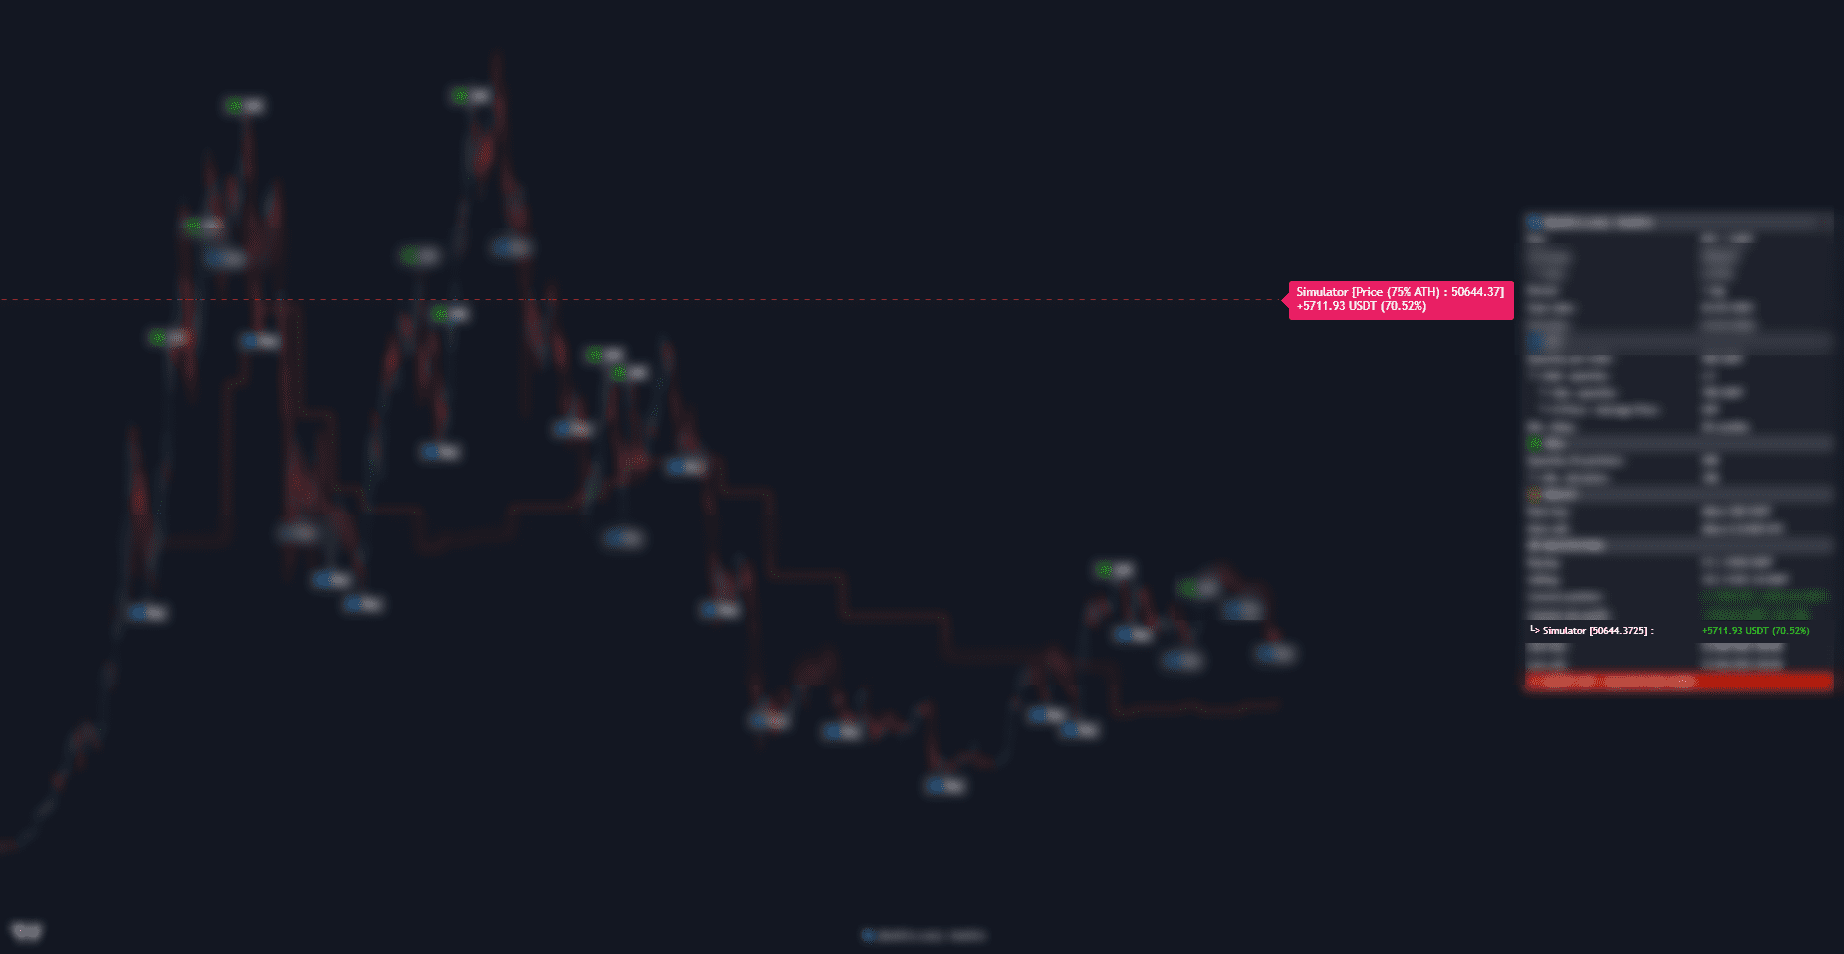
Price (% ATH) : Estimates the potential gains if the price reaches the indicated percentage, based on the highest price since the token’s listing.
The value must be indicated as a percentage.
Note : If value is set to 0 : Disabled
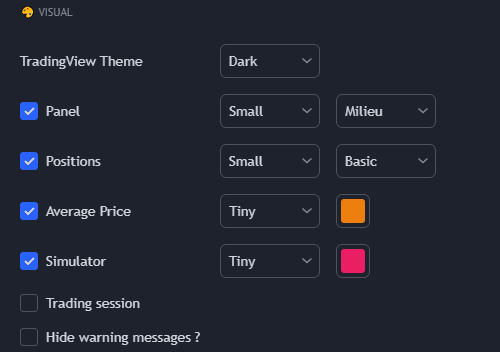
TradingView Theme : Set a dark or light interface to correspond to your TradingView theme.
Panel : Manage Panel size and position on the chart.
Positions : Manage the size and display of Positions labels on the chart.
Average price : Manage the size and color of the Average price line on the chart.
Simulator : Manage the size and color of the Simulator line on the chart.
Note : You can check/uncheck boxes to display or hide elements of the chart.
Trading session : Display/Hide Trading session background.
Hide warning messages ? : If checked, this hides warning messages when the bot detects a misconfiguration.
It is not recommended to check this box before launching your bot in real mode.

START THE BOT ? » ALERTS ON : REAL MODE : If checked, activates TradingView Alerts and launches the bot (REAL MODE).
If the box is unchecked, Alerts are deactivated (BACKTESTING MODE).
Note : This box must be checked to start the bot in real mode !
⭐ Mode FULL Auto :
Enable full-automatic trading : You receive position alerts from the bot, and buy/sell transactions are automatically executed on compatible exchanges (Binance, Coinbase, Kraken, KuCoin, MEXC, Gate.io, Bitget).
Custom notifications : Stay informed anywhere, anytime, and receive personalized buy/sell alerts by e-mail, Telegram or Discord, in addition to TradingView notifications.
⭐ PIN Code FULL Auto : This PIN Code secures the connection between the bot on TradingView and the dedicated server that automates buy and sell orders to the exchange.
This PIN Code must be exactly the same as the one set in My Account » Bot (Pack FULL Auto).
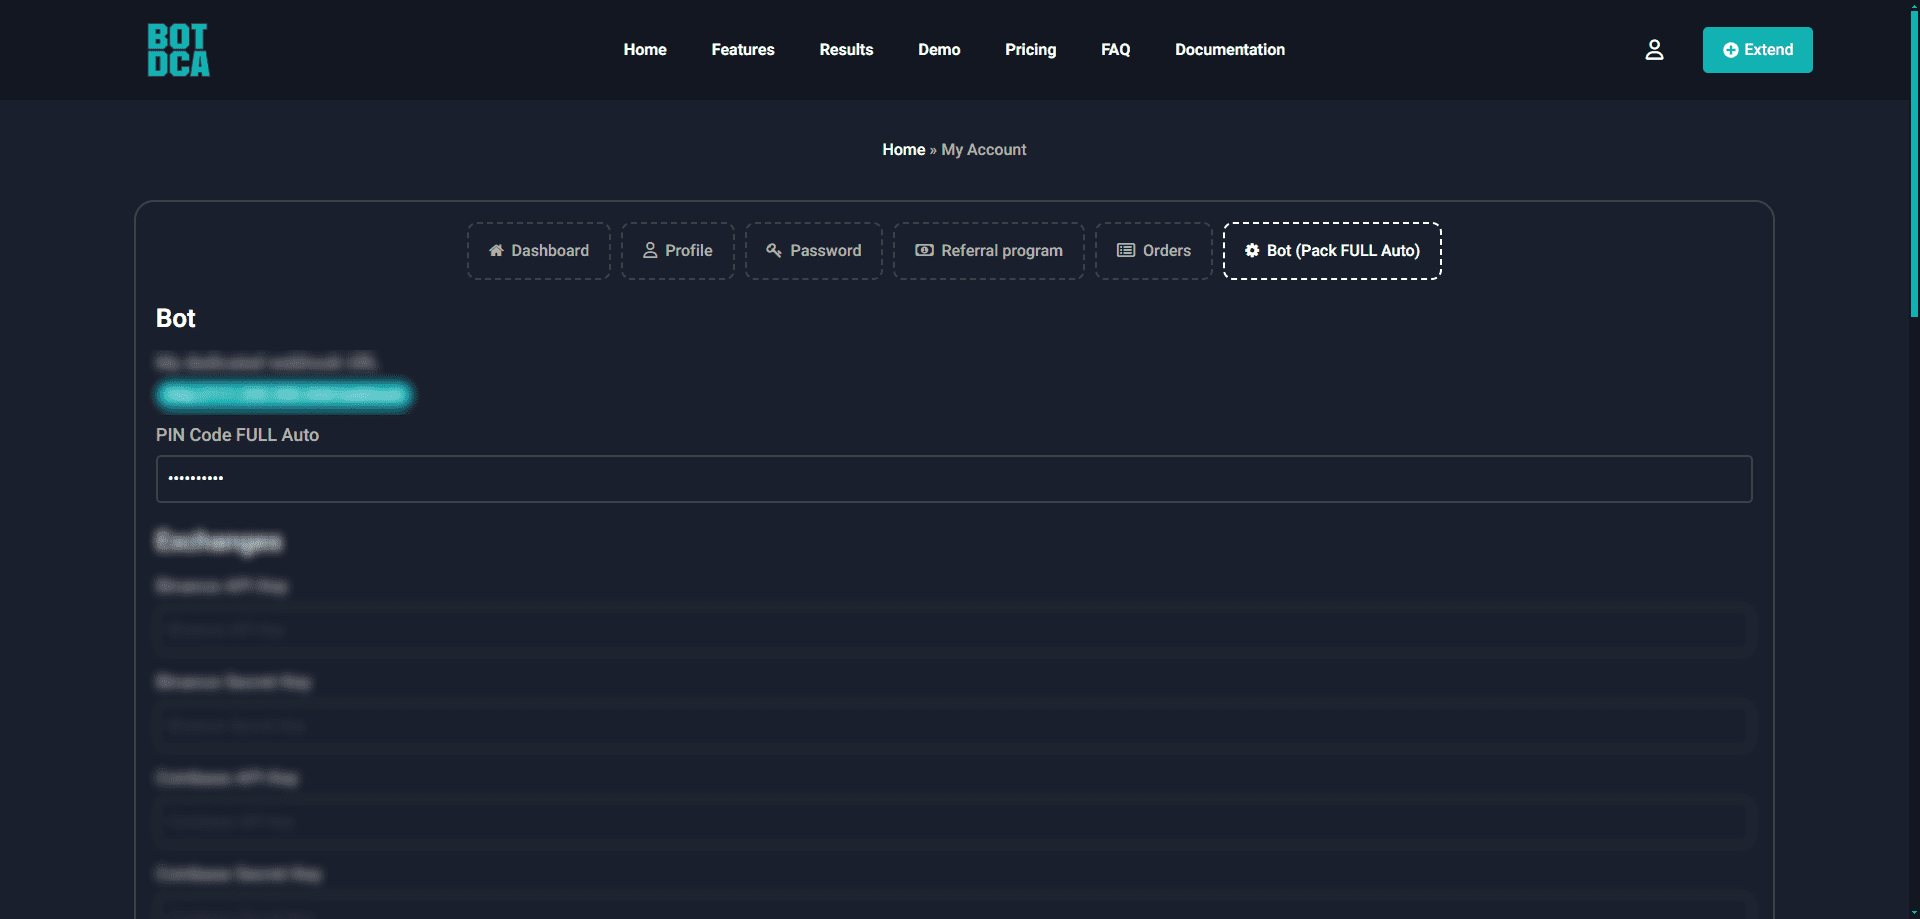
Note : If PIN Code is not the same on the bot settings and on the website in your member area, the bot won't be able to take orders and you'll get an error.
⭐ Mode FULL Auto ? and ⭐ PIN Code FULL Auto work only if you have a Pack FULL Auto.
🔄 Add to Position ? : This allows to add crypto and modify the Position when you launch the bot.
🔄 How much ? (Base) : Amount to add to Position (in crypto)
🔄 Cost ? ($) : What is the cost of Position added (in stable coins / $) ?
If the value is set to 0, the tokens are considered to have been obtained for free.
Example : Adding tokens to the position is very useful if you've obtained tokens via airdrop.
You can then choose Sell (only) in Signals input option to maximize your earnings.
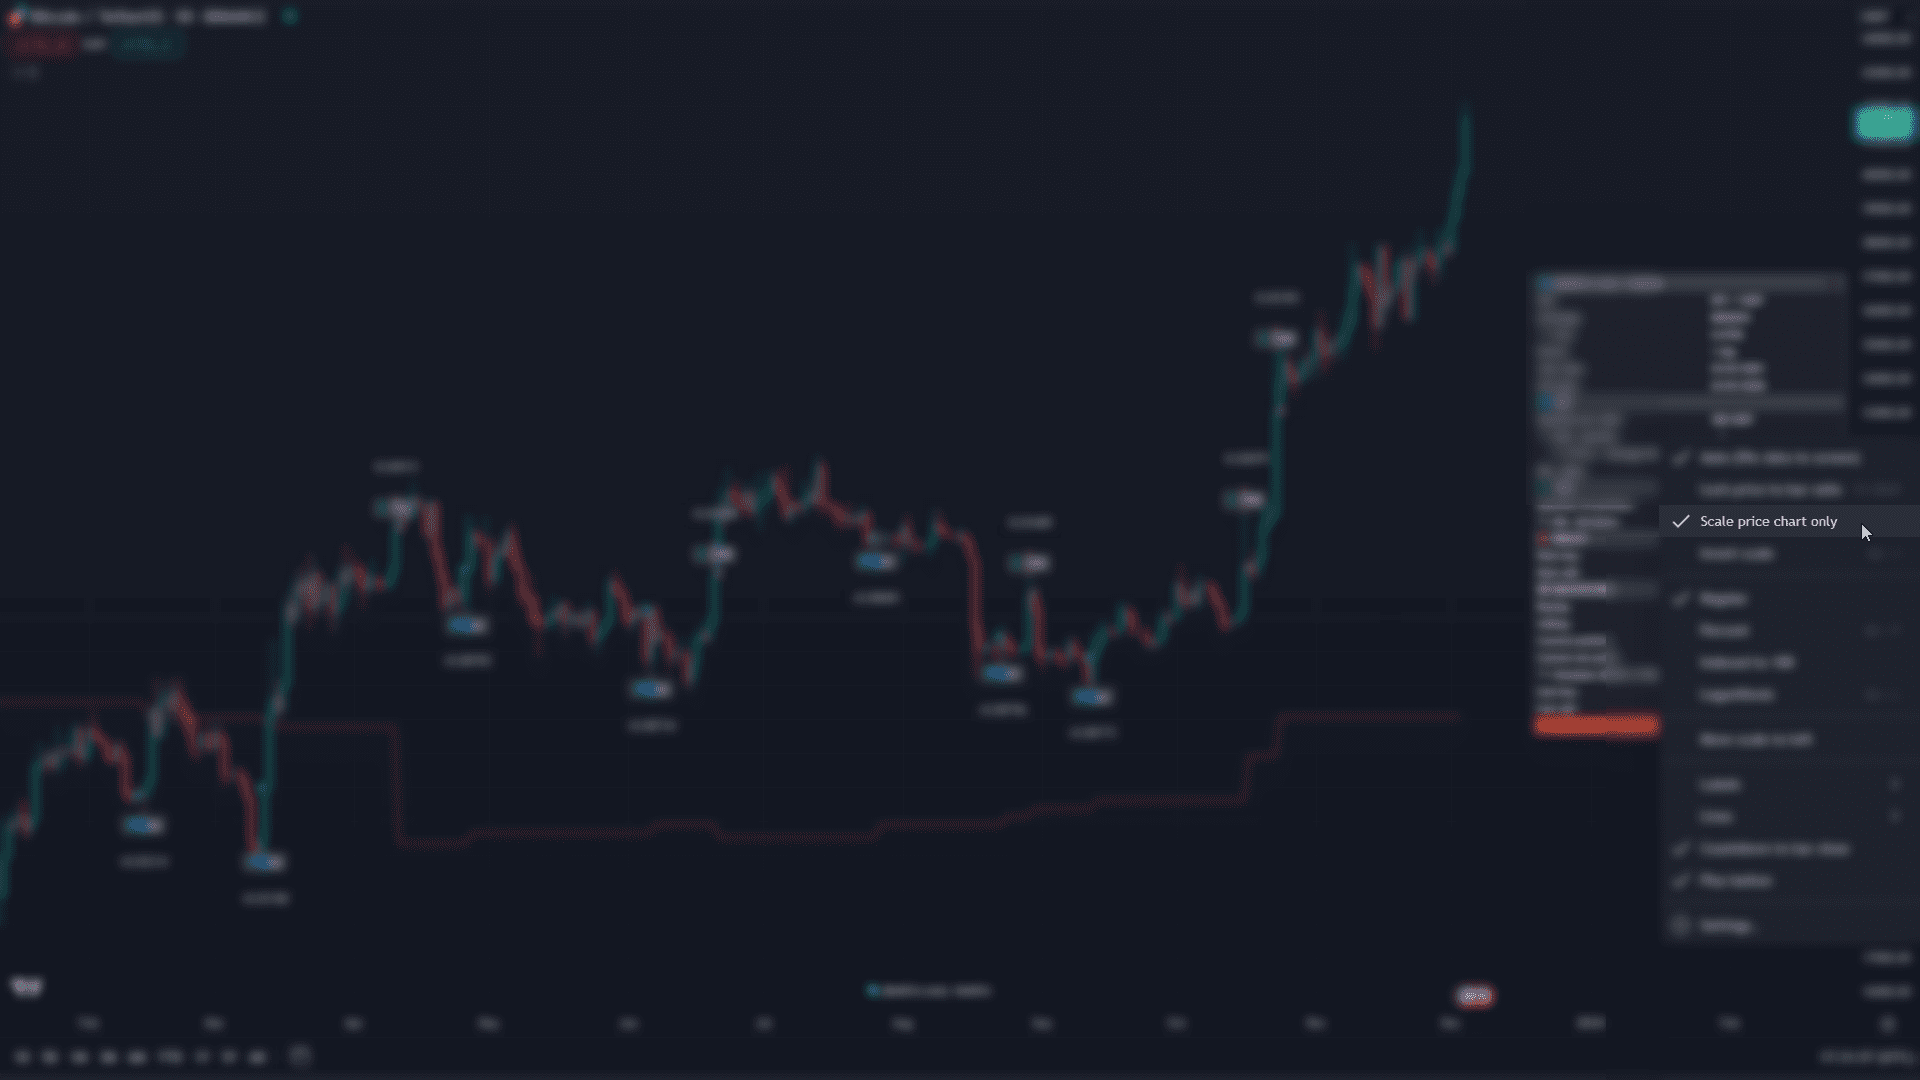
To adapt the bot to the chart price, right-click on the scale on the right, then tick Scale price chart only.
If you have a Pack SEMI Auto and wish to upgrade to a Pack FULL Auto, the remaining number of days of your Pack SEMI Auto will be converted and added to your 365 days of your new Pack FULL Auto.
26/07/2024
🤖 BotDCA 1.6.3
• Change : Default inputs have been optimised
🌐 Website
• Add : New section for Updating the bot has been added to the documentation
02/07/2024
🤖 BotDCA 1.6.2
• Fix : Increment now correctly applied
28/06/2024
🤖 BotDCA 1.6.1
• Add : New Sell input ‘Min. to sell ($)’
• Change : Minimum value of ‘Quantity per order ($)’ input now $10
• Change : Sell orders can no longer be lower than the value defined by the user
• Remove : Warning messages about the $11 limit have been removed
🌐 Website
• Add : Bot and Website release notes have been added to the documentation
• Change : Documentation has been updated from version 1.6.1 of the bot
07/06/2024
🤖 BotDCA 1.6.0
• Change : Sell orders have been optimized for tokens with high upward volatility
• Fix : Sell orders can no longer be below $11 to comply with exchange limits
14/05/2024
🤖 BotDCA 1.5.0
• Add : A backup of configuration is automatically sent by notification when the bot is launched (FULL Auto)
• Change : In Basic display, selling positions now show the percentage of position sold
• Change : Panel ergonomics improved
• Fix : Buy or sell orders can no longer be executed on the bot’s launch candle
• Fix : Average price line now displayed in real time
• Remove : Average price has been removed from notifications
🌐 Website
• Change : Documentation has been updated from version 1.5.0 of the bot
11/04/2024
🤖 BotDCA 1.4.2
• Fix : Warning messages are now displayed correctly depending on the Signals input
07/04/2024
🤖 BotDCA 1.4.1
• Add : New warning message when start/end date time is incorrect for H4 timeframe
• Change : Auto mode for Quantity (% position) has been optimized. Now the bot sells a larger quantity during strong bullish periods
04/04/2024
🤖 BotDCA 1.4.0
• Add : Users can now define a variation for the sell orders min deviation
• Change : Sell orders variation now appear on the panel
🌐 Website
• Change : Documentation has been updated from version 1.4.0 of the bot
02/04/2024
🤖 BotDCA 1.3.1
• Add : New warning message when Increment (+) is > 0 in daily timeframe
• Fix : No more warning message when timeframe is not in daily and start/end date time is not equal to 00:00
• Fix : Adding funds to the position is no longer defined as a buy order for warning messages
• Other : Code cleanup
01/04/2024
🤖 BotDCA 1.3.0
• Add : New buy input ‘Increment (+)’
• Add : BotDCA algorithm now adapted for H4 timeframe thanks to the new incrementation setting
• Add : New warning message when Min. delay is set to 0 and Increment is > 0
• Change : Default Mult. quantity (x) changes from 2.0 to 1.5
• Change : Buying help message has been enhanced
• Change : Buy inputs have been reorganized
• Change : Input Min. delay (in days) has been renamed to Min. delay (in candles)
• Change : Value of Min. delay (in candles) displayed on panel is now dynamic
🌐 Website
• Change : Documentation has been updated from version 1.3.0 of the bot
• Change : In the documentation, Buy inputs section has been enriched
26/03/2024
🤖 BotDCA 1.2.1
• Fix : Calculation for Next buy has been fixed
🌐 Website
• Change : In the documentation, Chart setup section has been enriched
24/03/2024
🤖 BotDCA 1.2.0
• Add : Total invested is now displayed on the panel and is included in alerts
• Add : New warning message when end date time is different from 00:00
• Add : For notifications, add Total invested
• Change : The formula for calculating Net profit (%) now uses the total invested
• Change : Simulator input group has been moved after Sell input group
• Change : Profit simulator now disabled by default
• Change : Panel backtesting section has been reorganized
• Change : For notifications, the message concerning the expiry of alerts becomes a clickable link
• Fix : Profit simulator is now hidden on the graph and on the panel when the input value is 0
• Fix : Average price and its value are now correctly displayed in Backtesting mode
• Fix : For Buy (only) and Sell (only) signals, elements in the Backtesting / Results section of the panel appear correctly
• Fix : For alerts, the buy/sell amount is correctly rounded
🌐 Website
• Add : Three new sections in the documentation: Requirements – Relaunch / Edit bot – Expiration of alerts
• Change : In the documentation, Launch bot section has been enriched
• Change : Documentation has been updated from version 1.2.0 of the bot
• Change : On the home page, results are more readable & understandable, and now consider the total invested when calculating net profit
• Change : Screenshots in the demo section have been updated to reflect bot version 1.2.0
• Translation : Several site strings have been translated
15/03/2024
🌐 Website
• Add : Demo help button added to home page
• Add : Help on accessing the demo has been added to the documentation
• Add : In the documentation, the Exchange section has been enriched with links to information on all the exchanges fees supported by BotDCA
• Add : A third, more attractive price plan has been added for users wishing to use the bot for 2 years
• Change : The price of the Pack FULL Auto (1 year) has been adjusted to reflect the addition of the third package
• Change : The earnings simulator for the referral program has been updated
11/03/2024
🤖 BotDCA 1.1.2
• Add : User can now define a minimum price for sell orders
• Add : A new style input displays (or not) a minimum price line for sell orders
• Change : Buy inputs have been reorganized
• Other : Code cleanup
🌐 Website
• Change : Documentation has been updated from version 1.1.2 of the bot
07/03/2024
🌐 Website
• Change : Features & Benefits section has a different design
• Change : Simulated net profit has been removed from the results table
• Translation : Several Homepage strings have been translated
05/03/2024
🤖 BotDCA 1.1.1
• Fix : Situation is fixed when start date is below the first candle on the chart
• Fix : Inputs are now correctly aligned on computer
🌐 Website
• Change : New images replace old ones in the Demo section.
• Change : Documentation and Members’ area have been updated from version 1.1.0 of the bot
04/03/202
🤖 BotDCA 1.1.0
• Add : User can now choose which signals the bot should generate : Buy & Sell, Buy (only) or Sell (only)
• Add : A label is added to the chart to indicate the bot’s launch date (and if user has added funds to the position)
• Add : New warning message when start date time is different from 00:00
• Add : New warning message when Signals is set to Sell (only) but no crypto has been added to Position
• Add : New warning message when PIN Code contains something other than digits
• Change : Title now includes the version of BotDCA
• Change : Password FULL Auto is renamed to PIN Code FULL Auto
• Change : Cost ? ($) input specifies via a tooltip that 0 = Free
• Change : Default fee changes from 0.075% to 0.1%
• Fix : Average price calculation is now correct when crypto are added to Position
• Other : Code cleanup
27/02/2024
🤖 BotDCA 1.0.1
• Add : New warning message when Quantity per order ($) > Max. quantity ($)
• Change : Average price line is now colored Light Sky Blue
• Change : Tooltip for input BUY > Max. quantity ($) now displays ‘0 = Disabled’
• Fix : Warning message for input SELL > Min. deviation (%) is now fixed
• Other : Code cleanup
🌐 Website
• Add : In the documentation, a section Save configuration has been added.
• Change : Bot demo link has been updated.
• Change : In the section : My Account : Bot (Pack FULL Auto), the text fields Notifications : E-mail, URL Webhook Discord and Telegram Chat ID are no longer hidden by default.
• Fix : On mobile, the text You already have an account ? Login is no longer pasted to the Register button
• Translation : Several Crypto payment strings have been translated.
21/02/2024
🤖 BotDCA 1.0.0
• Initial release
© 2024 BotDCA.com • All rights reserved.

We respect your privacy.
Our site uses cookies to enhance your experience.
By continuing to use this website, you consent the use of cookies.